OpenVINO is an open-source toolkit that melds classical computer vision and deep learning. It provides a consistent API to run inferences across a variety of devices, including Intel CPUs, VPUs, FPGAs, the Neural Compute Stick 2, and more – using C, C++, or Python. There are a bunch of pretrained models and code examples available, so I'm excited to play with it for my companion robots. :)
As you can see in the tests below, this model is pretty powerful, and I'm interested to try new things and see if I can break it. I'm generally not a fan of proliferating facial recognition tech, so this is a fun way to develop new counter-methods.
You can find installation guides for a variety of platforms in the excellent documentation.
I recently installed Raspbian Buster on a Raspberry Pi 3 Model B+ and followed Intel's instructions for installing OpenVINO on that platform, to use with the Neural Compute Stick 2 (NCS2). It went pretty smoothly, except for a couple of errors. If you're trying to do the same thing, hopefully this will help you.
I also attached a Raspberry Pi Camera v2.1 module, which I'm using to grab images to run inferencing on.
Object detection sampleTo be honest, I didn't do much with this one – I was more interested in seeing what I could do with the second example. But I got it up and running, and resolved an issue during the workflow, which could be useful for you.
While trying to run the this sample, I first hit an error on this command:
cmake -DCMAKE_BUILD_TYPE=Release -DCMAKE_CXX_FLAGS="-march=armv7-a" /opt/intel/openvino/deployment_tools/inference_engine/samplesThe error I got was:
CMake Error: The source directory "/opt/intel/openvino/deployment_tools/inference_engine/samples" does not appear to contain CMakeLists.txt.
Specify --help for usage, or press the help button on the CMake GUI.
I found a closed issue for this on GitHub, and user henry1758f recommended appending /cpp to the end of the command. That worked for me!
Facial detection modelI was curious about what I could do with the face detection model with OpenCV; to test it, I downloaded an image with 3 faces and copied it to /openvino on the Pi. When I tried to run the sample, I got:
[ ERROR ] Check 'axis < static_cast<size_t>(input_rank)' failed at /teamcity/work/scoring_engine_build/releases_2020_1/ngraph/src/ngraph/op/gather.cpp:140:
While validating node 'Gather[Gather_852](patternLabel_848: float{10,20,30}, patternLabel_849: int64_t{5}, patternLabel_851: int64_t{1}) -> (??)':
The axis must => 0 and <= input_rank (axis: 4294967295).
Googling around, I found a description of a similar issue. User DavidC from Intel recommended trying the pre-trained model from the previous release. To do this, replace the.bin and.xml download commands:
wget --no-check-certificate https://download.01.org/opencv/2019/open_model_zoo/R3/20190905_163000_models_bin/face-detection-retail-0004/FP16/face-detection-retail-0004.binand
wget --no-check-certificate https://download.01.org/opencv/2019/open_model_zoo/R3/20190905_163000_models_bin/face-detection-retail-0004/FP16/face-detection-retail-0004.xmlMoving onward, the command I used to run this against my images was:
./armv7l/Release/object_detection_sample_ssd -m face-detection-retail-0004.xml -d MYRIAD -i IMAGE.jpgThis worked, and I've attached a working log at the bottom of this tutorial – scroll down to the "Code" section for that.
It looks like they've now updated the tutorial to use a saved Python script, which makes the command a lot prettier to run! However, it does seem annoying to have to edit the file every time you want to use a new image or output to a new filename. I'm sure that more advanced code mages could easily route around that, though.
In the meantime, scroll down to enjoy a few examples of what it can do!
Capturing images on the PiI want to have my robot take pictures and run inferencing against them, so here's my workflow for that:
On the Pi (/openvino): This takes a photo, runs the model against it, and copies the result to my "image-results" folder. For each new pic, I increment the number.
raspistill -o images/cam0.jpg
./armv7l/Release/object_detection_sample_ssd -m face-detection-retail-0004.xml -d MYRIAD -i images/cam0.jpg
cp out_0.bmp image-results/picam0.bmp
And, to copy the resultingimage to my PC (from the target folder):
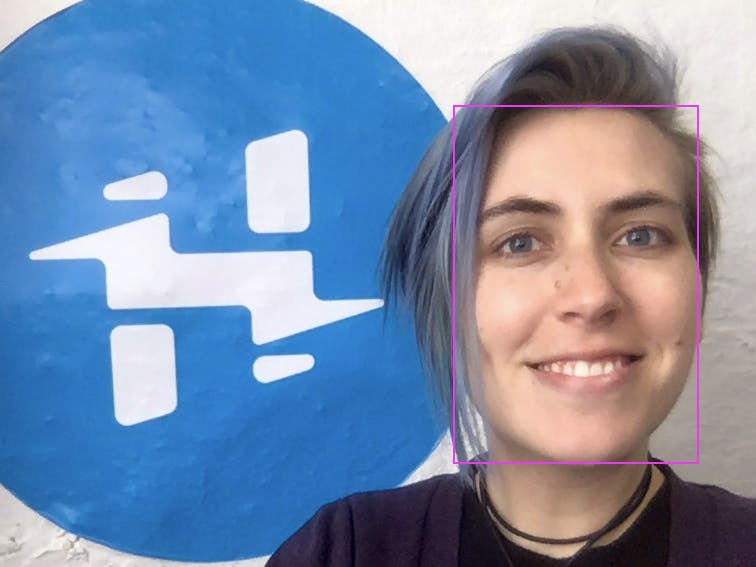
scp pi@raspberrypi.local:~/openvino/image-results/picam0.bmp .Images taken with the Raspberry Pi camera, using the above workflow: Even with the face shadowed / partially occluded, it works pretty well. A pink rectangle surrounds the face in each image:
I also tried this on a stock photo with multiple faces, and it marked each one:
And I tried blocking various parts of my face, and using different angles, to test the model's flexibility:
I ran a very low-res speed test using the stopwatch on my phone, hitting "stop" when the script prints "Image out0.bmp created!" I've highlighted the photos that are shown in the section above:
- faces-trevoy-kelly.jpg (3 faces) = 5.16 seconds
- alex12.jpg (normal) = 4 seconds
- alex4.jpg (normal) = 4
- alex5.jpg (squinchy face) = 3.83
- alex6.jpg (tongue out) = 3.9
- alex7.jpg (covered eyes) = 3.93
- alex8.jpg (covered mouth) = 3.93
- alex9.jpg (covered middle of face) = 3.76
- alex10.jpg (looking way up) = 3.86 – no result
- alex11.jpg (looking mid-up) = 3.76
Even when I was intentionally trying to thwart the algorithm, it took about the same amount of time to find my face.
Future testingThe models are going to keep getting better and better, and I can use some of those same models to test counter-methods.
One of my favorites is HyperFace, developed by Adam Harvey in collaboration with Hyphen Labs. It's a scarf with a "false-face computer vision camouflage pattern". Check out the description of how HyperFace works, reproduced below:
Rather than trying to obscure the face, HyperFace surrounds your actual face with hundreds of false faces. Wow! 😍
For further background on this question, check out the documentary Coded Bias by director Shalini Kantayya.


Comments
Please log in or sign up to comment.