


Hardware components | ||||||
 |
| × | 1 | |||
 |
| × | 2 | |||
 |
| × | 1 | |||
Hand tools and fabrication machines | ||||||
 |
| |||||
The Photon is a marvelous little board that runs about $20 and enables (probably) thousands of smart-home projects. It's programmed with C code that very closely resembles Arduino, but has a few differences. You'll pick it up quickly!
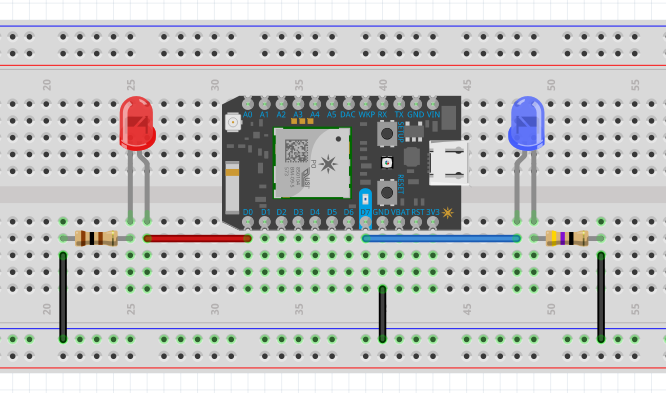
The SetupGrab your Photon, its Micro USB cable, and a couple of LEDs with appropriate resistors. Hook up the LEDs' positive legs to digital pins 0 and 7, and the negative legs back to ground via the resistors; something like this:
Plug in your Photon and link it to your account. This can be done in a few different ways:
- Via the app: click the
+button at top-right after logging in, then follow the steps to name it and set it up on your WiFi network.
- Or, log into the cloud IDE.
- If you're at a hackathon or conference, the command-line interface can be the most reliable – if you're comfortable working in a terminal.
Once your board is happily breathing cyan (and thus connected to WiFi), it's time to get coding.
The CodeFire up the cloud IDE, if you hadn't already for the previous step. On the sidebar, you'll see options to flash/verify/save your code, and to view code, available libraries, documentation, your connected boards, and more. Click the Code icon, < > , and scroll down to the "Web-Connected LED" example project. Click the lightning icon to flash this code.
If you have more than one Particle device, go to the Cores tab and make sure that the one you're using is starred. Also, if you click on one of them, you'll see its Device ID – which is useful for talking to these boards from other applications and devices.
What it does is tie your two LEDs to their pins, then set them as OUTPUTs in the setup section. Next, we create a nickname ("led") for the blinking function ledToggle() which will become available to the internet. The setup section ends with both LEDs turned off.
The weird part comes next: we're not going to do anything in the loop. Your Photon is just gonna sit there, waiting for commands from its internet overlords, whoever that happens to be.
And after all the standard stuff is taken care of, comes the meat of the program. We're setting up the ledToggle() command mentioned earlier, since it doesn't exist yet as a standard Photon function. It takes a string argument, some piece of text enclosed in "quotation marks", and it responds to two strings in particular: "on" and "off". Otherwise, it basically does nothing, but flags an error.
There's so much you can do from here!
For those experienced with software, you can call the led function to trigger actions from your code. Note that you'll need the Device ID and your secure Access Token (which can be re-generated in case someone gets hold of it). Your Access Token is available via the Settings tab (cog icon). Here's another useful hint.
For everyone else, my favorite way to talk to Photons is with If This Then That (IFTTT). It's dead simple to set up – even if you do have software experience, it's often the fastest way to get things done. Let's try a couple of projects!
Project 1. Party Time!I decided that 6pm is Universal Party Time, mainly because it was 5 minutes from when I started building this app. To set up a time-triggered event, log into IFTTT and click the My Recipes tab, then the Create New Recipe button.
Setting up the trigger and action is pretty straightforward, using the Date & Time module:
...And that's it! 6pm hits, the lights come on, the disco ball starts spinning, the beat drops, the penguins are released, and your coffee transmutes into Four Loko. At least one of those things.
Note that you'll need to do a little setup on IFTTT, to give it your time zone and Particle account link.
Project 2. Voice-controlled Party On Demand!!!Now we're gonna take this IFTTT glory to a whole new level using Amazon's Alexa Voice Service. If you have an Echo (or similar), this is what powers it. If you don't, you can still install Alexa on a Raspberry Pi (or similar). Rather than writing an entire new Skill, you can make a custom command with a few clicks. As with the previous Recipe, you'll need to connect your Amazon account to IFTTT to use Alexa here.
Alexa automatically pulls in the exposed functions currently available for each of your boards, making it really easy to select from the list. Make sure to feed in the on or off argument.
You can go back anytime and rename your recipe, edit the function and its arguments, and more. Note that in order to turn your party OFF, you'll need a second Recipe, using the "off" argument.
You can prevent this by rewriting the ledToggle() function to:
- read the current state of the LED, then
- write the opposite.
Need a hint? Check out the Code Magic tutorial.
See the whole series of Hackster 101 tutorials on Hackster and YouTube.


Comments
Please log in or sign up to comment.