


Hardware components | ||||||
_baVEVgguW1.jpg?auto=compress%2Cformat&w=48&h=48&fit=fill&bg=ffffff) |
| × | 1 | |||
 |
| × | 5 | |||
 |
| × | 5 | |||
 |
| × | 1 | |||
 |
| × | 1 | |||
Yet Another Blinking LED Example: Web Bluetooth API & Arduino 101
Introduction & Motivation:
The real motivation for this project is guilt! After finding out about the Web Bluetooth API and wanting to try the annyang voice recognition library, I made and posted a demo project using these technologies to control an arduino101 by voice over BLE. I didn't want to write another "blink" project to demo the API. Immediately after posting that project, I realized that if someone just wanted to investigate the Web Bluetooth API, maybe that wasn’t the best intro project.
Well, everyone who has an arduino/genuino101 has a few LEDs and resistors laying around. So I present, "Yet Another Blinking LED Example!"
The Web Bluetooth API is still in development and not supported on all platforms. You can check the current implementation status and platform compatibility on the implementation status page. I recommend using Chrome on a Chromebook, but other platforms as supported.
I am working with the Web Bluetooth API behind an enabling flag on Chrome, but you can obtain a origin trial token for deployment. Information on this can be found here: https://developers.google.com/web/updates/2015/07/interact-with-ble-devices-on-the-web
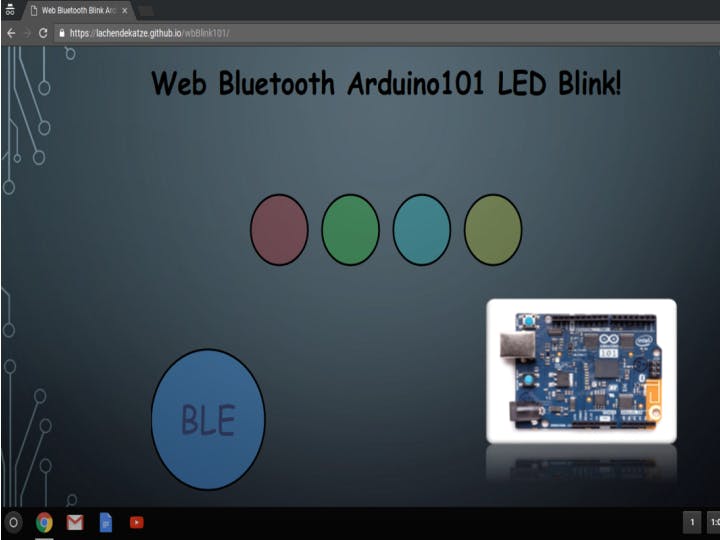
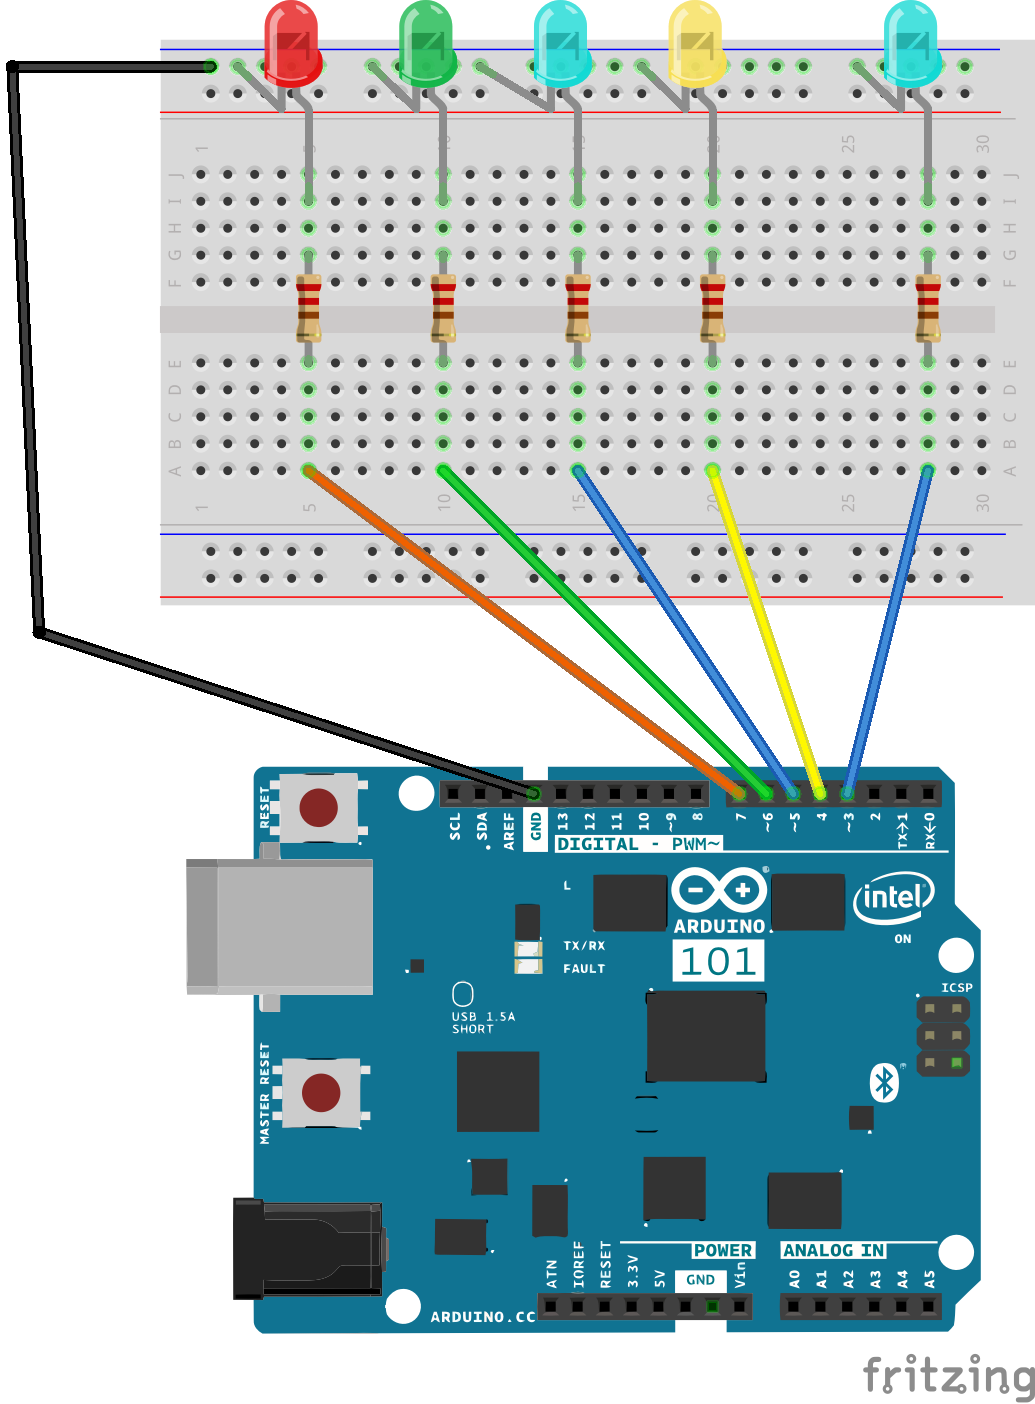
No special hardware is required for this project and once you build the circuit and upload the sketch to your arduino/genuino101, no further programming is required. Simply connect to my github page and begin.
Hopefully the UI is obvious, but click on the big blue circle with the letters BLE in it. This should bring up the following screen:
This active click and selection of a BLE device is a security feature of the Web Bluetooth API. After you select Connect the blue BLE connection indicator LED will turn on. Then clicking on the colored circles will cause one of the corresponding LEDs on the board to blink. Clicking on the circle again will step through an increasing blink frequency. All four LEDs can blink at different rates at the same time.
The Software:
There are 2 major components to the software, the sketch running on the arduino/genuino101 and the website to interact with the circuit. All the code can be found at my github repository for this project which is linked below.
The sketch:
The wbBlink101.ino sketch is pretty routine for a BLE sketch running on the arduino/genuino101. We simply want to have a service with a single characteristic to turn our 4 LEDs on or off. This is done in the following code:
/* establish BLE service & characteristics */
BLEPeripheral blePeripheral;
BLEService ledService("917649a3-d98e-11e5-9eec-0002a5d5c51b");
BLEUnsignedCharCharacteristic ledCharacteristic("917649a4-d98e-11e5-9eec-0002a5d5c51b", BLEWrite);
BLEDescriptor exp3Descriptor("2902","exp");
And then in our Setup() function:
/**
  *  BLE initilizations
  */
 blePeripheral.setLocalName("blink");
 blePeripheral.setAdvertisedServiceUuid(ledService.uuid());
 blePeripheral.addAttribute(ledService);
 blePeripheral.addAttribute(ledCharacteristic);
 blePeripheral.addAttribute(exp3Descriptor);
 blePeripheral.setEventHandler(BLEConnected, blePeripheralConnectHandler);
 blePeripheral.setEventHandler(BLEDisconnected, blePeripheralDisconnectHandler);
 ledCharacteristic.setEventHandler(BLEWritten, ledCharacteristicWritten);
...
 ledCharacteristic.setValue(0);
 blePeripheral.begin();
I like using the ble event handler approach to dealing with characteristic changes. It helps to keep the loop() function cleaner. We are only responding to actual BLE events and not constantly polling for activities in our loop().
In order to make the project a bit more interesting, I used the multi-tasking approach described by Bill Earl from Adafruit. I highly recommend his series of 3 arduino multi-tasking tutorials. Using his techniques, we can have all the LEDs blinking at different rates at the same time without using any delay() statements at all.
With this approach we create an object for each of our peripherals and then use our loop() function to continually check for updates or state changes on these objects. Within in the object itself we replace the use of the delay() function with time checks using the millis() function to change an object's, and LED in this case, state. The delay() function will block all processor activity for the specified amount of time. Eliminating the delay() ensures that the processor is available to continually execute code statements. From more on this approach please checkout Bill Earl's multitasking tutorials in the link above.
void update()
 {
   if (rateIndex != 0) {
     if ((millis()-lastSwitch) > (rates[rateIndex]))
     {
       lastSwitch = millis();
       ledOn = !ledOn;
       digitalWrite(pin,ledOn);
     }
   }
 }
The Web Page:
The more interesting elements of the software are on the web page side of things. For this I have created several files listed below.
index.html - this is the entry point into our web page, it calls all the necessary JavaScript, styling libraries and displays our svg ui image.
app.js - this file connects the LED.js file with actions called in the svg file. It is the conduit between the JavaScript representation of our project and the
led.js - this is the JavaScript representation of project. Think of it as a class and within this class you create an instance of this object for the app to use. This is where you specify your uuids and implement BLE connectivity.
 class LED {
   /**
     * The LED class is a object used to represent the BLE service. Note for this project
     * the read code is not used, but I kept it there for you to see.
     *
     * customize your project here to reflect the uuid of your service and characteristics.
     */
   constructor() {
       this.deviceName = 'blink';
       this.serviceUUID =   '917649a3-d98e-11e5-9eec-0002a5d5c51b';
       this.ledUUID =       '917649a4-d98e-11e5-9eec-0002a5d5c51b';
       this.device = null;
       this.server = null;
       // The cache allows us to hold on to characeristics for access in response to user commands
       this._characteristics = new Map();
   }
For further information on this please check out the samples and examples available online and my prior Hackster project.
leds.svg - I wanted to play around a bit with SVG, so there is also an svg file for the face of the UI. The file will render as graphically, but behind the scenes we have code that is very similar to html markup which is also able to call on the actions available in the app.js file.
This is barely scraping the surface of what can be done with SVG.
Conclusion:
I hope you will be inspired to work with the Web Bluetooth API as I believe it will be a big factor in IoT and the Physical Web in the future and many of our connect projects can benefit from it. There is a growong body of information and examples online as well. My hope is that one day soon I will see Windows being supported on the implementation page!


Comments
Please log in or sign up to comment.