


Hardware components | ||||||
 |
| × | 1 | |||
_ztBMuBhMHo.jpg?auto=compress%2Cformat&w=48&h=48&fit=fill&bg=ffffff) |
| × | 1 | |||
 |
| × | 1 | |||
| × | 2 | ||||
 |
| × | 2 | |||
 |
| × | 1 | |||
 |
| × | 1 | |||
 |
| × | 1 | |||
| × | 1 | ||||
 |
| × | 1 | |||
 |
| × | 1 | |||
 |
| × | 1 | |||
Software apps and online services | ||||||
 |
| |||||
 |
| |||||
| ||||||
 |
| |||||
| ||||||
| ||||||
 |
| |||||
Hand tools and fabrication machines | ||||||
 |
| |||||
 |
| |||||
 |
| |||||
 |
| |||||
HI, HELLO EVERY ONE
This project is mainly about the rover for earth which can help farmers.This project mainly contains three modulus.
MODULE 1:Hardware connections for the complete setup now consider the dc motors.
This requires the two dc motors and a motor drivers. motor driver contains
Here you have to connect the v+, en1, en2, to the single point in bread board and motor four wires to the four input in the 1 ma 2 pins.Now next the output pins of the motor driver pin is connected to the arduino and battery should be connected as follow diagram.
Now next we have to connect them to bolt.the same four pins hould be connected to the digital pins of the bolt(0, 1, 2, 3).
now the soil sensor should be connected to the bolt but placing the digital pin to the bolt(digital 4 pin).now finally its time to connect temperature sensor to the bolt analog pin(A0).
Now this time all the ground and the v+(temperature sensor, moisture sensor), en1, en2 to the 5v of the arduino and finally this all pin should be suplied with the required voltage batteries.
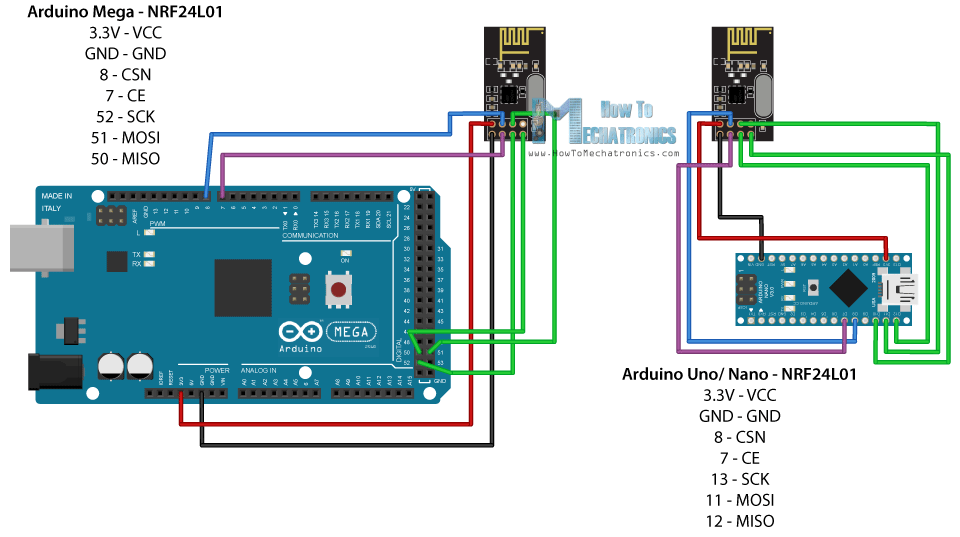
NRF CONNECTIONS:
The above diagram is called as the nrf module which is used for radio communication.the above diagram should also included in our circuit to control the car in the near areas.
FINAL CONNECTION OF THE NRF WITH THE ARDUINO
NOW ITS TIME CONNECT JOY STICKS:
Two joysticks are used :
1)to control the car direction.
2)to control the servo.
FINAL CODING
1)ARDUINO CODING:
transmitter:
#include <SPI.h>
#include <nRF24L01.h>
#include <printf.h>
#include <RF24.h>
#include <RF24_config.h>

RF24 radio(7, 8); // CSN, CE
const byte address[6] = "00001";

int x_key = A1;
int y_key = A0;
int p_key = A3;
int q_key = A2;
int x_pos;
int y_pos;
int p_pos;
int q_pos;

void setup() {
  radio.begin();
  radio.openWritingPipe(address)
;
  radio.setPALevel(RF24_PA_MIN);
  radio.setChannel(87);
  radio.setDataRate(RF24_
250KBPS);
  radio.stopListening();

  Serial.begin(9600);
  pinMode (x_key, INPUT) ;
  pinMode (y_key, INPUT) ;
  pinMode (p_key, INPUT) ;
  pinMode (q_key, INPUT) ;
}
int pos;
void loop() {
  x_pos = analogRead (x_key) ;
  y_pos = analogRead (y_key) ;
  p_pos = analogRead (p_key) ;
  q_pos = analogRead (q_key) ;
  Serial.println(x_pos);
  Serial.println(y_pos);
  Serial.println(p_pos);
  Serial.println(q_pos);
  if (p_pos>400 && p_pos<600 && q_pos>400 && q_pos<600)
  {
  if(x_pos>400 && x_pos<600 && y_pos>400 && y_pos<600)
  {
    pos=100;
    radio.write(&pos, sizeof(pos));
  }
  if(x_pos>400 && x_pos<600 && y_pos<400)
  {
    pos=200;
    radio.write(&pos, sizeof(pos));
  }
  if(x_pos>400 && x_pos<600 && y_pos>600)
  {
    pos=300;
    radio.write(&pos, sizeof(pos));
  }
  if(y_pos>400 && y_pos<600 && x_pos<400)
  {
    pos=400;
    radio.write(&pos, sizeof(pos));
  }
  if(y_pos>400 && y_pos<600 && x_pos>600)
  {
    pos=500;
    radio.write(&pos, sizeof(pos));
  }
  Serial.println(pos);
  delay(100);
}
else if(p_pos<400 || p_pos>600)
{
  if(p_pos<400)
  {
    pos=600;
    radio.write(&pos, sizeof(pos));
  }
  if(p_pos>600)
  {
    pos=700;
    radio.write(&pos, sizeof(pos));
  }
  delay(100);
}
}
reciever:
#include <SPI.h>
#include <nRF24L01.h>
#include <printf.h>
#include <RF24.h>
#include <RF24_config.h>
#include <Servo.h>
Servo servo;

RF24 radio(7, 8); // CSN, CE
const byte address[6] = "00001";
int servo_pin = 9;
int sensor_pin=A0;
int output_value;

void setup() {
  Serial.begin(9600);
  radio.begin();
  servo.attach (servo_pin ) ;
  radio.openReadingPipe(0, address);
  radio.setPALevel(RF24_PA_MIN);
  radio.setChannel(87);
  radio.setDataRate(RF24_250KBPS);
  radio.startListening();
}
int pos;
void loop() {
  if (radio.available()) {
    radio.read(&pos, sizeof(pos));
    Serial.println(pos);
    if(pos==100)
    {
    digitalWrite(6,LOW);
    digitalWrite(5,LOW);
    digitalWrite(4,LOW);
    digitalWrite(3,LOW);
  //   Serial.println("gk0");
    }
    else if (pos==200){
    digitalWrite(6,HIGH);
    digitalWrite(5,LOW);
    digitalWrite(4,HIGH);
    digitalWrite(3,LOW);
    delay(10);
    // Serial.println("gk1");
    }
     else if (pos==300){
    digitalWrite(6,LOW);
    digitalWrite(5,HIGH );
    digitalWrite(4,LOW);
    digitalWrite(3,HIGH);
     delay(10);
   // Serial.println("gk2");
    }
    else if (pos==400){
    digitalWrite(6,LOW);
    digitalWrite(5,HIGH );
    digitalWrite(4,HIGH);
    digitalWrite(3,LOW);
    delay(10);
   //  Serial.println("gk3");
    }
     else if (pos== 500){
    digitalWrite(6,HIGH);
    digitalWrite(5,LOW );
    digitalWrite(4,LOW);
    digitalWrite(3,HIGH);
     delay(10);
    //  Serial.println("gk5");
    }
    else if (pos== 600){
     servo.write(90);
     delay(10);
    //  Serial.println("gk6");
    }
     else if (pos== 700){
     servo.write(180);
     delay(10);
    //  Serial.println("gk7");

 }
  }
  else
  {
    Serial.println("connection lost");
  }
}
}
now to receive telegram message :(server code )
login to one of the server like ripl.it and then upload the codes
import requests                 # for making HTTP requests
import json                     # library for handling JSON data
import time                     # module for sleep operation
from boltiot import Bolt        # importing Bolt from boltiot module
import conf                     # config file
mybolt = Bolt(conf.bolt_api_key, conf.device_id)
def get_sensor_value_from_pin(pin):
try:
response = mybolt.digitalRead(pin)
data = json.loads(response)
if data["success"] != 1:
print("Request not successfull")
print("This is the response->", data)
return -999
sensor_value = int(data["value"])
return sensor_value
except Exception as e:
print("Something went wrong when returning the sensor value")
print(e)
return -999
def send_telegram_message(message):
"""Sends message via Telegram"""
url = "https://api.telegram.org/" + conf.telegram_bot_id + "/sendMessage"
data = {
"chat_id": conf.telegram_chat_id,
"text": message
}
try:
response = requests.request(
"GET",
url,
params=data
)
print("This is the Telegram response")
print(response.text)
telegram_data = json.loads(response.text)
return telegram_data["ok"]
except Exception as e:
print("An error occurred in sending the alert message via Telegram")
print(e)
return False
while True:
# Step 1
sensor_value = get_sensor_value_from_pin("4")
print("The current sensor value is:", sensor_value)
# Step 2
if sensor_value == -999:
print("Request was unsuccessfull. Skipping.")
time.sleep(10)
continue
# Step 3
if sensor_value >= conf.threshold:
print("The current temperature value is")
message = "The moisture value is just greater than threshold "
telegram_status = send_telegram_message(message)
print("This is the Telegram status:", telegram_status)
# Step 4
time.sleep(100)
conf.py:
"""Configurations for telegram_alert.py"""
bolt_api_key = "XXXX"               # This is your Bolt Cloud API Key
device_id = "XXXX"                  # This is the device ID and will be similar to BOLTXXXX where XXXX is some numbers
telegram_chat_id = "@XXXX"          # This is the channel ID of the created Telegram channel. Paste after @
telegram_bot_id = "botXXXX"         # This is the bot ID of the created Telegram Bot. Paste after bot
threshold = 0                     # Threshold beyond which the alert should be sent
enter your bot and api values
PROCESS:
Alert messaging using TelegramWhat is Telegram?Telegram is a messaging app similar to Whatsapp. You can send and receive messages along with files also. It is FREE to use. You can access the platform via your Android/iOS/Windows phone and also your PC or Mac.
A channel is to Telegram what Groups are to Whatsapp. Channels are a tool for broadcasting your messages to large audiences. They can have an unlimited number of subscribers, they can be public with a permanent URL and each post in a channel has its own view counter.
What is a Bot?Bots are third-party applications that run inside Telegram. Users can interact with bots by sending them messages, commands and requests.
We will be using Bots to send alerts on our channel.
What will we learn in this project?In this project, you will be able to send alerts via Telegram to your phone when the sensor value exceeds your set threshold.
What do I require for this project?To send alerts and messages via Telegram, you will require,
- An Android/iOS/Windows phone with Internet connectivity.
- A Telegram account. You will require a mobile number for this.
- Access to your Ubuntu OS via puTTY or Virtual Machine.
- Go to the Playstore or App Store on your phone and search for Telegram.
- Download and Install the latest version of Telegram app.
- Signup for a new account or sign in to Telegram by providing your mobile number.
- Telegram will call you OR send you a SMS to verify your mobile number.
- Get your account verified and approve any permissions if required.
- You will be logged in to Telegram and will be shown a screen similar to the one below. (It's okay if it differs from the screenshot below)
You have successfully installed Telegram and setup your account. In the next lessons, we will be learning more about Channels and Bots.
Creating a ChannelWhat is a Telegram channel?A channel is to Telegram what Groups are to Whatsapp. Channels are a tool for broadcasting your messages to large audiences. They can have an unlimited number of subscribers, they can be public with a permanent URL and each post in a channel has its own view counter.
Steps to create a channel- Go to the home screen of the Telegram app.
- Swipe from the left side to reveal the menu.
- Click on "New Channel".
- It will ask you for a Name and Description for your channel. Give a suitable name and description. Adding photo is optional.
- In the next screen set the channel as Public.
- On the same screen, it will ask you to enter a permanent link for your channel. You can use lowercase letters and numbers 0-9 to create the channel link.
- Please note that the channel link name is global and you will be able to create a channel link only if the link name is available. The channel link name is something similar to an email address, i.e. only one unique email ID can exist at one time.
- You can keep the channel link name as temperature_alert_ followed by your email ID. Example, if my email ID is developer@boltiot.com, I can keep the channel link name as temperature_alert_developer_boltiot_com(I have removed the @ and. symbol since it was not allowed and replaced it with an underscore _). This is just a suggestion. You can keep the channel link name as you like as long as it is valid.
- Keep a note of this Channel permanent link name. It will be required later on to send messages to this channel. For example, the channel link name in the screenshot below is "temperature_alert".
- Congratulations! You have created a new channel. You can also view this channel from your app home screen.
- You can click on the channel name at the top to view more details about it.
- Next we will need to create and add a Bot to the channel so that it can post alerts for us in this channel.
Bots are third-party applications that run inside Telegram. Users can interact with bots by sending them messages, commands and requests.
We will be using Bots to send alerts on our channel.
Create a new BotTelegram allows us to create a new bot with the help of a bot called as "BotFather". It is a single bot to create and manage other bots.
- On the Home screen of the app, click on the search icon on the top right and type in "botfather".
- In the search results, click on the correct result for "BotFather" as shown below. The correct "BotFather" will have a blue tick mark next to its name. This will take you to a chat window with the "BotFather".
- The chat will have a few items already and will display you a list of commands to get started.
- Since we need to create a new Bot, go ahead and type in "/newbot" in the window.
- It will ask you to type in few more details like Bot name and Bot username.
- When your bot is created successfully, you will be shown a screen similar to the one below and will contain the Bot Token. This token is used to control your Bot as well as send messages on behalf of it. Please keep this token secure as it will allow anyone to access your Bot.
- In the screenshot above, the Bot token is "894346529:AAhuJ2XJQy5dlEtLYF0sc0Z_qu0fSqihSSc". Please save it as telegram_bot_id. The telegram_bot_id is saved as "bot" followed by the bot token. So, in this example, the telegram_bot_id will be "bot894346529:AAhuJ2XJQy5dlEtLYF0sc0Z_qu0fSqihSSc".
- The telegram_bot_id will be used in the python code to send messages. The python code will be taught in the later lessons.
- Also, please be careful when saving the Bot ID. You may get confused between 0 and O, I and 1 etc. as they are similar looking.
- Congratulations, you have created a new Bot. Now, we will need to add it to the channel we have created previously so that we can send alerts.
- From the App home screen, open the channel we have created earlier.
- In the screen, click on the channel name on the top to open the information for the Channel.
- Click on the Administrators button so that we can add the newly created bot to the channel.
- Search for the bot that we have created using the Bot's username. Once you have found the correct Bot click on it to add it to the channel. Please make sure you have clicked on the Administrators button in the previous step as this will allow our bot to post to the channel.
- You will be asked to confirm the rights for the bot. Press on the tick mark on the top right to continue adding the bot to the channel. Make sure that the bot has the rights to "Post Messages".
- You will now see the newly created Bot in the list of administrators for the channel.
- Now we will code for sending messages to the channel via the Bot.
NOW SETTING THE NETWORK FOR TWILLO AND MAIL GUN
Receive the LM35 temperature sensor values via SMS and Email anytime on your mobile phone using Google Assistant.
What do you do when you need to check the sensor values of your Iot project anytime? You just login to your cloud to check it. Seems simple, right? But what if you had to check the values once in every hour or once in every few minutes and that to many times in a day. That would be a little (very) cumbersome, right? Now, imagine a world where you could get the sensor values via SMS and Email by just saying "Send me the sensor values" to your Google Assistant. Wait, wait, wait. That situation is no more imaginary because you yourselves could do that in a few steps. Read on to find out.
In this project, we will be receiving the temperature sensor values from LM35 sensor via SMS and Email through a command to Google Assistant.
Step 1 : Hardware SetupHold the LM35 sensor in your hand such that the name is visible to you. The three pins, from left to right, are VCC, output and GND. Connect the three pins to female-to-male wires. Connect the three wires, corresponding to the three pins from left to right, to 5 V, A0 and GND pins on the Bolt WiFi module. Connect the WiFi module to a 5 V power source. Make sure it is connected to an active internet connection.
Step 2 : Creating an IFTTT module in IntegromatLogin to your Integromat account. If you haven't signed up on Integromat, then you can create an account by clicking here. After logging in, click on "Create a new scenario" on the top-right of the screen. Select IFTTT, HTTP, Mailgun and Twilio in the screen to select the required tools and then click "Continue". Then click on the white circle and select IFTTT from the list and then select "Receive Data" from the menu. This module is essential to connect it to the Applet on IFTTT which will be discussed later. Click on "Add" to add a new Webhook followed by giving a suitable name to it and click on "Save". Now, you will be getting a URL or link. Save it for further purpose.
Next, click on "+" symbol attached to the module to add a new module. Select "HTTP" followed by "Make a request". This is required to receive the sensor values from the Bolt Iot Cloud. In the URL, paste the link https://cloud.boltiot.com/remote/your-bolt-iot-api-key/analogRead?pin=A0&deviceName=BOLTXXXXXXX. Replace "your-bolt-iot-api-key" and "BOLTXXXXXXX" with your respective credentials which you can easily find in your Bolt Iot Cloud. Let the method be "GET" and click "OK".
The above link is used to fetch the sensor values from Bolt Iot Cloud. The output of the above link will be in the form of {"value": "XXX", "success": "1"} where XXX are the sensor values.
Now, click again on "+" and type "Flow Control" in the search box and select it followed by "Router". Two white circles must be made. Click on the first white circle and select "Mailgun" followed by "Send an email". Here, Mailgun is used to receive the Email with the temperature. If you are already having an account in Mailgun, then you must be having the API key and Domain Name which can be easily found in your Mailgun account. If you don't have an account in Mailgun, then you can follow the Alternative Step given below. Fill in the required details as asked for. Type the recipient's mail (which is your Email address). In the "Sender" field, type "test@yourdomainname". In the "Content" section, we need to write the temperature value and not the sensor value. To convert the temperature value to the sensor value we need to divide the number by 10.24. To get the sensor value in the form XXX, we need to eliminate all the other characters for which we use the function "substring". Click on "A" symbol in the dialog box beside and select "substring".
In the first space inside the brackets, click on "Data" option under the star symbol followed by "11" and "14" in the second space and third space. Strictly speaking, this is not the right method to fetch the sensor value so am using a hack to get. If someone knows the right way, they can mention the method in the comment section below.
The latter is done to capture only the "XXX" from the output. This number is then divided by 10.24
Login to your IFTTT account. If you haven't signed up on IFTTT, then you can create an account by clicking here. After logging in, click on "New Applet" under the "My Applets" section. Click on "+this" followed by "Google Assistant" after searching for it in the search box. Click on "Say a simple phrase" in the following screen. Type the command for which you want to trigger the required action.
Click on "Trigger" followed by "+that". Search for "Webhooks" in the search box and select it followed by selecting "Make a web request" in the following screen. In the URL field, paste the link which we got in Step 2 after creating an IFTTT module in Integromat. This step is very essential to run the scenario in Integromat when you say the command to Google Assistant. Afterwards, select "POST" in method and click on "Create Action". Write a suitable name for the applet and select "Finish".
That's it. Now see the magic when you take out your mobile phone and say "Ok Google, send the temperature sensor value."
SchematicsConnecting female-to-male wires to LM35 sensorTHAT'S IT NOW UPLOAD EVERY THING AND THEN CHECK.
IF ANY DOUBTS CONTACT ME BY COMMENT SECTION.
THANK YOU....................................


_3u05Tpwasz.png?auto=compress%2Cformat&w=40&h=40&fit=fillmax&bg=fff&dpr=2)

Comments
Please log in or sign up to comment.