Meet O'nine! A personal home robotic companion that can move around, pick up objects, and look after your house. Thanks to Alexa, O'nine can hear you and perform programmable tasks like feeding your fish.
This project hopes to extend Alexa's capabilities by providing a scalable and open robot platform that can perform dynamic tasks in a smart home environment. Current smart home solutions require custom rigs that are devised just for a specific function. O'nine aims to bridge this gap by minimizing these hardware requirements and using robotics as an alternative. The idea is to create a technology-proving platform to test the feasibility and viability of using robots as another component of a home automation system. Hopefully we can answer questions like "Does it make sense to use a robot to shut off AC units rather than mounting microcontrollers in every room just to control every AC unit?" as what used to be a static solution can now be mobile with the aid of a robot.
Here's a video of O'nine feeding my fish.
TL;DW (Time-Lapse Video)
Full length video.
You want to check on your baby or who's at the door? O'nine has a built in camera so you can also ask it to take a picture.
This tutorial will walk you through on how to build the robot and how to create an Alexa Skill that can command the robot to perform autonomous tasks.
2. High Level ArchitectureIn summary, here's how O'nine - Alexa integration works:
1. Amazon Echo Dot listens to voice command.
2. Custom Alexa Skill detects Intent.
3. AWS Lambda function receives request from Amazon Alexa Skill and publishes to the PubNub MQTT broker.
4. O'nine receives data by subscribing to the MQTT broker.
5. O'nine executes required task autonomously.
3. Hardware3.1 Robot Base
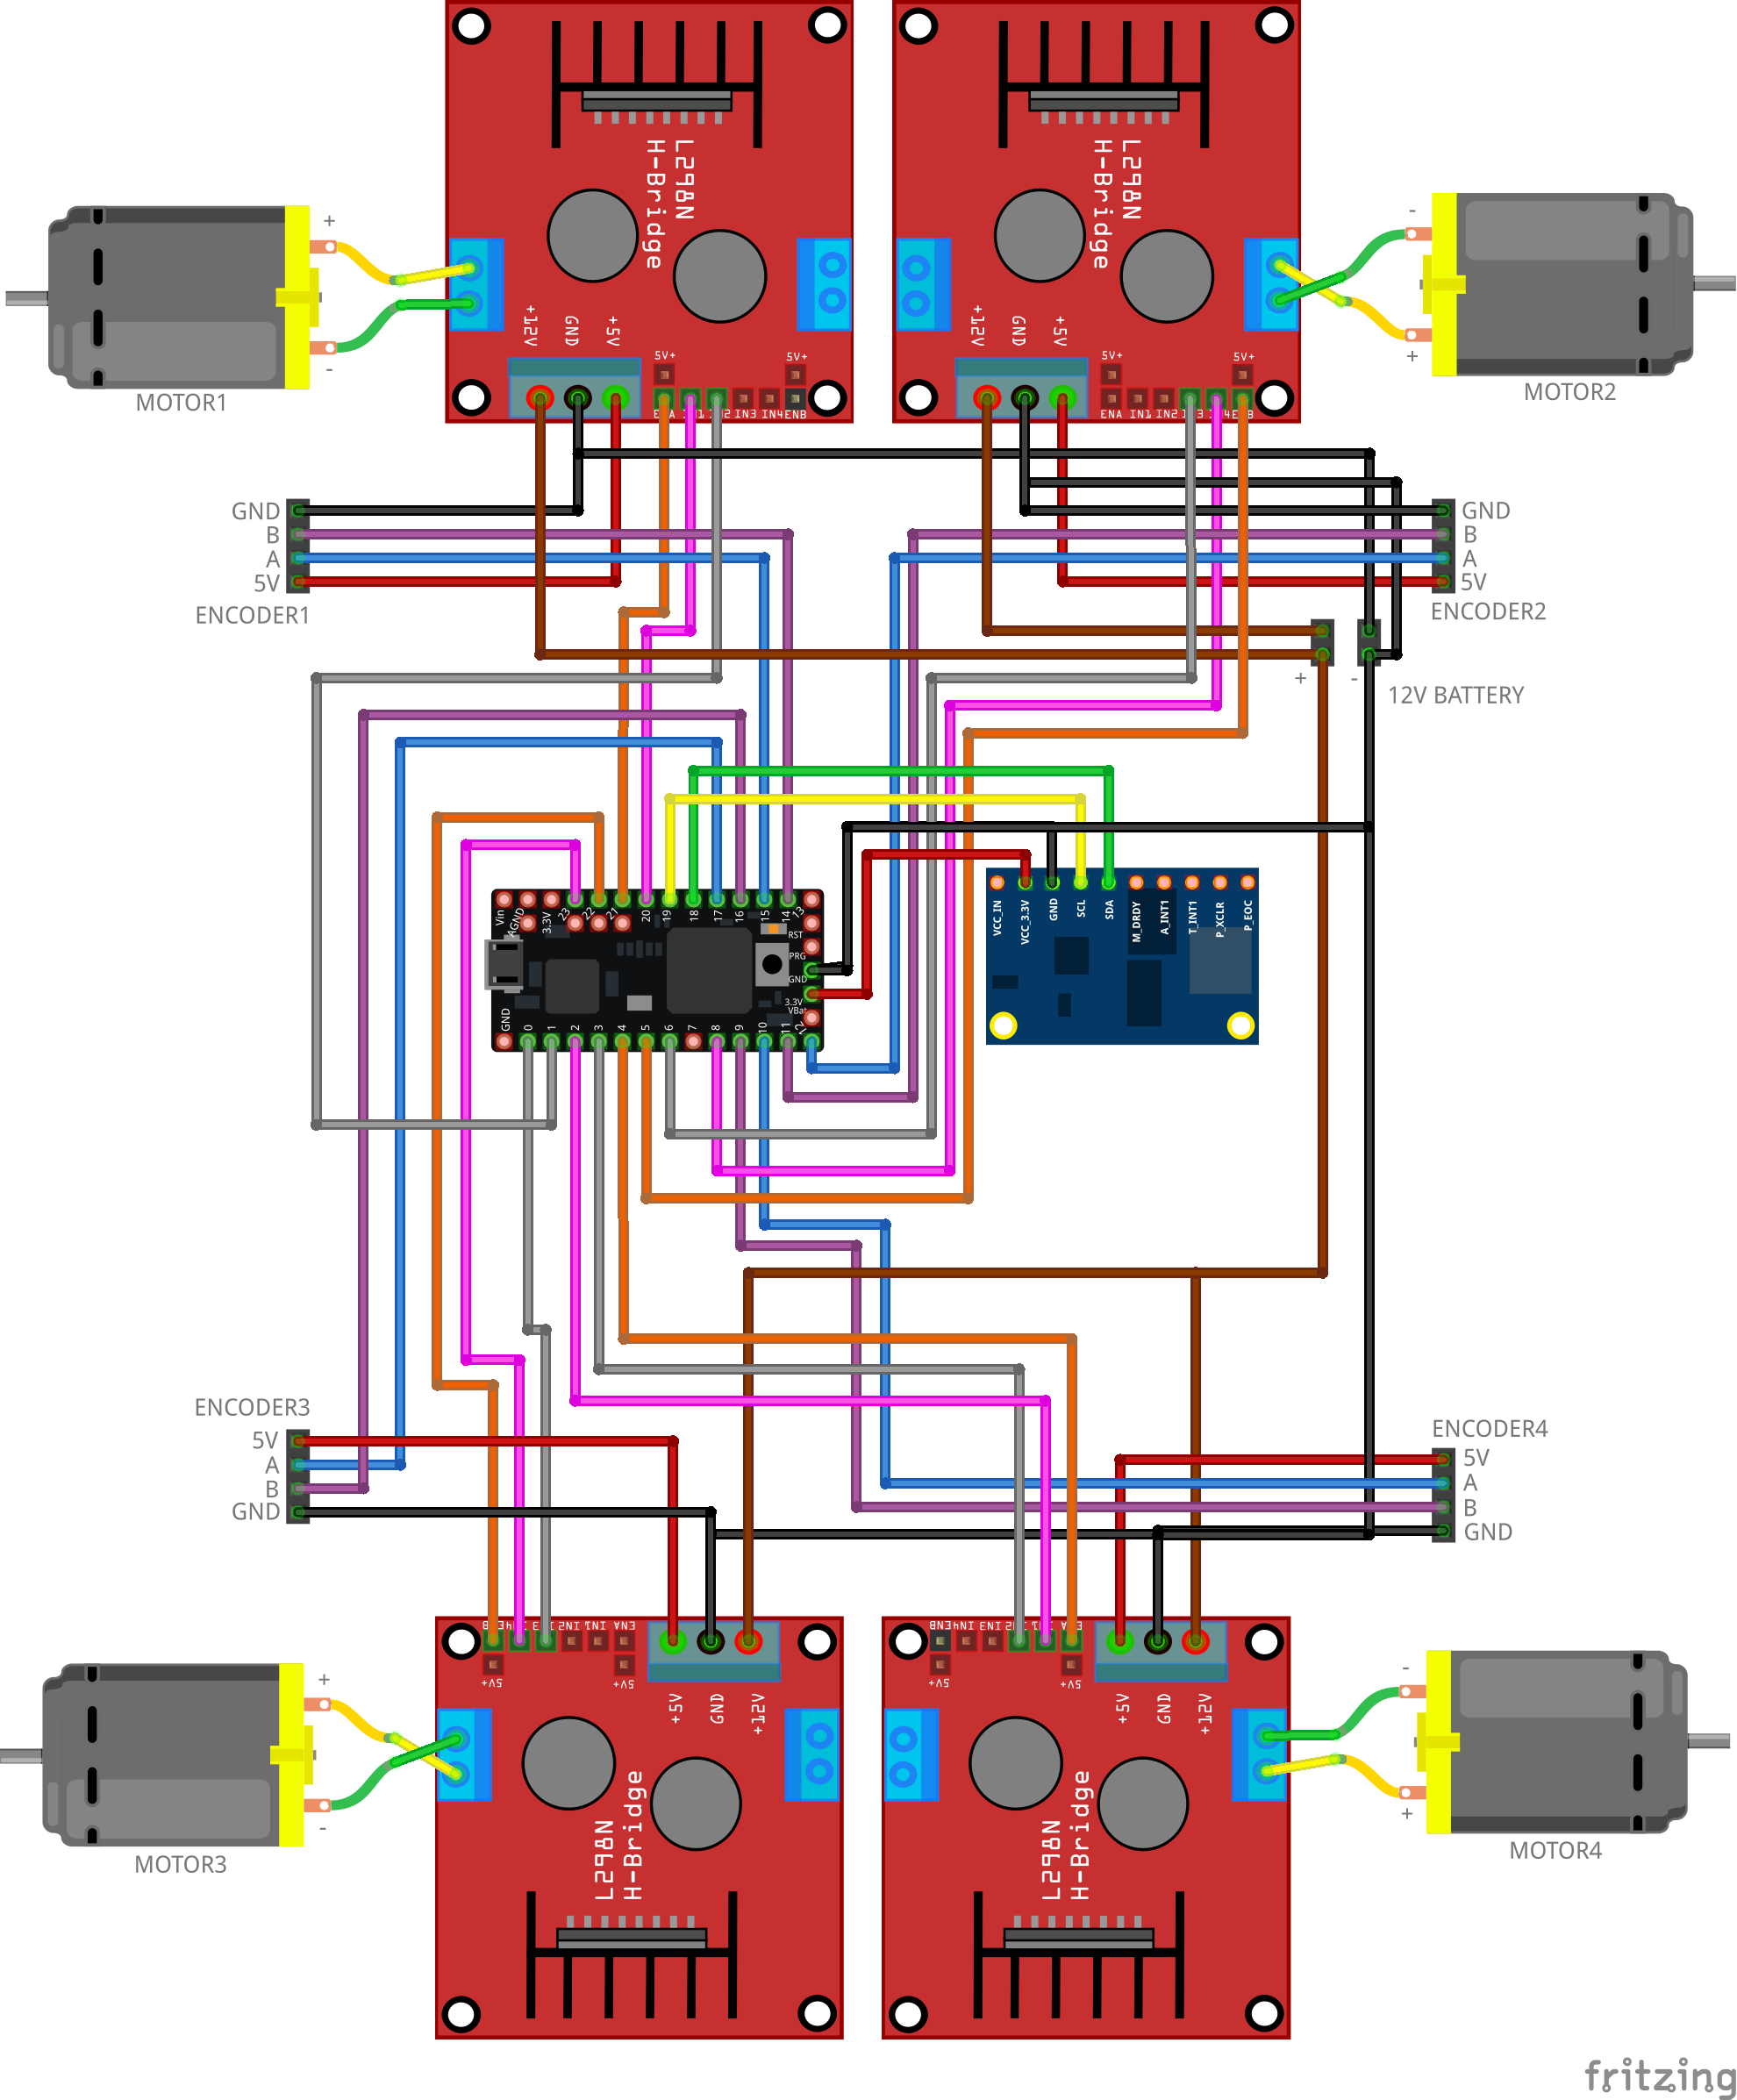
Wire up the components as shown below. This circuit translates all the velocity commands sent from ROS Navigation Stack into motor movements. The firmware includes a PID controller to maintain the required speed using the feedback from the motor encoders.
A few photos of the assembled robot base.
The robot chassis is an upcycled A4 paper tin container. You can also use old plastic container box to house your components.
You can check out my Linorobot project for comprehensive tutorial on how to build DIY ROS compatible robots.
3.2 Vertical Lift Circuit (Arm Parent)
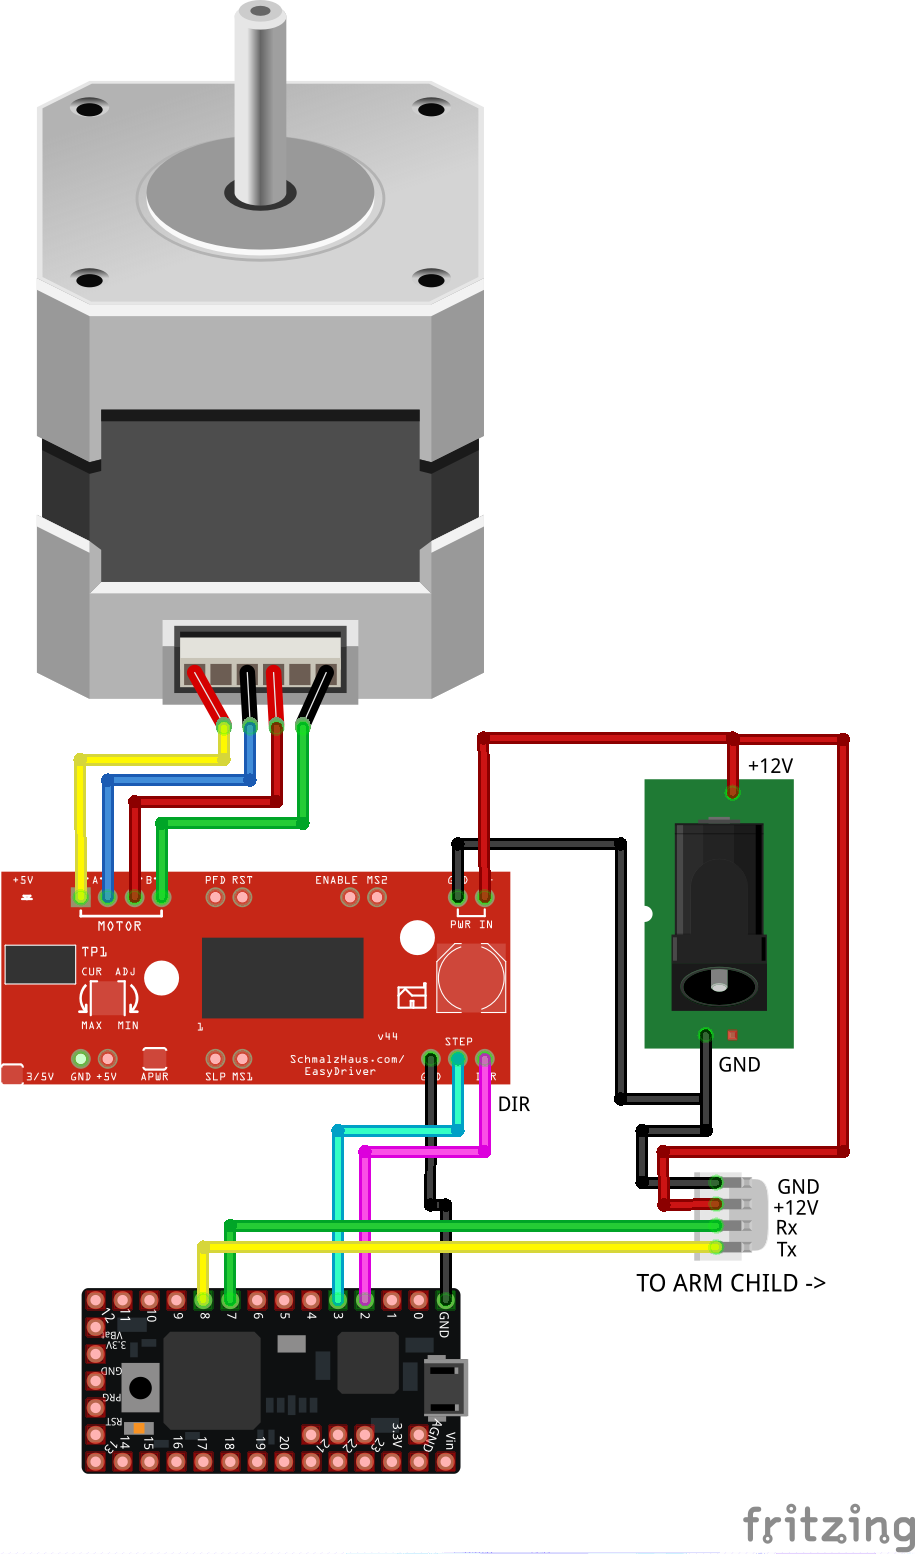
Wire up the components as shown below. This circuit controls the vertical lift of the arm and translates the required height sent by http://moveit.ros.org/ into stepper movements. This is an Open-Loop system which calculates the current height of the arm by correlating the number of steps done into distance in millimeter. The microcontroller also relays the data sent from MoveIt to the robotic arm that's mounted on the moving vertical platform.
Here are photos of the assembled circuit for the vertical lift.
The spiral cable houses the Tx/Rx wires for serial communication between the vertical lift circuit and robotic arm controller, and +12V DC supply to juice up the robotic arm.
3.3 Robotic Arm Controller ( Arm Child )
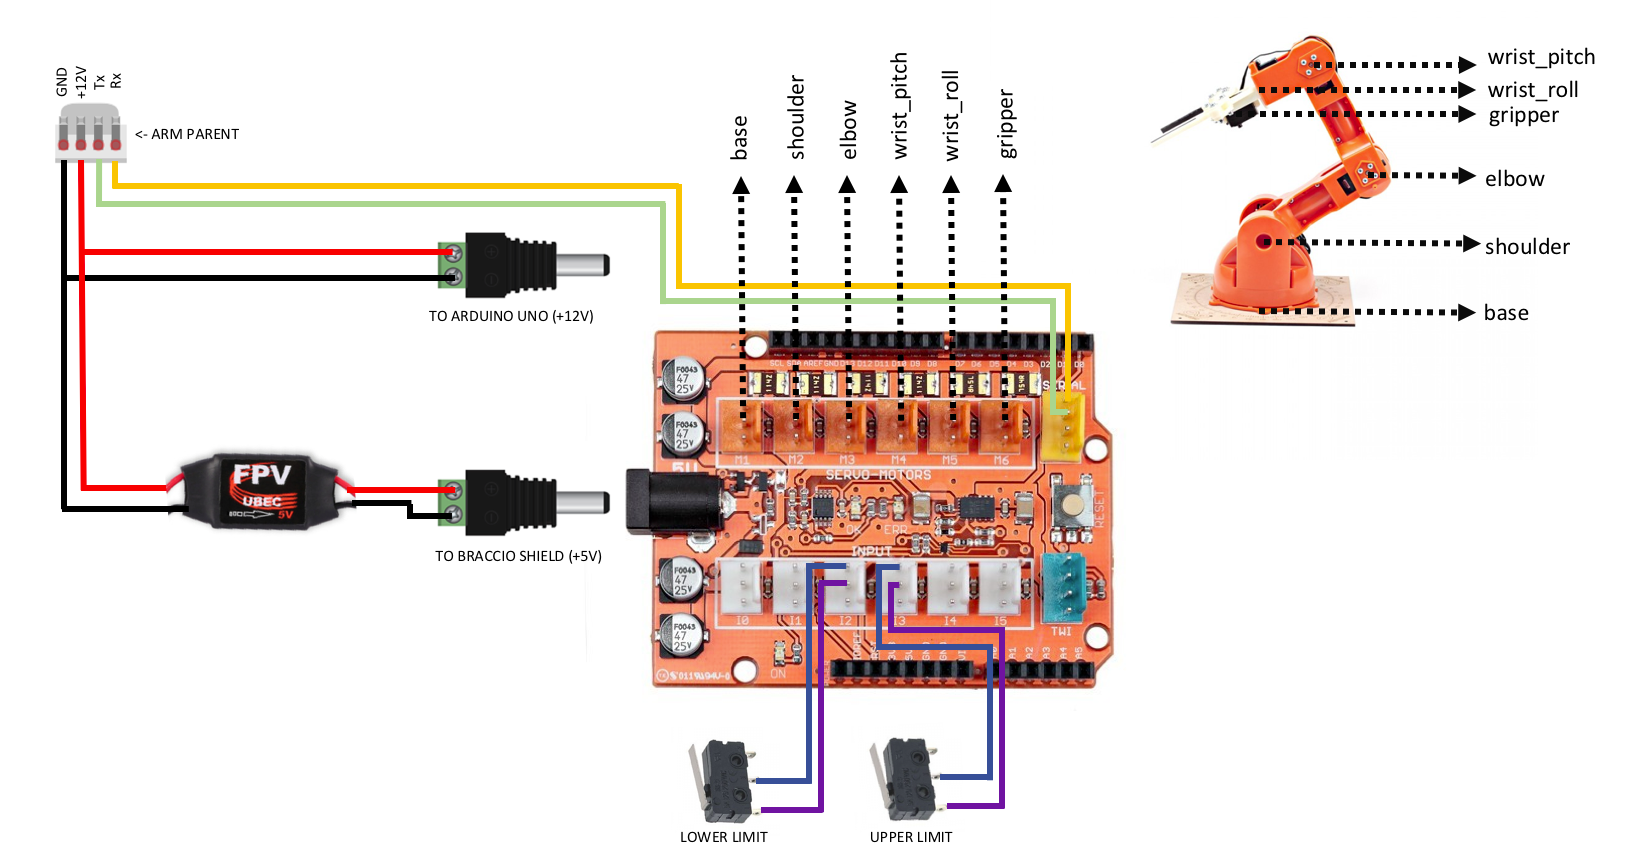
Wire up the components as shown below after assembling the robotic arm and stacking its shield to Arduino Uno. This circuit communicates with the parent arm through serial communication. The received data is an array of required angle for each joint that is used to actuate the servo motors.
Here are photos of the assembled robotic arm controller stacked on an Arduino Uno.
And a few more to show the rest of O'nine's mechanical parts.
3.4 Integrate all circuits
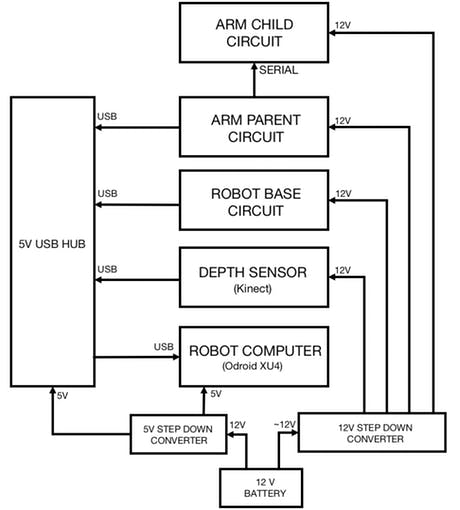
Finally, connect all the circuits you have previously wired together as shown below. The diagram also shows how to power each circuit:
Take note that this project requires to be run on two Linux machines (Ubuntu 14.04 or 16.04). One development machine to run MoveIt and data visualization (Rviz) and another machine (ARM dev board) to run the robot's navigation package and hardware/sensor drivers.
Click here for ROS supported dev boards that you can use for the robot (preferably 2GB of RAM).
4.1 ROS Installation
Install ROS on both machines:
git clone https://github.com/linorobot/rosme
cd rosme
./install
The installer automatically detects the machine's operating system and architecture so you don't have to worry which version of ROS to install.
4.2 ROS Packages Installation
4.2.1 Install the following on the development machine:
cd  ~/catkin_ws/src
git clone https://github.com/linorobot/lino_pid
git clone https://github.com/linorobot/lino_msgs
git clone https://github.com/linorobot/lino_visualize
cd .. && catkin_make
4.2.2 Install Linorobot on robot's computer(robot base):
git clone https://github.com/linorobot/lino_install
cd lino_install
./install mecanum kinect
This installs the robot base's firmware, navigation software, and hardware/sensor drivers.
4.2.3 Install O’nine’s package on both machines:
cd
git clone https://github.com/grassjelly/onine_install
cd onine_install
./install
This installs the robotic arm's firmware, kinematics solver, and Onine's autonomous tasks.
4.2.4 Install alexa_tasker:
cd ~/onine_ws/src
git clone https://github.com/grassjelly/onine_alexa
cd
catkin_make
This downloads the MQTT client that links the O'nine and alexa. The package also contains the NodeJS app that will be compressed as a zip file and uploaded in AWS Lambda.
5. Software Setup5.1 Setting Up Alexa Skill
5.1.1 Sign Up and Log In
Create an Alexa Developer Account here and click 'Start a Skill':
Key In your email address and password:
5.1.2 Start an Alexa Skill
Click 'Get Started' Under Alexa Skills kit.
Click 'Add a New Skill' at the top right of the window:
5.1.3 Skill Information
Tick 'Custom Interaction Model' under Skill Type.
Key in the name of your skill (optionally your robot name) under 'Name'.
Key in the invocation name of your skill (name to activate your skill) under 'Invocation Name'.
Click 'Next'.
5.1.4 Interaction Model
Copy and paste the codes from https://github.com/grassjelly/onine_alexa/blob/master/lamda/assets/schema.json to 'Intent Schema'.
Copy and paste the codes from https://github.com/grassjelly/onine_alexa/blob/master/lamda/assets/utterances.txt to 'Sample Utterances'.
Click 'Next'.
5.1.5 Skill Configuration
Copy your App Skill ID from the top left corner and skip to step 5.2 to create a Lambda Function. Take note of Amazon Resource Name once you're done creating the function.
Tick 'AWS Lambda ARN' and key in your ARN on the default tab.
Click 'Next'.
5.1.6 Testing the skill
Key in the voice command under 'Enter Utterance' and click ' Ask <skill name>'
You can check if your Skill works if there's a reply under 'Service Response'.
5.2 Setting Up Lambda Function
5.2.1 Sign Up and Log In
Create an AWS Lamda account here and click 'Sign In to Console' at the top right of the window:
Key in your email address and password.
5.2.2 Create Lambda Function
Click 'Create Function' at the top right of the window to start making the Lambda function.
Choose 'NodeJS 4.3' under Runtime*.
Choose 'Choose an existing role' under Role*.
Choose 'lambda_basic_execution' under Existing Role*.
Click 'Create Function'.
5.2.3 Link up Alexa
Add a trigger and Choose 'Alexa Skills Kit'
Key in your Alexa Skill 'skill id' under Skill ID.
then click 'Add'.
5.2.4 Upload the app
Before creating the function, copy and paste your PubNub's Pub-Sub keys to the function code.
cd ~/onine_ws/src/onine_alexa/lambda/app
nano
Now generate the zip file that will be uploaded to AWS Lambda:
cd ~/onine_ws/src/onine_alexa/lambda/app
npm install
./zipme
This will compress the lambda function and node_modules required into a .zip
On Function Code, choose 'Upload a .ZIP File' under Code entry type.
Click 'Upload' and choose Onine.zip that was created earlier to upload.
Click 'Save' at the top right of the window.
Now your Lambda function is done.
5.3 Creating PubNub Account
5.3.1 Sign Up and Log In
Create a PubNub Account here.
Key in your email and password:
5.3.2 Create a new PubNub App
Click on 'Create New APP' at the top right of the window:
Key in your app's name under 'App Name':
5.3.3 Record your pubilsh and subscribe keys.
5.3.4 Key in your publish and subscribe keys on these lines.
5.4 Creating Pusover Notifications
O'nine uses Pushover to send photos to the user's phone. Sign up for an account here and download the app so you can receive photos from O'nine when you ask it to check on something within the house.
5.4.1 Log in to Pushover
and key in your email and password:
Record down your user key once you've successfully logged in.
5.4.2 Create an application
Click on 'Apps & Plugins' at the top of the window. Click 'Create a New Application / API Token' .
Key in the name of the Application under 'Name'.
Choose 'Application' under 'Type'.
Key in any description of the application.
Click 'Create Application'.
Once done, record down your API token.
5.4.3 Copy and paste your app token and user key to O'nine's 'snaptask'.
5.5 Installing the firmwares
5.5.1 uDev Rules
The microcontrollers' serial ports are defined using its static names on the roslaunch files. In order for the serial ports to be remembered and linked to its static names, a uDev rule must be created. Run the uDev tool on the robot's computer.
rosrun lino_udev lino_udev.py
Plug in robot base's Teensy board and key in "linobase". Do the same thing for the vertical lift circuit and name it as "oninearm". Save your uDev rules by pressing CTRL+C.
Copy the saved udev rules to /etc/udev/rules.d:
sudo cp 58-lino.rules /etc/udev/rules.d/58-lino.rules
Restart udev:
sudo service udev reloadsudo service udev restart
Confirm if the uDev rules worked:
ls /dev/linobase
ls /dev/oninearm
If it the ports were not detected, restart the robot's computer and check again.
5.5.2 Upload robot base's firmware
Before uploading the robot base's firmware, you have to define your components' specifications like wheel diamater, encoder's PPR, etc. Click here to configure your robot.
Plug-in the robot base's Teensy board to the robot's computer and run:
roscd linorobot/firmware/teensy
platformio run --target upload
5.5.3 Upload vertical lift's firmware
Plug-in the vertical lift's Teensy board to the robot's computer and run:
cd
platformio run --target upload
5.5.4 Upload robot controller's firmware
Plug-in the Arduino Uno to the robot's computer and run:
cd
platformio run --target upload
Remember to unplug the Arduino Uno after uploading the codes as the received data is relayed through the Vertical Lift's Teensy board using serial communication.
5.6 Editing Linorobot's codes
You have to edit a few lines in Linorobot's (robot base) launch files to add the drivers required to run Onine.
5.6.1 Append the following after this line in bringup.launch.
<node pkg="rosserial_python" name="rosserial_onine" type="serial_node.py" output="screen">
        <param name="port" value="/dev/oninearm" />
        <param name="baud" value="115200" />
    </node>
    <param name="robot_description" textfile="$(find onine_description)/urdf/onine.urdf"/>
    <node name="robot_state_publisher" pkg="robot_state_publisher" type="robot_state_publisher" respawn="true" output="screen" />
This adds the software package required to talk to vertical lift's microcontroller and Onine's define the Onine's transforms (location of Onine's mechanical parts in 3D space).
5.6.2 Change this line to:
<node pkg="tf" type="static_transform_publisher" name="base_link_to_laser" args="0.065 0 0 0 0 0 /base_link /laser 100"/>
This is to create a virtual frame that will be used to translate the point cloud data read from the Kinect into a 2D laser scan data.
5.6.3 Comment out this line as the transforms for this link is already defined in Onine's URDF file.
5.6.4 Replace the following lines to:
   <node name="pointcloud_to_laserscan" pkg="pointcloud_to_laserscan" type="pointcloud_to_laserscan_node" output="screen">
        <remap from="cloud_in" to="/camera/depth/points"/>
        <param name="target_frame" value="laser" />
        <param name="range_max" value="4.0" />
    </node>
This runs the software package to translate the pointcloud data read from the Kinect into a 2D laser scan data.
5.6.5 Replace Linorobot's base reference frame from base_link to base_footprint:
Change from 'base_link' to 'base_footprint' on the following:
linorobot/param/navigation/global_costmap_params.yaml
linorobot/param/navigation/local_costmap_params.yaml
linorobot/src/lino_base_node.cpp - line 90
linorobot/src/lino_base_node.cpp - lino 111
5.6.6 Recompile the odometry node:
cd ~/linorobot_ws
catkin_make
5.7 Setting up O'nine's object detector
To make it easier for O'nine to detect objects, it uses AR tags to distinguish objects of interest when performing pick and place tasks. Similar concept as these robots:
Print the image below and paste it on the object you want O'nine to pick-up. Image's dimension should be 2cm x 2cm. These numbers are arbitrary, just remember to change the dimension on Onine's tracker launch file.
The perception software used is http://wiki.ros.org/ar_track_alvar . This can be easily replaced if you prefer using your own object detection software or use some other ROS compatible packages like:
http://wiki.ros.org/find_object_2d
http://wiki.ros.org/tabletop_object_detector
6. Running the demoMake sure you configure your network before starting the demo. Check out this ROS network for more comprehensive tutorial.
6.1 Creating the map
O'nine uses a pre-created map to localize itself and plan its path when navigating around the house. Run the following to create a map:
On the robot’s computer, open 2 new terminal windows. Run bringup.launch:
roslaunch linorobot bringup.launch
Run slam.launch:
roslaunch linorobot slam.launch
On your development computer, open 2 new terminal windows: Run teleop_twist_keyboard:
rosrun teleop_twist_keyboard teleop_twist_keyboard.py
Run rviz:
roscd lino_visualize/rvizrviz -d slam.rviz
Using teleop_twist_keyboard, drive the robot around the area you want to map.
Once you are done mapping, save the map by running map_server on the robot's computer:
rosrun map_server map_saver -f ~/linorobot_ws/src/linorobot/maps/map
Check if map.pgm and map.yaml has been saved:
roscd linorobot/maps
ls -a map.pgm map.yaml
Change the invoked map on navigate.launch to load your own map. Change 'house.yaml' to 'map.yaml'.
6.2 Getting target goal coordinates
When you ask O'nine to perform a task that requires autonomous navigation within the house, it has to know the coordinates of the point where it has to do the job.
You can echo these coordinates by subscribing to move_base_simple/goal and pointing the target location in Rviz.
SSH to the robot computer and run the following:
Run bringup.launch:
roslaunch linorobot bringup.launch
On another terminal run the navigation stack:
roslaunch linorobot navigate.launch
Run Rviz on your development computer:
roscd lino_visualize/rviz
rviz -d navigate.rviz
Open another terminal on your development computer and run:
rostopic echo move_base_simple/goal
This will echo the coordinates and heading of the target pose that you will click on Rviz.
On Rviz, click the point that is approximately 1 meter away from where you want the robot to perform the task and drag towards where the robot is supposed to face when it has reached it's goal. (1 box in Rviz is equals to 1 square meter).
Copy the coordinates on the window where you echo 'move_base_simple/goal'
Edit onine/onine_apps/scripts/fishtask.py and replace Point(x,y,z) with position/x position/y, and position/z from the echoed values. Replace Quaternion(x,y,z,w) with orientation/x, orientation/y, orientation/z, and orientation/w from the echoed values.
6.3 Running O'nine
6.3.1 Open a new terminal on the development computer and run the ROSCORE:
roscore
Open three new terminals on the development computer and SSH to the robot computer.
6.3.2 Run robot base's and robotic arm's driver:
roslaunch linorobot bringup.launch
6.3.3 Run the navigation software on the second terminal:
roslaunch linorobot navigate.launch
6.3.4 Run the object detection software on the third terminal:
roslaunch onine_apps ar_tracker.launch
On the development computer open two new terminals.
6.3.5 Run MoveIt software:
roslaunch onine_moveit_config demo.launch
This will run all the software required to move the robotic arm and open Rviz for data visualization.
6.3.6 Run the PubNub client which launches the autonomous task upon voice command through Amazon Echo Dot:
rosrun onine_alexa alexa_tasker.py
6.3.7 Before talking to executing voice commands, you have to help O'nine localize relative to the map.
On Rviz, click '2D Post Estimate' and click on the map the approximate location of the robot and drag towards O'nine's current heading.
Once O'nine is localized, you're now ready to command Alexa to ask Onine to perform tasks.
Have fun with your new personal home assistant robot!
7. Future Works7.1 O'nine simulation model
Building the hardware can be time consuming and tedious. I'm planning to create a Gazebo simulation model so that users can play around with O'nine without the need of a hardware. This way, O'nine's Alexa Custom skill can be tried purely with software.
7.2 Better computing power
The first ARM board I used to run O'nine was an Nvidia Jetson TK1 which comes in nifty for computer vision applications. Due to power reasons I replaced it with an Odroid XU4 as it only requires 5V and has a smaller form factor. I'm currently eyeing on a Rock64 board which has 4GB of RAM and hopefully get more juice to run more applications concurrently. The current setup requires to offload some of the applications to my laptop and has to be hardwired to the dev board (ethernet cable) as there's a huge stream of data running across both machines.


_ztBMuBhMHo.jpg?auto=compress%2Cformat&w=48&h=48&fit=fill&bg=ffffff)


_3u05Tpwasz.png?auto=compress%2Cformat&w=40&h=40&fit=fillmax&bg=fff&dpr=2)
Comments
Please log in or sign up to comment.