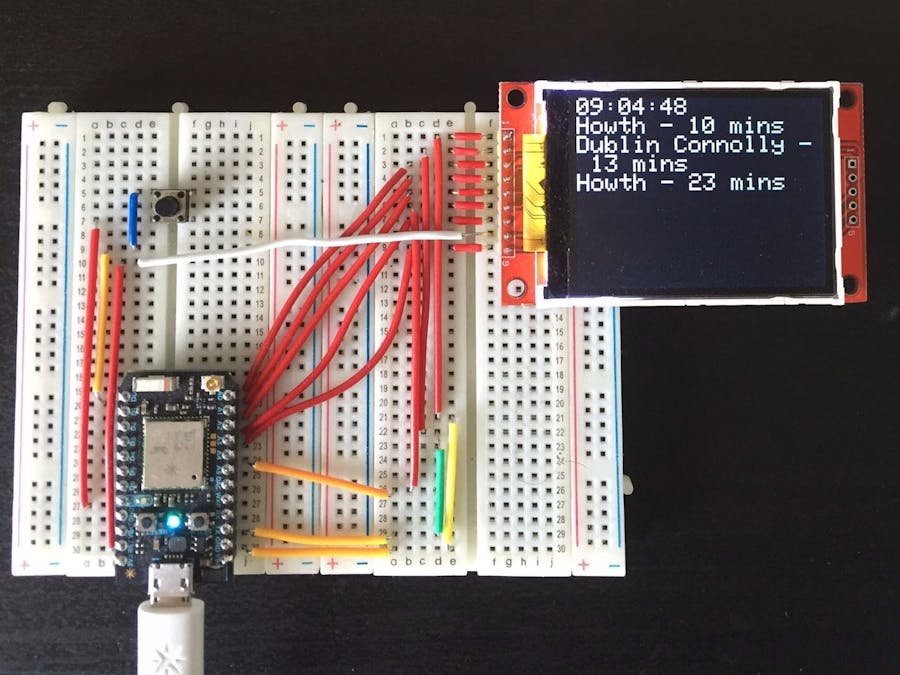
Most mornings I'm rushing out the door trying to catch my train to work. I'm not a morning person and after I've showered, dressed and packed my bag I usually fumble around on my phone trying to open an app to get the train timetable. Every second is precious and too many seconds messing around with my phone have ended up in missed trains.
After I had tinkered around with my Particle Photon abit, I saw an opportunity to make my morning routine easier by creating a ticker board for my nearby station and customising it to exactly what I need. A passively updating screen that can show me the how long until the train will arrive. ally ends in a mad dash to the station to catch the train on time.
RequirementsThere were a few things that I wanted this project to do. The main one was to display the trains arriving to my station at my platform, this was the one essential thing that it had to do.
To make my life a little bit easier I wanted it to be a total hands off experience in the mornings. So I decided I wanted it to refresh automatically. This meant that I could turn it on when I got up and quickly glance at it while I was getting ready, allowing me to busy myself with getting prepared and not worry about checking the time.
The last requirement that I wanted was that I wanted a way that I could refresh the ticker manually. Because the station is so close to my house, I usually grab one if I'm heading into the city. It makes sense to automatically refresh in the mornings but aside from then, there is no other time I need it to refresh constantly. I wanted to implement a manual refresh I could use in those once off, unpredictable times that I would be getting the train.
BuildInitially I used a 0.96" OLED screen that I received in my Particle Maker Kit. This used the Adafruit SSD1306 library. I switched to using a 2.2" TFT panel later due to the bigger size. This screen uses the Adafruit ILI9340 instead. I've included both versions in the Github repo for reference.
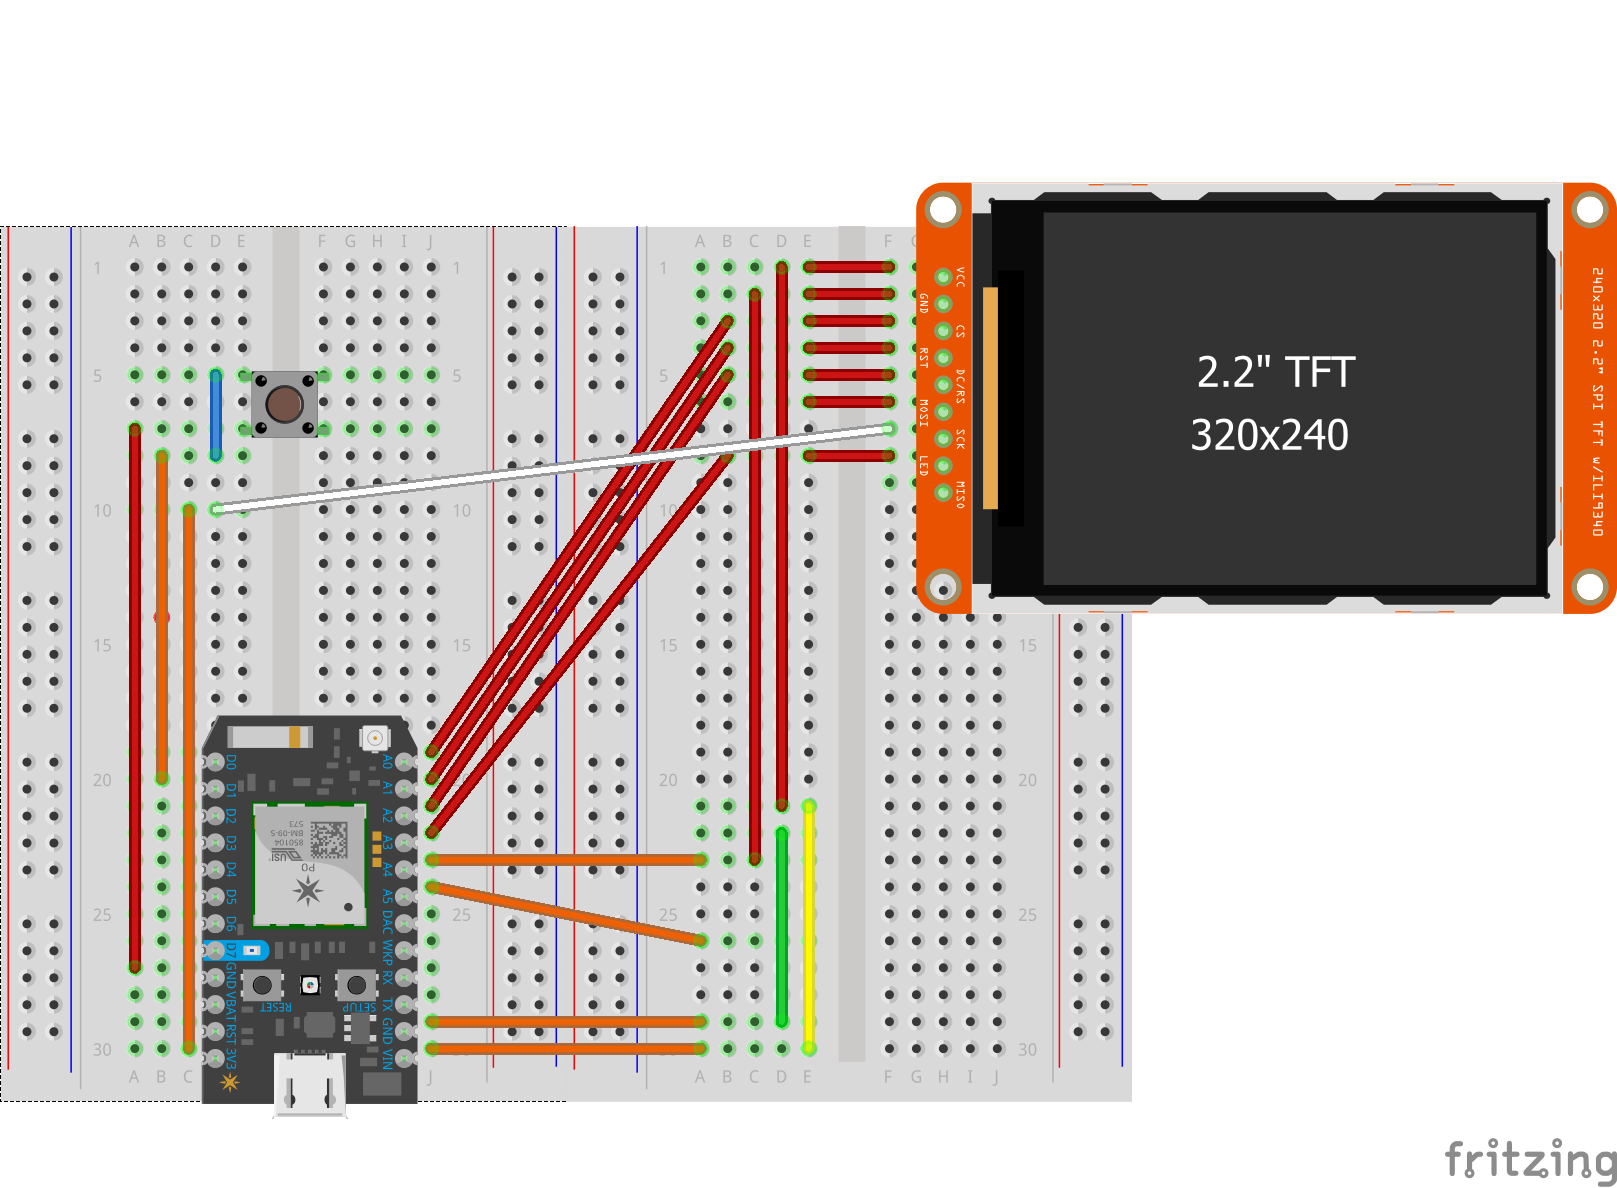
The set up is simple
Button Connections
- Button 1 to D1
- Button 2 to GND
Screen Connections(ILI9340)
- CS to A0
- RESET to A1
- CD/RS to A2
- SCK to A3
- SD0/MISO to A4
- SDI/MOSIto A5
- GND to GND
- VCC to VIN
- LED to 3V3
You can check out the Fritzing diagram attached for this exact configuration.
If you are using a SSD1306 compatible screen. These are the connections to use
Screen Connections(SSD1306)
- DC to D3
- CS to D4
- RST to D5
- D1 to A5
- D0 to A3
- GND to GND
- VCC to 3V3
Photon Code
Once the you have the pins connected and the screen working the rest of the code is straightforward.
The code uses three libraries which are imported at the start
- Adafruit_SSD1306
- Adafruit_GFX
- HttpClient
The first two are related to the display. If you are using the SSD1306 compatible screen then you must replace the Adafruit_ILI9340 library with the Adafruit_SSD1306 library.
Quick note, if you are building using the Particle IDE, you can import the libraries from there. If you are using the Particle Dev desktop app, I’ve included the libraries in my Github repo.
The HTTP library is used for the GET request to the Node server.
setup()void setup() {
Serial.begin(9600);
display.begin();
pinMode(switchPin, INPUT_PULLUP);
Time.zone(+1); //set timezone for bst
display.setRotation(3); // rotate screen for landscape orientation
display.fillScreen(ILI9340_YELLOW); // flash screen yellow to ensure screen is working
getTrainTime(); //display nextTrainTime on startup to make sure its working correctly, then clear the display
}
In the setup, I turn on the screen and ensure that it is connected properly by flashing yellow on the screen.
The inbuilt Photon time library doesn’t account for daylight savings, so I adjust the timezone to account for BST.
After the screen is connected and the timezone has been set, the getTrainTime() method is called to display the current trains due.
loop()void loop() {
if(Time.weekday() >= 2 && Time.weekday() <= 6) { //check to make sure it is a weekday
if(Time.hour() == 8) { // check if the hour is 8:XX AM
if (nextTime > millis()) {
return;
} else {
getTrainTime();
nextTime = millis() + 180000;
}
}
}
if(digitalRead(switchPin) == LOW) {
getTrainTime();
}
}
The loop handles refreshing the data every three minutes in the morning. First, it checks if it is weekday. The Photon time library sets Sunday as the first day of the week, so we check of the day is between day two(Monday) and day six(Friday). The library uses counts the hours between 1-24, so we check the hour is 8 (ie 8AM). Once these conditions have been met, there is a check for the last time the data was refreshed. This is done by adding three seconds(180,000 ms = 3 s) onto the the current time(resulting in 'nextTime') and checking if the current time has passed it. If it hasn’t the loop starts again, if it has then we connect to the Node server and get the latest train times. We then calculate the next time to refresh the data(the current time plus three seconds).
getTrainTime()void getTrainTime() {
// GET request
request.hostname = "floating-ravine-80137.herokuapp.com";
request.port = 80;
request.path = "/Sandymount/Northbound/30";
http.get(request, response, headers);
// Response Status
// Serial.print("Application>\tResponse status: ");
// Serial.println(response.status);
// Response Body
// Serial.print("Application>\tHTTP Response Body: ");
// Serial.println(response.body);
//Print result on the OLED screen
printText(response.body);
}
The get train time method sets up the variables needed for the GET request
- Host to connect to
- Port
- Path
The path is the most important of these as it tells the Node server what station to get the data from. Its broken down into three parts - station, direction and time
Finally, the request is sent and the response passed to the printText() method to display on the screen.
printText()void printText(String text) {
display.fillScreen(ILI9340_BLACK);
display.setCursor(0, 0);
display.setTextColor(ILI9340_WHITE);
display.setTextSize(3);
display.println(text);
}
This method prints the data received from the Node server on the attached display. There is some small set up
- Clear the display
- Set the cursor to start displaying from the top left of the screen
- Set the text color
- Set the font size
These can be changed to alter the appearance of the text on screen. To render the text on the display, println() is used.
Node ServerThe Irish Rail API is a RESTful one which simplifies the requests but it does turn XML. In order to consume the response easily, I decided to use a small ExpressJS server running on Heroku.
The server has one end point /:station/:direction/:time. Each of these values is a variable, allowing you to easily change them. This was useful for making tweaks after testing.
Initially, I didn't have the :direction parameter but after testing it for a week, it made sense to filter out the trains going in the direction I wasn't.
app.get('/:station/:direction/:time', function (req, res) {
 getTrainTime(req.params.station, req.params.direction, req.params.time, function(err, result){
   if(err){
     res.status(500).send({ error: 'Something went wrong!' });
   } else {
     res.status(200).send(result);
   }
});
});
The meat of the server is in the the getTrainTime method. When you hit the /:station/:direction/:time endpoint, it’s invoked with a callback that is returned to the photon. I decided to do the text formatting on the server rather than on the Photon as it’s easier done there.
var getTrainTime = function(station, direction, time, callback) {
 request.post("http://api.irishrail.ie/realtime/realtime.asmx/getStationDataByNameXML_withNumMins")
   .send('StationDesc=' + station)
   .send('NumMins=' + time)
   .accept('xml')
   .parse(xml2jsParser) // add the parser function
   .end(function(err, res){
     if (err || !res.ok) {
       callback(err);
     } else {
       var res = _.chain(res.body.ArrayOfObjStationData.objStationData)
               .filter({'Direction' : [direction]})
               .transform(function(result, value, key){
                 result[key]= '\n' +value.Destination + ' - ' + value.Duein + ' mins'
               }).value();
       var resStr = getCurrentTime();
       if(res.length > 0){
         res.forEach(function(value) {
           resStr += value;
         });
       } else {
         resStr += '\n' + 'No data available'
       }
       console.log(resStr)
       callback(null, resStr);
     }
   });
}
The Irish Rail API returns an array (ArrayOfObjStationData) contain XML objects of each train (objStationData) as seen below
<ArrayOfObjStationData>
 <objStationData>
   <Servertime>2016-10-12T22:39:57.78</Servertime>
   <Traincode>E833</Traincode>
   <Stationfullname>Sandymount</Stationfullname>
   <Stationcode>SMONT</Stationcode>
   <Querytime>22:39:57</Querytime>
   <Traindate>12 Oct 2016</Traindate>
   <Origin>Greystones</Origin>
   <Destination>Malahide</Destination>
   <Origintime>22:00</Origintime>
   <Destinationtime>23:20</Destinationtime>
   <Status>En Route</Status>
   <Lastlocation>Arrived Booterstown</Lastlocation>
   <Duein>4</Duein>
   <Late>1</Late>
   <Exparrival>22:42</Exparrival>
   <Expdepart>22:43</Expdepart>
   <Scharrival>22:41</Scharrival>
   <Schdepart>22:42</Schdepart>
   <Direction>Northbound</Direction>
   <Traintype>DART</Traintype>
   <Locationtype>S</Locationtype>
 </objStationData>
</ArrayOfObjStationData>
I only wanted to display the final destination and the time it will arrive in my station. These are contained in the <Destination/> and <Exparrival/> elements.<ArrayOfObjStationData>.
Lodash was used to filter the data. Leaving only the trains going in the direction I needed (ie the value in the :direction variable). The response is transformed into a string array with the destination and arrival time, putting a newline break at the beginning to make it display nicer on the photon.
After testing it like this for a few days, I realised I needed to know the current time when looking at the ticker. I created the getCurrentTime() method for this. There is some string manipulating to ensure the format is always HH:MM:SS.
The current time is added to the beginning of the string. The filtered data is looped though, adding each element to the final string we will return to the and display via the photon.
HerokuI chose Heroku as a hosting solution mainly due to its awesome free tier. On this 'price' plan, unverified accounts get 550 free hours per month and verified accounts get 1,000 (This is shared across all servers tied to your account). The server will sleep after 30 minutes of inactivity so this small little server which is used maybe an hour a day will never reach those limits. The server was easy to set up and update. Heroku is something I'll definitely be using in other projects.
ConclusionI've now had the train ticker set up in my room for the past month and it has been a great help. Its much more useful than checking an app on my phone. I'm certain that my punctuality has gotten better since I've set it up! There might still be a few mad dashes to the train but the amount of missed trains has gone down considerably.
There are one or two improvements that I'm thinking of making to the project. The first is to get a bigger screen so that I could possibly mount it on my wall to run 24/7. The second would be to get something to house the photon in instead of having it bare on the breadboard.


_3u05Tpwasz.png?auto=compress%2Cformat&w=40&h=40&fit=fillmax&bg=fff&dpr=2)
Comments
Please log in or sign up to comment.