


Hardware components | ||||||
 |
| × | 1 | |||
 |
| × | 1 | |||
 |
| × | 1 | |||
Software apps and online services | ||||||
| ||||||
 |
| |||||
| ||||||
In this hands on lab, you will build and connect you temperature sensing device to the Arduino IOT Cloud.
This is the second in a series of labs in the SMART Cities Program and introduces a simple application of the Internet of Things with the ability to send data across the Internet to the Cloud.
There are five parts to this tutorial:
- Installing the Arduino Create plugin
- Assembling the circuit
- Setting up your board in the cloud
- Setting up the IOT Cloud
- Adding your code
A quick tutorial for installing the plugin can be found Here
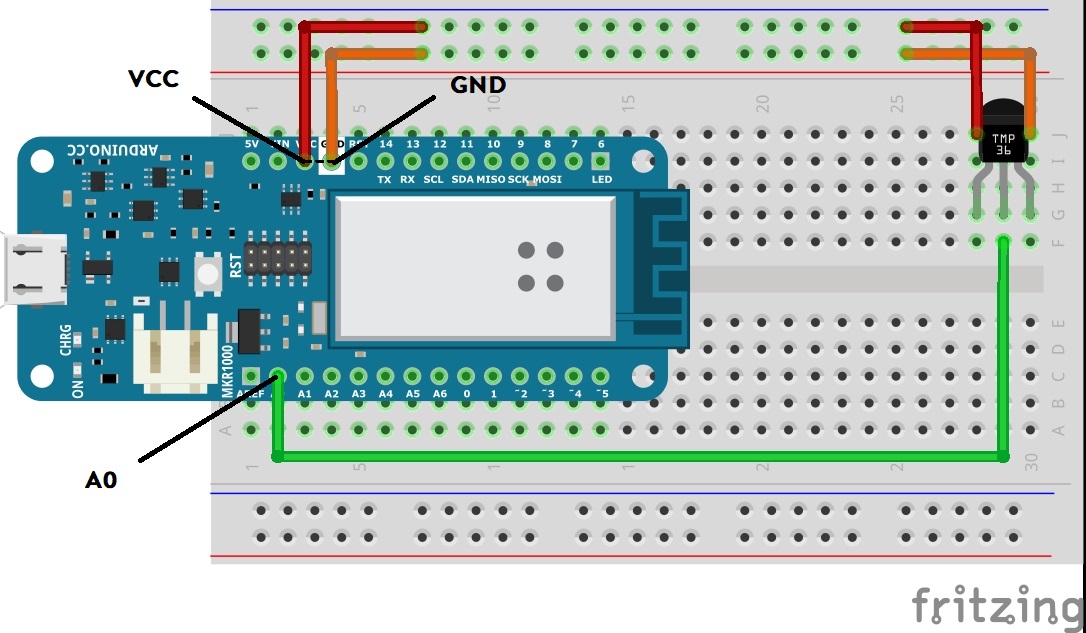
Using the below wiring diagram as a reference assemble your device
Note:
- The temperature sensor (TMP36) is connected to pin A0
- When inserting the Temperature sensor make sure that the flat side is facing towards you.
To configure your board navigate to Arduino Create and complete the following steps (highlighted in orange)
You will now see your MKR1000 board listed and named "MyThing" as shown below (circled in orange)
This completes the registration of the board in the cloud
Part 4 - Setting up the IOT CloudWith the device registered in the cloud navigate to Arduino Create and complete the following steps (highlighted in orange)
This completes the setup of the device in the Arduino IOT Cloud.
Part 5 - Adding your codeStep 1 -On line 18 enter the Temperature Sensor variables (Snippet 1)
// Temperature Sensor variables
int sensorPin = A0;
int sensorValue = 0;
int Dres = 1024;
int VCC = 3300;          // set VCC voltage milliVolts
int offset = 500;        // set tolerance of 500 milliVolts
int scaling = 10;        // set the voltage scaling at 10mM / deg C
float voltage = 0.0;     // set the initial voltage to 0
Step 2 - In void setup () on line 36 add the following setup functions (Snippet 2)
// Set 10bit read resolution
analogReadResolution(10);
Step 3 - In On line 59 add the main code (Snippet 3)
 // read the value from the sensor:
 sensorValue = analogRead(sensorPin);
 Serial.print("sensorValue = ");
 Serial.print(sensorValue);
 // Calculate the voltage
 voltage = sensorValue * (VCC/Dres); // milliVolts
 Serial.print(" voltage = ");
 Serial.print(voltage);
 Serial.print(" VCC = ");
 Serial.print(VCC);
 // Calculate the temperature
 temperature = (voltage - offset ) / scaling;
 Serial.print(" temperature(C) = ");
 Serial.println(temperature);
 delay(1000);
Step 4 - Navigate to the Secret tab, enter your Wifi Network Name and password
Step 5 - Save and Verify the code
Step 6 - Upload the code
You have now completed the coding of your device !!!
The Final ResultOn completion the device will display the temperature on the Arduino IOT Cloud dashboard.


Comments