This is a project of three students from EPITA:
- Joël J. Présent (
joel.present) - Guillaume Pagnoux (
pagnou_g) - Maxence Caron-Lasne (
caron-_m)
Please note that no part of this project has been submitted to a previous MakeWithAda competition.
Presentation of Ada_MorseThis project is coded in Ada and allows users to type Morse code on a STM32F429 board.
The user simply has to press the button on the board and alternate between short presses, long presses and pauses; and the text gets displayed progressively on the board's screen!
A short press (which lasts less than one second) corresponds to a dot (.).
A long press (which lasts at least one second) corresponds to a dash (-).
A pause (a moment lasting more than two seconds when the button is not pressed) corresponds to a slash (/), and is used for separating letters or words.
We developed this project because we thought it would be amusing and original to make something which lets you write actual text with just one button.
ExampleIf you want to display the text “JP 1” on the screen (which is .---/.--.//.---- in Morse), you'll have to press the button in the following way:
- One short press followed by three long presses to type the J (
.---). - A pause to validate the J.
- One short press, two long presses and one short press to type the P (
.--.). - A pause to validate the P.
- Another pause to insert a space.
- One short press and four long presses to type the 1 (
.----). - A pause to validate the 1.
The characters get displayed on the screen progressively as they are validated.
Software architectureThe source code of this project is made up of several Ada packages that can be found in the src/ directory.
Let's talk about the generated files first: the stm32f4*.ads files were generated by GPS (Gnat Programming Studio) and are specific to the STM32F4 boards. Other files that deal with how the board functions on a hardware level were generated by GPS: registers.ads, leds.ad*, button.ad*, last_chance_handler.ad*, and driver.ad*.
Please note that these files have been slightly edited, notably to fix the indentation and to replace the states of the button from Clockwise/CounterClockwise to Released/Pushed.
Among those generated files, the Button package handles the basic pressing of the button, and the LEDs package lets you control the LEDs of the board.
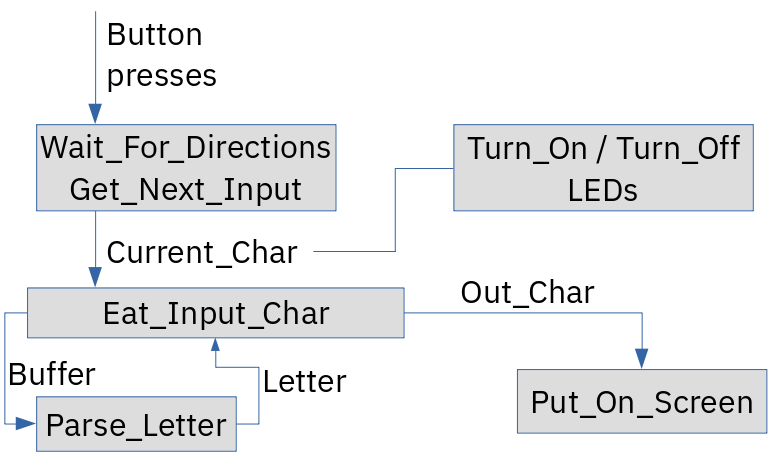
Then, the Lexer package defines the Get_Next_Input function which uses a clock to determine whether the changes in presses of the button correspond to a short input (.), a long input (-), a pause (/), an invalid input (Error) or just Empty.
The Morse_Code package defines most of the functions dealing with Morse code snippets.
Its most important feature is the Parse_Letter function which turns a piece of Morse code into the corresponding letter. For instance, if you give this function the Morse code .---, it will return the character ‘J’.
Please note that in the context of this project, digits and characters with an official Morse representation are viewed as “letters”.
The Parser package defines the Eat_Input_Char function which takes dots, dashes and slashes as argument and fills a buffer with dots and dashes.
When this function is encountered, the buffer is “flushed”: its content (a series of dots and dashes) is converted to a letter using the Parse_Letter function and the buffer gets emptied.
Last but not least, the Screen package defines the Put_On_Screen procedure which displays a character on the screen if it is valid, or displays “Error” on an error.
The code that is executed on the board is (unsurprisingly) the Main procedure.
First, a prompt (> ) is displayed on the screen and the LEDs are initialized.
Then, in an endless loop, the current status of the button is determined with Wait_For_Direction from the Button package, then Get_Next_Input converts this status into a Morse character (dot, dash, slash…) called Current_Char.
To make sure that we entered the correct Morse character, LEDs turn on and off depending on the value of Current_Char.
This character is then passed to Eat_Input_Char which fills a buffer if Current_Char is a dot or a dash; if Current_Char is a slash, the content of the buffer is decoded as some Morse code into a letter which is then displayed on screen with the Put_On_Screen function.
In order to avoid bugs, we rely on various features of Ada: strong typing, contracts (notably preconditions and postconditions), etc.
We also coded many tests in the tests directory that can be run via a test suite.
Most of the code has been written by us, but on the basis of an example generated by GPS (Gnat Programming Studio). Most notably, the *.gpr and src/stm32f4*.ads files were generated.
However, the project relies on some external code and tools:
- Gnat for
arm-eabiandx86_64-linux-gnutoolchains; - Ada_Drivers_Library from AdaCore containing the
boards/stm32f429_discovery/objdirectory.
We'd advise you to follow this tutorial to set up the build.
Of course, you'll also need a computer (in our case, Linux) and a STM32F429 board that you shall connect to your computer with a USB cable.
Build the projectThe source code of the project is hosted on a GitHub repository.
git clone https://github.com/JoelJPresent/ada_morse.git
cd ada_morse
git clone https://github.com/AdaCore/Ada_Drivers_Library.git
python ./Ada_Drivers_Library/scripts/install_dependencies.py
python ./Ada_Drivers_Library/scripts/project_wizard.py
# Choose the STM32F429 option.
make
Run make flash to flash the board and make test to launch the test suite.


_9nsOFQ7ama.png?auto=compress%2Cformat&w=48&h=48&fit=fill&bg=ffffff)

Comments
Please log in or sign up to comment.