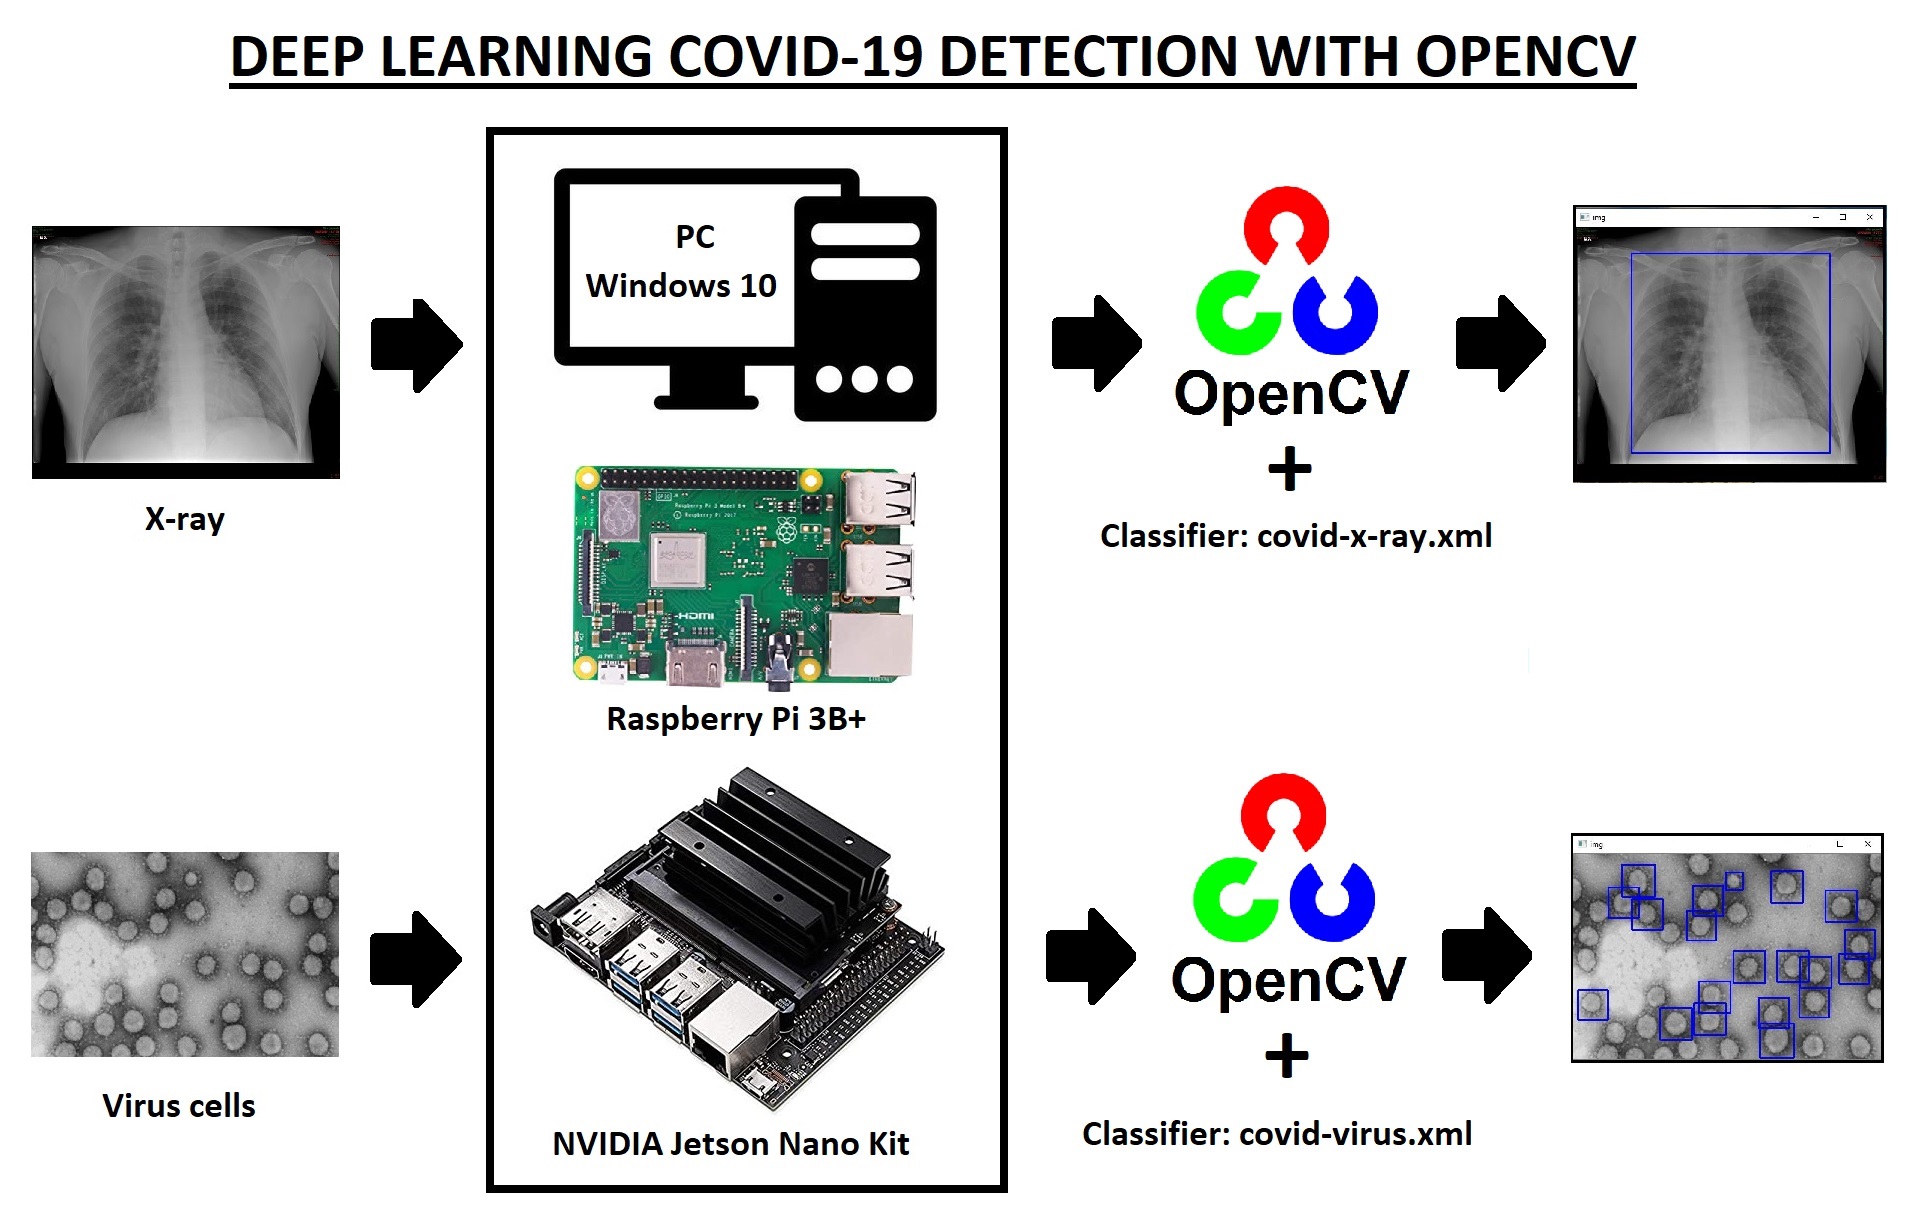
Coronavirus disease 2019 (COVID-19) is an infectious disease caused by severe acute respiratory syndrome coronavirus 2 (SARS-CoV-2). The disease was first identified in December 2019 in Wuhan, the capital of China's Hubei province, and has since spread globally, resulting in the ongoing 2019–20 coronavirus pandemic. Common symptoms include fever, cough, and shortness of breath mainly. https://en.wikipedia.org/wiki/Coronavirus_disease_2019
The time from exposure to onset of symptoms is typically around five days but may range from two to fourteen days. While the majority of cases result in mild symptoms, some progress to viral pneumonia and multi-organ failure. To make this project I was inspired by one of the resources of this contest: https://www.pyimagesearch.com/2020/03/16/detecting-covid-19-in-x-ray-images-with-keras-tensorflow-and-deep-learning/
Goals:
- 1 --> Make the Classifier: covid-x-ray.xml
- 2 --> Make the Classifier: covid-virus.xml
- 3 --> Testing the Classifiers on the PC
- 4 --> Testing the Classifiers on the Raspberry Pi 3B+
- 5 --> Testing the Classifiers on the NVIDIA Jetson Nano Kit
Reference: https://github.com/sauhaardac/Haar-Training/tree/master/training
We can make our own classifiers for recognition of lungs damaged by COVID-19 virus cells. Following are the steps covered in the next sections to be successful in your classifier.
- A --> Collecting Image Database
- B --> Arranging Negative Images
- C --> Crop & Mark Positive Images
- D --> Creating a vector of positive images
- E --> Haar-Training
- F --> Creating the XML File
Notes: 1) In the download section you can get all the files that I will mention below, or you can do click here: https://github.com/guillengap/covid-19-opencv ; and 2) Once downloaded, we will use the files shown in the folder: Y-ray
--> Step A: Collecting Image Database
I recommend you to collect 100 positive images and 100 negative images at last. I suggest you check out https://github.com/ieee8023/covid-chestxray-dataset
The positive images are those images that contain the object (e.g. lungs damaged), and negatives are those ones which do not contain the object . Having more number of positive and negative images will normally cause a more accurate classifier.
--> Step B: Arranging Negative Images
Put your background images in folder …\training\negative and run the batch file:
create_list.bat
Running this batch file, you will get a text file each line looks as below:
Later, we need this negative data file for training the classifier.
--> Step C: Crop & Mark Positive Images
We continue with Objectmaker which is straight forward.
In folder ..\training\positive\rawdata put you positive images
In folder ..\training\positive there is a file objectmaker.exe that we need it for marking the objects in positive images.
How to mark objects? Running the file objectmaker.exe you will see two windows like below: one shows the loaded image, and the other one shows the image name.
Click at the top left corner of the object area, and hold the mouse left-key down. While keeping the left-key down, drag the mouse to the bottom right corner of the object.
Now you could be able to see a rectangle that surrounds the object. If you are not happy with your selection press any key (except Spacebar and Enter) to undo your selection, and try to draw another rectangle again.
If you are happy with the selected rectangle, press SPACE. After that, the rectangle position and its size will appear on the left window.
Repeat steps if there are multiple objects in the current folder. When you finished with the current image, press ENTER to load the next image.
Repeat steps until the entire positive images load one by one, and finished, and a file named info.txt would be created. Within the info.txt there would be some information like below:
--> Step D: Creating a vector of positive images
The next step is packing the object images into a vector-file. In folder ..\training\ there is a batch file named samples_creation.bat
The content of the bath file is:
Main Parameters:
- info positive/info.txt Path for positive info file
- vec vector/facevector.vec Path for the output vector file
- num 100 Number of positive files to be packed in a vector file
- w 24 Width of objects
- h 24 Height of objects
After running the batch file, you will have the file facevector.vec in the folder..\training\vector
--> Step E: Haar-Training
In folder ..\training , you can modify the haartraining.bat
Main Parameters:
- -data cascades Path and for storing the cascade of classifiers
- -vec data/vector.vec Path which points the location of vector file
- -bg negative/bg.txt Path which points to background file
- -npos 100 Number of positive samples ≤ no. positive bmp files
- -nneg 100 Number of negative samples (patches) ≥ npos
- -nstages 18 Number of intended stages for training
- -mem 1024 Quantity of memory assigned in MB
- -mode ALL Look literatures for more info about this parameter
- -w 24 -h 24 Sample size
- -nonsym Use this if your subject is not horizontally symmetrical
Harrtraining.exe file collects a new set of negative samples for each stage, and –nneg sets the limit for the size of the set. It uses the previous stages’ information to determine which of the "candidate samples" are misclassified. Training ends when the ratio of misclassified samples to candidate samples is lower.
--> Step F: Creating the XML File
After finishing Haar-training step, in folder ../training/cascades/ you should have catalogues named from “0” upto “N-1” in which N is the number of stages you already defined in haartraining.bat. Note that I've configured "-nstages 18", however, in the end I got 10 states, this means that these were enough to get our classifier.
Copy all the folders 0..N-1 into the folder ../cascade2xml/data/
Now we should combine all created stages (classifiers) into a single XML file which will be our final file a “cascade of Haar-like classifiers”.
Run the batch file convert.bat at ../cascade2xml/
Which is:
Finally we get the following file: covid-x-ray.xml
Notes: 1) In this section we are going to do the same steps as in section 1; 2) In the download section you can get all the files that I will mention below, or you can do click here: https://github.com/guillengap/covid-19-opencv ; and 3) Once downloaded, we will use the files shown in the folder: Virus-Cells
I downloaded positive images of the COVID-19 virus cells from various official sites such as the following: https://www.msn.com/es-mx/noticias/mundo/las-impactantes-fotos-del-coronavirus-bajo-el-microscopio/ss-BB12ke0f
Below, you can see an image of this classifier:
---> Classifier: covid-x-ray.xml
I will first use this classifier on my Windows 10 64-bit PC. To do this, I will use the Anaconda package, and you can download Anaconda 2020.02 for Windows Installer here: https://www.anaconda.com/distribution/
The program used is Python 3.7.3
covid-x-ray.py
import numpy as np
import cv2

banana_cascade = cv2.CascadeClassifier('covid-x-ray.xml')

img = cv2.imread('covid-005.jpg')
gray = cv2.cvtColor(img, cv2.COLOR_BGR2GRAY)

bananas = banana_cascade.detectMultiScale(gray, 1.3, 5)
for (x,y,w,h) in bananas:
    img = cv2.rectangle(img,(x,y),(x+w,y+h),(255,0,0),2)

cv2.imshow('img',img)
cv2.waitKey(0)
cv2.destroyAllWindows()Tests obtained are shown in the images below:
---> Classifier: covid-virus.xml
covid-virus.py
import numpy as np
import cv2

banana_cascade = cv2.CascadeClassifier('covid-virus.xml')

img = cv2.imread('covid-004.jpg')
gray = cv2.cvtColor(img, cv2.COLOR_BGR2GRAY)

bananas = banana_cascade.detectMultiScale(gray, 1.3, 5)
for (x,y,w,h) in bananas:
    img = cv2.rectangle(img,(x,y),(x+w,y+h),(255,0,0),2)

cv2.imshow('img',img)
cv2.waitKey(0)
cv2.destroyAllWindows()Below you can see the tests carried out:
---> Hardware
What do we need?
The schematic diagram is shown in the figure below:
Resources: 1) Raspberry Pi Beginners Guide: https://www.raspberrypi.org/magpi-issues/Beginners_Guide_v1.pdf ; and 2) 3.5 "Touchscreen ILI9486 User Manual: https://www.waveshare.com/w/upload/1/1e/RPi_LCD_User_Manual_EN.pdf
---> Software
A good tutorial for installing and optimizing OpenCV on our Raspberry Pi is: https://pimylifeup.com/raspberry-pi-opencv/
Installation of the 3.5 "Touchscreen ILI9486:
git clone https://github.com/waveshare/LCD-show.git
cd LCD-show/
chmod +x LCD35-show
./LCD35-showAfter system rebooting, the RPi LCD is ready to use. Para alternar entre la pantalla LCD y HDMI:
cd LCD-show/
./LCD-hdmi
chmod +x LCD35-show
./LCD35-showFor more information, consult the user manual in the previous section. Now we can see our screen like this:
---> Classifier: covid-x-ray.xml
On my Raspberry Pi I have installed Python 2.7.13
covid-x-ray.py
import numpy as np
import cv2

banana_cascade = cv2.CascadeClassifier('covid-x-ray.xml')

img = cv2.imread('covid-005.jpg')
gray = cv2.cvtColor(img, cv2.COLOR_BGR2GRAY)

bananas = banana_cascade.detectMultiScale(gray, 1.3, 5)
for (x,y,w,h) in bananas:
    img = cv2.rectangle(img,(x,y),(x+w,y+h),(255,0,0),2)

cv2.imshow('img',img)
cv2.waitKey(0)
cv2.destroyAllWindows()Below you can see a test with this project
---> Classifier: covid-virus.xml
The code to test our classifier is as follows:
covid-virus.py
import numpy as np
import cv2

banana_cascade = cv2.CascadeClassifier('covid-virus.xml')

img = cv2.imread('covid-004.jpg')
gray = cv2.cvtColor(img, cv2.COLOR_BGR2GRAY)

bananas = banana_cascade.detectMultiScale(gray, 1.3, 5)
for (x,y,w,h) in bananas:
    img = cv2.rectangle(img,(x,y),(x+w,y+h),(255,0,0),2)

cv2.imshow('img',img)
cv2.waitKey(0)
cv2.destroyAllWindows()Video below you can see a test with this project
5.- Testing the Classifiers on the NVIDIA Jetson Nano KitBy default the Ubuntu 18.04 is going to be intslled on our Jetson Nano board.
How to install OpenCV on Jetson Nano? You can get a good tutorial to install OpenCV 4.1 here: https://pysource.com/2019/08/26/install-opencv-4-1-on-nvidia-jetson-nano/
How to check the version of our OpenCV?
$ python
>>> import cv2
>>> cv2.__version__
---> Classifier: covid-x-ray.xml
covid-x-ray.py
import numpy as np
import cv2

banana_cascade = cv2.CascadeClassifier('covid-x-ray.xml')

img = cv2.imread('covid-005.jpg')
gray = cv2.cvtColor(img, cv2.COLOR_BGR2GRAY)

bananas = banana_cascade.detectMultiScale(gray, 1.3, 5)
for (x,y,w,h) in bananas:
    img = cv2.rectangle(img,(x,y),(x+w,y+h),(255,0,0),2)

cv2.imshow('img',img)
cv2.waitKey(0)
cv2.destroyAllWindows()Images tested:
Below you can see a test with this project
---> Classifier: covid-virus.xml
covid-virus.py
import numpy as np
import cv2

banana_cascade = cv2.CascadeClassifier('covid-virus.xml')

img = cv2.imread('covid-004.jpg')
gray = cv2.cvtColor(img, cv2.COLOR_BGR2GRAY)

bananas = banana_cascade.detectMultiScale(gray, 1.3, 5)
for (x,y,w,h) in bananas:
    img = cv2.rectangle(img,(x,y),(x+w,y+h),(255,0,0),2)

cv2.imshow('img',img)
cv2.waitKey(0)
cv2.destroyAllWindows()Images tested:
Video below you can see a test with this project
6.- Conclusion and Recommendations- According to what we have seen, we have met our goals, and made our own classifiers to detect the COVID-19 virus: 1) covid-x-ray.xml and 2) covid-virus.xml
- Detecting COVID-19 in X-ray with OpenCV, I got a high prediction rate, and in the same way happens with detecting COVID-19 Virus Cells with OpenCV. If we want to increase the prediction rate, simply we'll use more samples of positive and negative images and the classifier will be more powerful, however, it will take us longer to obtain it.
- In general terms, we learned how to Install OpenCV, and how to test our classifiers on our Windows 10 PC, and our Raspberry Pi 3B + and Jetson Nano boards. The images processed in the videos were identical and only the data processing time varied.
- By using the screen for Raspberry Pi, I observe that our project is operationally more practical since we can transport it to any destination, simply we replace the power supply with a 5V - 2A battery.


Comments
Please log in or sign up to comment.