


Hardware components | ||||||
 |
| × | 1 | |||
| × | 1 | ||||
 |
| × | 1 | |||
 |
| × | 1 | |||
Recently I've been developing a new project that requires a sensor to be checked at a certain time of day. The unit will be battery powered, I didn't want to be counting time continuously so I opted for a Real Time Clock (RTC) to trigger an interrupt pin at a specific time each day.
I could see many applications for using the RTCs and started to wonder how I would manage them.
As with all Arduino projects there isn't an automatic user interface and I wanted a way to set the clocks without having to set up a board and plug them into the laptop each time so I thought I'd get an LCD with a keypad and build a simple interface to set the RTCs up.
Maybe I could use this code in my other projects or maybe I could just set the RTC before putting it into the project - who knows - but it seemed like a good project.
There was a learning curve:
- I had to learn about LCDs
- I had to learn about Keypads going to one analogue pin
- I discovered an issues with cheaper generic LCD Keypad shields
- I had to learn about manipulating bytes and, as it turned out, initiating them
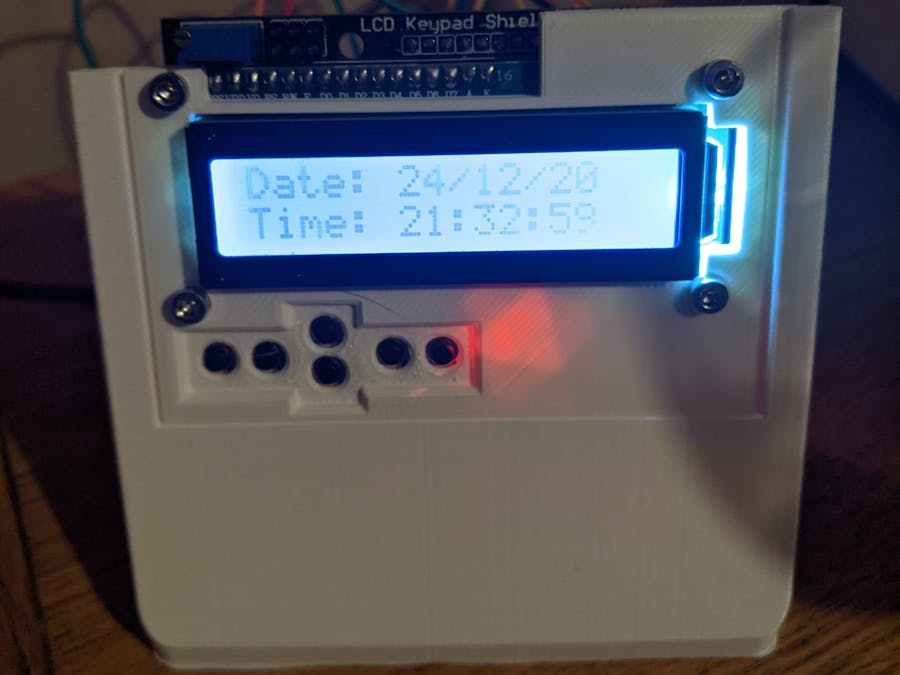
So now I have some code that works and a simple 3D printed housing to hold the shield, Arduino nano and breadboard.
DS3231 RTCThe DS3231 has the ability to store:
- dates using two digit years,
- the current day of the week,
- time in hours, minutes & seconds
- time as 24 hour or 12 hour (with am and pm data)
- an alarm (alarm 1) that can be set from days to seconds and has five different methods of triggering
- an alarm (alarm 2) that can be set from days to minutes and has three different methods of triggering
(See https://www.digikey.co.uk/en/datasheets/maxim-integrated/maxim-integrated-ds3231-ds3231s for more detailed information)
For my application I made a couple of decisions:
- I'm not bothered about 12 hour clocks so I was going to only use the clock in 24 hour mode.
- I only read dates in dd/mm/yy format so I wasn't going to give the user an option to show dates in mm/dd/yy format. If that is your preference then the code is easy to adjust but you would have to pay attention to the sequencing during the date set up routine.
The first decision to be made was the sequencing of options for the user. The LCD has two lines of display so each step had to accommodate that. I didn't want the LCD to scroll a new line up or down each time so I though it would be better if each screen presented had a theme.
When I first created the project I used the following sequences:
- Date & Time
- Alarm 1
- Alarm 2
- Set Date
- Set Time
- Set Alarm 1 On or Off
- Set Alarm 1 Date and/or time
- Set Alarm 1 Method
- Set Alarm 2 On or Off
- Set Alarm 2 Date and/or time
- Set Alarm 2 Method
But this method took a lot of steps to get from simply displaying Alarm 1 back to Date & Time and also from displaying Alarm 2 to setting Alarm 2 so I changed the sequence:
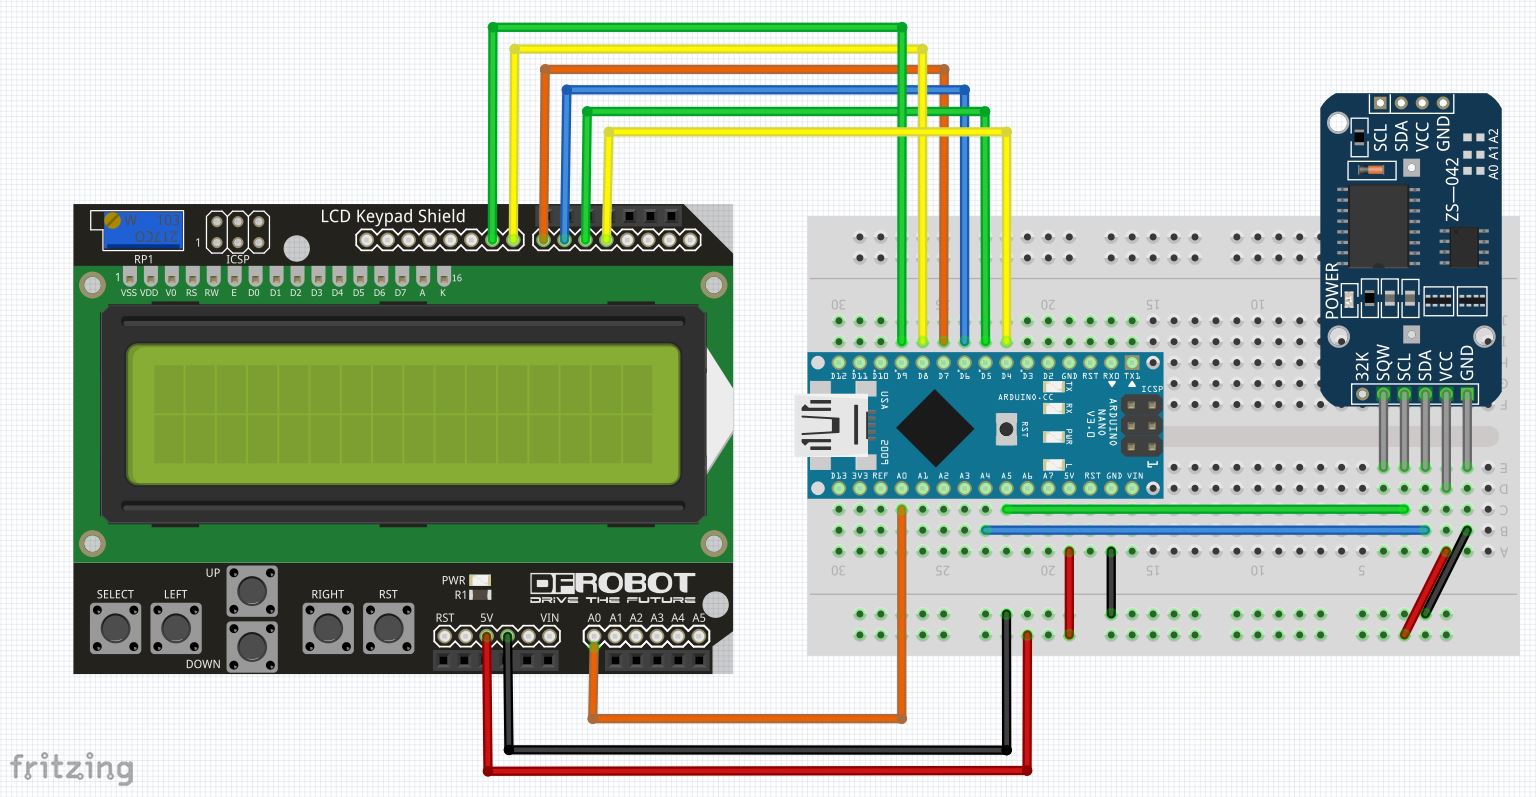
For this project I used the following libraries:
- DS3231 (for the RTC)
- Wire (also for the RTC for the I2C communication)
- LiquidCrystal
I maintained the wiring for the LCD as if it had been plugged into an Arduino UNO so the code for initiating looks like:
#include <DS3231.h>
#include <Wire.h>
#include <LiquidCrystal.h>
DS3231 Clock;
LiquidCrystal lcd(8, 9, 4, 5, 6, 7);
void setup() {
	// Start the lcd and set the cursor
	lcd.begin(16,2);
	lcd.setCursor(0,0);
	// Start the I2C interface
	Wire.begin();
}
Luckily I was able to find all the code I needed for the keypad in the datasheet at https://media.digikey.com/pdf/Data%20Sheets/DFRobot%20PDFs/DFR0009_Web.pdf. There are a lot of videos on YouTube for how these keypads work but essentially each key provides a different voltage to the analogue pin A0 and from the value of this pin the code can determine which button was pressed.
I used the same variables for each of the buttons pressed. There is a lot of information on the internet about managing button bounce, I controlled it with a 50ms debounce delay. To learn more about debounce try this vide:
I also added a variable to store the last button pressed, this avoids the issue of long button presses. Because the Arduino loop runs very often every time it entered the loop after the debounce delay the code would act as if a new button had been pressed without this code.
// check the key press against the previous key press to avoid issues from long key presses
 if (oldKey!=lcd_key) {
   // depending on which button was pushed, we perform an action
   switch (lcd_key)
   {
     case btnRIGHT:
Below is the initial code for the display sequencing, the first block is taken straight from the datasheet:
/ define some values used by the panel and buttons
int lcd_key     = 0;
int adc_key_in  = 0;
const int btnRIGHT = 0;
const int btnUP     =1;
const int btnDOWN   =2;
const int btnLEFT   =3;
const int btnSELECT =4;
const int btnNONE   =5;
int bounceDelay;
int oldKey = 0;
/***************************************************************
* Functions to read the buttons
***************************************************************/
// read the buttons
int read_LCD_buttons()
{
adc_key_in = analogRead(0);      // read the value from the sensor
// my buttons when read are centered at these valies: 0, 144, 329, 504, 741
// we add approx 50 to those values and check to see if we are close
if (adc_key_in > 1000) return btnNONE; // We make this the 1st option for speed reasons since it will be the most likely result
// For V1.1 us this threshold
if (adc_key_in < 50)   return btnRIGHT;
if (adc_key_in < 250)  return btnUP;
if (adc_key_in < 450)  return btnDOWN;
if (adc_key_in < 650)  return btnLEFT;
if (adc_key_in < 850)  return btnSELECT;
return btnNONE;  // when all others fail, return this...
}
void loop() {
 //Set the menu item or display text for the user
 setMenu();
 // read the buttons
 lcd_key = read_LCD_buttons();
 // check the key press against the previous key press to avoid issues from long key presses
 if (oldKey!=lcd_key) {
   // depending on which button was pushed, we perform an action
   switch (lcd_key)
   {
     case btnRIGHT:
     {
       oldKey = btnRIGHT;
         if (currentMode==modeSHOWDATETIME){currentMode=modeSHOWALARM1;}
       else if (currentMode==modeSHOWALARM1){currentMode=modeSHOWALARM2;}
       else if (currentMode==modeSHOWALARM2){currentMode=modeSHOWDATETIME;}
       delay(50);
       break;
     }
     case btnLEFT:
     {
       oldKey = btnLEFT;
       delay(50);
       break;
     }
     case btnUP:
     {
       oldKey = btnUP;
       delay(50);
       break;
     }
     case btnDOWN:
     {
       oldKey = btnDOWN;
       delay(50);
       break;
     }
     case btnSELECT:
     {
		oldKey = btnSELECT;
       if (currentMode==modeSHOWDATETIME){currentMode=modeSETDATE;}
       else if (currentMode==modeSHOWALARM1){currentMode=modeSETALARM1ON;}
       else if (currentMode==modeSHOWALARM2){currentMode=modeSETALARM2ON;}
       else if (currentMode==modeSETDATE){currentMode=modeSETTIME;}
       else if (currentMode==modeSETTIME){currentMode=modeSHOWDATETIME;}
       else if (currentMode==modeSETALARM1ON && Clock.checkAlarmEnabled(1)){currentMode=modeSETALARM1;}
       else if (currentMode==modeSETALARM1ON && !Clock.checkAlarmEnabled(1)){currentMode=modeSHOWALARM1;}
       else if (currentMode==modeSETALARM1){currentMode=modeSETALARM1METHOD;}
       else if (currentMode==modeSETALARM1METHOD){currentMode=modeSHOWALARM1;}
       else if (currentMode==modeSETALARM2ON && Clock.checkAlarmEnabled(2)){currentMode=modeSETALARM2;}
       else if (currentMode==modeSETALARM2ON && !Clock.checkAlarmEnabled(2)){currentMode=modeSHOWALARM2;}
       else if (currentMode==modeSETALARM2){currentMode=modeSETALARM2METHOD;}
       else if (currentMode==modeSETALARM2METHOD){currentMode=modeSHOWALARM2;};
       break;
     }
     case btnNONE:
     {
       oldKey=btnNONE;
       break;
     }
   }
 }
}
When I entered the adjustment modes I need a way to show the user which part of the display they could adjust with the up or down arrows. I resolved this in four parts:
- an integer that changed as the user selected each different section of the display (with the left or right buttons)
- an integer to hold the maximum value for the blink integer, so that if the maximum number of blink stages (items on display) couldn't be exceeded
- a variable to hold the blink status (either true or false)
- a variable to hold the time in milliseconds since the blink status last changed, once that exceeded a set value the blink status changed from true to false or false to true as required.
Global variables:
bool blinkNow=false;
int blinkInt=1;
int maxBlinkInt=3;
uint32_t blinkStart=0;
uint32_t blinkDelay=500;
Code added to the loop() function:
void loop() {
 //Set the menu item or display text for the user
 setMenu();
 // read the buttons
 lcd_key = read_LCD_buttons();
 // check the blink counter isn't too high
 if (blinkInt > maxBlinkInt){blinkInt=maxBlinkInt;}
 // Set the current blink status
 if (currentMode>modeSHOWALARM2 && ((millis()-blinkStart)>blinkDelay)){
   blinkNow=!blinkNow;
   blinkStart=millis();
     }
 else if (currentMode<=modeSHOWALARM2)
   {blinkNow=false;}
 // check the key press against the previous key press to avoid issues from long key presses
 if (oldKey!=lcd_key) {
Note from the code above, I only needed to consider the blink state if the current mode was not just a display mode (currentMode>modeSHOWALARM2)
This gave the following full setup and loop functions :
void setup() {
    // Start the serial port
    Serial.begin(9600);
    Serial.println("Starting");
    // Set the bounce delay
    bounceDelay=50;
    // Start the lcd and set the cursor
    lcd.begin(16,2);
    lcd.setCursor(0,0);
    // Start the I2C interface
    Wire.begin();
}
void loop() {
 //Set the menu item or display text for the user
 setMenu();
 // read the buttons
 lcd_key = read_LCD_buttons();
 // check the blink counter isn't too high
 if (blinkInt > maxBlinkInt){blinkInt=maxBlinkInt;}
 // Set the current blink status
 if (currentMode>modeSHOWALARM2 && ((millis()-blinkStart)>blinkDelay)){
   blinkNow=!blinkNow;
   blinkStart=millis();
     }
 else if (currentMode<=modeSHOWALARM2)
   {blinkNow=false;}
 // check the key press against the previous key press to avoid issues from long key presses
 if (oldKey!=lcd_key) {
   // depending on which button was pushed, we perform an action
   switch (lcd_key)
   {
     case btnRIGHT:
     {
       oldKey = btnRIGHT;
       if (blinkInt<maxBlinkInt) {blinkInt+=1;}
       if (currentMode==modeSHOWDATETIME){currentMode=modeSHOWALARM1;}
       else if (currentMode==modeSHOWALARM1){currentMode=modeSHOWALARM2;}
       else if (currentMode==modeSHOWALARM2){currentMode=modeSHOWDATETIME;}
       delay(50);
       break;
     }
     case btnLEFT:
     {
       oldKey = btnLEFT;
       if (blinkInt>1) {blinkInt-=1;}
       delay(50);
       break;
     }
     case btnUP:
     {
       oldKey = btnUP;
       if (currentMode==modeSETDATE){
         if (blinkInt==1){increaseDate();}
         if (blinkInt==2){increaseMonth();}
         if (blinkInt==3){increaseYear();}
       }
       if (currentMode==modeSETTIME){
         if (blinkInt==1){increaseHour();}
         if (blinkInt==2){increaseMinute();}
       }
       if (currentMode==modeSETALARM1ON) {
         if (Clock.checkAlarmEnabled(1)) {AlarmOn(1, false);}
       }
       if (currentMode==modeSETALARM1) {
         if (blinkInt==1){changeAlarmDayOption(1);}
         if (blinkInt==2){ChangeAlarm(1, 1, 0, 0,0);}
         if (blinkInt==3){ChangeAlarm(1, 0, 1, 0,0);}
         if (blinkInt==4){ChangeAlarm(1, 0, 0, 1,0);}
         if (blinkInt==5){ChangeAlarm(1, 0, 0, 0,1);}
       }
       if (currentMode==modeSETALARM1METHOD) {
         changeAlarmMethod(1, 1);
       }
       if (currentMode==modeSETALARM2ON) {
         if (Clock.checkAlarmEnabled(2)) {AlarmOn(2, false);}
       }
       if (currentMode==modeSETALARM2) {
         if (blinkInt==1){changeAlarmDayOption(2);}
         if (blinkInt==2){ChangeAlarm(2, 1, 0, 0,0);}
         if (blinkInt==3){ChangeAlarm(2, 0, 1, 0,0);}
         if (blinkInt==4){ChangeAlarm(2, 0, 0, 1,0);}
         if (blinkInt==5){ChangeAlarm(2, 0, 0, 0,1);}
       }
       if (currentMode==modeSETALARM2METHOD) {
         changeAlarmMethod(2, 1);
       }
       delay(50);
       break;
     }
     case btnDOWN:
     {
       oldKey = btnDOWN;
       if (currentMode==modeSETDATE){
         if (blinkInt==1){decreaseDate();}
         if (blinkInt==2){decreaseMonth();}
         if (blinkInt==3){decreaseYear();}
       }
       if (currentMode==modeSETTIME){
         if (blinkInt==1){decreaseHour();}
         if (blinkInt==2){decreaseMinute();}
       }
       if (currentMode==modeSETALARM1ON) {
         if (!Clock.checkAlarmEnabled(1)) {AlarmOn(1, true);}
       }
       if (currentMode==modeSETALARM1) {
         if (blinkInt==1){changeAlarmDayOption(1);}
         if (blinkInt==2){ChangeAlarm(1, -1, 0, 0,0);}
         if (blinkInt==3){ChangeAlarm(1, 0, -1, 0,0);}
         if (blinkInt==4){ChangeAlarm(1, 0, 0, -1,0);}
         if (blinkInt==5){ChangeAlarm(1, 0, 0, 0,-1);}
       }
       if (currentMode==modeSETALARM1METHOD) {
         changeAlarmMethod(1, 0);
       }
       if (currentMode==modeSETALARM2ON) {
         if (!Clock.checkAlarmEnabled(2)) {AlarmOn(2, true);}
       }
       if (currentMode==modeSETALARM2) {
         if (blinkInt==1){changeAlarmDayOption(2);}
         if (blinkInt==2){ChangeAlarm(2, -1, 0, 0,0);}
         if (blinkInt==3){ChangeAlarm(2, 0, -1, 0,0);}
         if (blinkInt==4){ChangeAlarm(2, 0, 0, -1,0);}
         if (blinkInt==5){ChangeAlarm(2, 0, 0, 0,-1);}
       }
       if (currentMode==modeSETALARM2METHOD) {
         changeAlarmMethod(2, 0);
       }
       delay(50);
       break;
     }
     case btnSELECT:
     {
       blinkInt=1;
       oldKey = btnSELECT;
       if (currentMode==modeSHOWDATETIME){currentMode=modeSETDATE;}
       else if (currentMode==modeSHOWALARM1){currentMode=modeSETALARM1ON;}
       else if (currentMode==modeSHOWALARM2){currentMode=modeSETALARM2ON;}
       else if (currentMode==modeSETDATE){currentMode=modeSETTIME;}
       else if (currentMode==modeSETTIME){currentMode=modeSHOWDATETIME;}
       else if (currentMode==modeSETALARM1ON && Clock.checkAlarmEnabled(1)){currentMode=modeSETALARM1;}
       else if (currentMode==modeSETALARM1ON && !Clock.checkAlarmEnabled(1)){currentMode=modeSHOWALARM1;}
       else if (currentMode==modeSETALARM1){currentMode=modeSETALARM1METHOD;}
       else if (currentMode==modeSETALARM1METHOD){currentMode=modeSHOWALARM1;}
       else if (currentMode==modeSETALARM2ON && Clock.checkAlarmEnabled(2)){currentMode=modeSETALARM2;}
       else if (currentMode==modeSETALARM2ON && !Clock.checkAlarmEnabled(2)){currentMode=modeSHOWALARM2;}
       else if (currentMode==modeSETALARM2){currentMode=modeSETALARM2METHOD;}
       else if (currentMode==modeSETALARM2METHOD){currentMode=modeSHOWALARM2;};
       break;
     }
     case btnNONE:
     {
       oldKey=btnNONE;
       break;
     }
   }
 }
}
Reading the tips and tricks from the BaldEngineer I noticed that it was best to send a full line of text to the LCD to overwrite everything as it can sometimes leave some cells with text. For example, if I sent a line saying 108 and then updated with text saying 22 it would actually say 228 because the LCD wouldn't overwrite the 8 at cell 3.
The solution is to create a function to write the text to the LCD:
void displayText(String line0Text, String line1Text){
 lcd.setCursor(0,0);
 sprintf(line0,"%-21s", line0Text.c_str());
 lcd.print(String(line0));
 lcd.setCursor(0,1);
 sprintf(line1,"%-21s", line1Text.c_str());
 lcd.print(String(line1));
}
The value "%-21s" creates trailing blank spaces up to 21 characters of text.
The code line1Text.c_str() converts the String into characters needed for the sprintf function.
There was also an issue with sending numbers to the LCD, they would only ever show up as the figure 10. This was resolved with another function that I copied from the internet where it is often cited and resolves the issue:
String twoDigitNumber(byte number)
{
 char buffer[3];
 snprintf(buffer,sizeof(buffer), "%02d", number );
 return String(buffer);
}
Showing and Adjusting the date and time using the DS3231 and LiquidCrystal libraries is now reasonably simple.
There three functions to display the text:
- DateText
- TimeText
- ShowDateTime
This is so that the DateText and TimeText can be reused when adjusting the date and time. They read the value of blinkInt and the state of the blinkNow to determine if some of the text should be hidden to give the impression of blinking.
String dateText() {
 String result="Date: ";
 if (blinkInt!=1 || blinkNow==false)
   {result+=twoDigitNumber(Clock.getDate());}
 else
   {result+="  ";}
 result+="/";
 if (blinkInt!=2 || blinkNow==false)
   {result+=twoDigitNumber(Clock.getMonth(Century));}
 else
   {result+="  ";}
 result+="/";
 if (blinkInt!=3 || blinkNow==false)
   {result+=twoDigitNumber(Clock.getYear());}
 else
   {result+="  ";}
 return result;
}
String timeText() {
 String result="Time: ";
 if (blinkInt!=1 || blinkNow==false)
   {result+=twoDigitNumber(Clock.getHour(h12, PM));}
 else
   {result+="  ";}
 result+=":";
 if (blinkInt!=2 || blinkNow==false)
   {result+=twoDigitNumber(Clock.getMinute());}
 else
   {result+="  ";}
 result+=":";
 result+=twoDigitNumber(Clock.getSecond());
 return result;
}
void showDateTime(){
 displayText(dateText(), timeText());
}
The two separate functions called setDate and setTime simple adjust the display and set the maxBlink variable. For the time I've not made an allowance for setting seconds manually, when minutes are changed seconds automatically go to 0. I don't need a clock to be that accurate, if you do you could easily alter this but you might need to account for lag in processing the command.
void setDate(){
 displayText("Set the date:", dateText());
 maxBlinkInt=3;
}
void setTime(){
 displayText("Set the time:", timeText());
 maxBlinkInt=2;
}
It is the up, down and right buttons that call the necessary functions to change the date and time. The right buttons changes the blinkInt value
case btnRIGHT:
     {
       oldKey = btnRIGHT;
       if (blinkInt<maxBlinkInt) {blinkInt+=1;}
       if (currentMode==modeSHOWDATETIME){currentMode=modeSHOWALARM1;}
       else if (currentMode==modeSHOWALARM1){currentMode=modeSHOWALARM2;}
       else if (currentMode==modeSHOWALARM2){currentMode=modeSHOWDATETIME;}
       delay(50);
       break;
     }
The up and down buttons adjust the values
case btnUP:
     {
       oldKey = btnUP;
       if (currentMode==modeSETDATE){
         if (blinkInt==1){increaseDate();}
         if (blinkInt==2){increaseMonth();}
         if (blinkInt==3){increaseYear();}
       }
       if (currentMode==modeSETTIME){
         if (blinkInt==1){increaseHour();}
         if (blinkInt==2){increaseMinute();}
       }
case btnDOWN:
     {
       oldKey = btnDOWN;
       if (currentMode==modeSETDATE){
         if (blinkInt==1){decreaseDate();}
         if (blinkInt==2){decreaseMonth();}
         if (blinkInt==3){decreaseYear();}
       }
       if (currentMode==modeSETTIME){
         if (blinkInt==1){decreaseHour();}
         if (blinkInt==2){decreaseMinute();}
       }
The functions to increase the various date and time parts use the DS3231 library. One of the decisions I made here was to keep scrolling through potential values rather than going to a dead end. For example, for minutes, instead of stopping at 59 and having to go down again to get to 0 I simply allow the sequence to go from 59 to 0. I also factor for the maximum days in a month, not just when setting days but also when setting months or years, just in case the day is set to 31 and the user adjusts to a month that only has 30 days or less. Leap years are adjusted for as well.
/***************************************************************
* Functions to increase and decrease time elements
***************************************************************/
void increaseYear(){
 Year=Clock.getYear();
 if (Year<99)
   {Year = Year + 1;}
 else
   {Year = 00;}
 Clock.setYear(Year);
 if (Clock.getDate()>monthMaxDays(Clock.getMonth(Century))){
   Clock.setDate(monthMaxDays(Clock.getMonth(Century)));
 }
}
void decreaseYear(){
 Year=Clock.getYear();
 if (Year>1)
   {Year = Year - 1;}
 else
   {Year = 99;}
 Clock.setYear(Year);
  if (Clock.getDate()>monthMaxDays(Clock.getMonth(Century))){
   Clock.setDate(monthMaxDays(Clock.getMonth(Century)));
 }
}
void increaseMonth(){
 Month=Clock.getMonth(Century);
 if (Month<12) {
   Month = Month + 1;
 }
 else
 {
   Month = 1;
 }
 Clock.setMonth(Month);
 if (Clock.getDate()>monthMaxDays(Clock.getMonth(Century))){
   Clock.setDate(monthMaxDays(Clock.getMonth(Century)));
 }
}
void decreaseMonth(){
 Month=Clock.getMonth(Century);
 if (Month>1) {
   Month = Month - 1;
 }
 else
 {
   Month = 12;
 }
 Clock.setMonth(Month);
 if (Clock.getDate()>monthMaxDays(Clock.getMonth(Century))){
   Clock.setDate(monthMaxDays(Clock.getMonth(Century)));
 }
}
void increaseDate(){
 Date=Clock.getDate();
 if (Date<monthMaxDays(Clock.getMonth(Century))) {
   Date = Date + 1;
 }
 else
 {
   Date = 1;
 }
 Clock.setDate(Date);
}
void decreaseDate(){
 Date=Clock.getDate();
 if(Date>1) {
   Date = Date- 1;
 }
 else {
   Date = monthMaxDays(Clock.getMonth(Century));
 }
 Clock.setDate(Date);
}
void increaseHour(){
 Hour=Clock.getHour(h12, PM);
 if (Hour<24)
   {Hour = Hour + 1;}
 else
   {Hour = 1;}
 Clock.setHour(Hour);
}
void decreaseHour(){
 Hour=Clock.getHour(h12, PM);
 if (Hour>1)
   {Hour = Hour - 1;}
 else
   {Hour = 24;}
 Clock.setHour(Hour);
}
void increaseMinute(){
 Minute=Clock.getMinute();
 if (Minute<60)
   {Minute = Minute + 1;}
 else
   {Minute = 1;}
 Clock.setMinute(Minute);
 Clock.setSecond(0);
}
void decreaseMinute(){
 Minute=Clock.getMinute();
 if (Minute>0)
   {Minute = Minute - 1;}
 else
   {Minute = 60;}
 Clock.setMinute(Minute);
 Clock.setSecond(0);
}
int monthMaxDays(int monthNumber){
 switch (monthNumber){
   case 1:
   case 3:
   case 5:
   case 7:
   case 8:
   case 10:
   case 12:
     return 31;
   case 4:
   case 6:
   case 9:
   case 11:
     return 30;
   case 2:
     int remainingYears;
     remainingYears=((Clock.getYear()-2020)%4);
     if (remainingYears==0){
       return 29;
     }
     else{
       return 28;
     }
  default:
   return 0;
 }
}
Setting the alarms on or off was fairly simple, there are three functions available in the DS3231 library. These are turnOnAlarm, turnOffAlarm and checkAlarmEnabled. I used the checkAlarmEnabled function to decide if the user needed to see the displays to set the rest of the alarm, if the user had turned the alarm off this all seemed redundant.
 case btnSELECT:
     {
       blinkInt=1;
       oldKey = btnSELECT;
       if (currentMode==modeSHOWDATETIME){currentMode=modeSETDATE;}
       else if (currentMode==modeSHOWALARM1){currentMode=modeSETALARM1ON;}
       else if (currentMode==modeSHOWALARM2){currentMode=modeSETALARM2ON;}
       else if (currentMode==modeSETDATE){currentMode=modeSETTIME;}
       else if (currentMode==modeSETTIME){currentMode=modeSHOWDATETIME;}
       else if (currentMode==modeSETALARM1ON && Clock.checkAlarmEnabled(1)){currentMode=modeSETALARM1;}
       else if (currentMode==modeSETALARM1ON && !Clock.checkAlarmEnabled(1)){currentMode=modeSHOWALARM1;}
       else if (currentMode==modeSETALARM1){currentMode=modeSETALARM1METHOD;}
       else if (currentMode==modeSETALARM1METHOD){currentMode=modeSHOWALARM1;}
       else if (currentMode==modeSETALARM2ON && Clock.checkAlarmEnabled(2)){currentMode=modeSETALARM2;}
       else if (currentMode==modeSETALARM2ON && !Clock.checkAlarmEnabled(2)){currentMode=modeSHOWALARM2;}
       else if (currentMode==modeSETALARM2){currentMode=modeSETALARM2METHOD;}
       else if (currentMode==modeSETALARM2METHOD){currentMode=modeSHOWALARM2;};
       break;
     }
The blinking was set to match the currently selected on or off option.
void setAlarmOnOff(int alarmNum){
 if (alarmNum>0 && alarmNum<3) {
   maxBlinkInt=1;
   if(Clock.checkAlarmEnabled(alarmNum)){
     blinkInt=2;}
   else {
     blinkInt=1;}
   if (blinkInt==1 && blinkNow==true)
     {displayText("", "Alarm" + String(alarmNum) + ": ON");}
   else if (blinkInt==2 && blinkNow==true)
     {displayText("Alarm" + String(alarmNum) + ": OFF", "");}
   else
    { displayText("Alarm" + String(alarmNum) + ": OFF", "Alarm" + String(alarmNum) + ": ON");}
 }
}
The alarm is then set:
void AlarmOn(int alarmNum, bool setOn){
 if (alarmNum>0 && alarmNum<3) {
   if (setOn){Clock.turnOnAlarm(alarmNum);}
   else {Clock.turnOffAlarm(alarmNum);}
 }
}
There are now only two other options for each alarm that we can use to help with displaying and setting the alarms:
getA1Time(ADay, AHour, AMinute, ASecond, ABits, ADy, A12h, Apm);
setA1Time(ADay, AHour, AMinute, ASecond, ABits, ADy, A12h, Apm);
getA2Time(ADay, AHour, AMinute, ABits, ADy, A12h, Apm);
setA2Time(ADay, AHour, AMinute, ABits, ADy, A12h, Apm);
You can tell that the only difference is that the A2 functions don't include a variable for seconds.
To change an alarm we have to first collect the current settings, then increment the correct value before returning all the old values plus the one new value.
The setAlarm method is simple enough, this just initiates the activity:
void setAlarm(int alarmNum){
 if (alarmNum>0 && alarmNum<3) {
   if (alarmNum==1)
   {
     maxBlinkInt=5;
     showAlarm1();
   }
   if (alarmNum==2)
   {
     maxBlinkInt=4;
     showAlarm2();
   }
 }
}
When the user presses the up button we call:
if (currentMode==modeSETALARM1) {
         if (blinkInt==1){changeAlarmDayOption(1);}
         if (blinkInt==2){ChangeAlarm(1, 1, 0, 0,0);}
         if (blinkInt==3){ChangeAlarm(1, 0, 1, 0,0);}
         if (blinkInt==4){ChangeAlarm(1, 0, 0, 1,0);}
         if (blinkInt==5){ChangeAlarm(1, 0, 0, 0,1);}
       }
And for the down button:
if (currentMode==modeSETALARM2) {
         if (blinkInt==1){changeAlarmDayOption(2);}
         if (blinkInt==2){ChangeAlarm(2, 1, 0, 0,0);}
         if (blinkInt==3){ChangeAlarm(2, 0, 1, 0,0);}
         if (blinkInt==4){ChangeAlarm(2, 0, 0, 1,0);}
         if (blinkInt==5){ChangeAlarm(2, 0, 0, 0,1);}
       }
I created two separate functions for changing the day/date options and for changing the time for simplicity of reading the code:
void changeAlarmDayOption(int alarmNum){
 byte ADay, AHour, AMinute, ASecond, ABits;
 bool ADy, A12h, Apm;
 //Collect the current alarm settings
 if (alarmNum==1){Clock.getA1Time(ADay, AHour, AMinute, ASecond, ABits, ADy, A12h, Apm);}
 if (alarmNum==2){Clock.getA2Time(ADay, AHour, AMinute, ABits, ADy, A12h, Apm);}
 ADy=!ADy;
 if (ADy && ADay>7) {ADay=7;}
 //Reset the alarm settings
 if (alarmNum==1){Clock.setA1Time(ADay, AHour, AMinute, ASecond, ABits, ADy, A12h, Apm);}
 if (alarmNum==2){Clock.setA2Time(ADay, AHour, AMinute, ABits, ADy, A12h, Apm);}
}
void ChangeAlarm(int alarmNum, int dayAdjust, int hourAdjust, int minAdjust,int secAdjust){
 byte ADay, AHour, AMinute, ASecond, ABits;
 bool ADy, A12h, Apm;
 //Collect the current alarm settings
 if (alarmNum==1){Clock.getA1Time(ADay, AHour, AMinute, ASecond, ABits, ADy, A12h, Apm);}
 if (alarmNum==2){Clock.getA2Time(ADay, AHour, AMinute, ABits, ADy, A12h, Apm);}
 //Adjust the date
 ADay+=dayAdjust;
 if (ADy){
   if (ADay<1){ADay=7;}
   if (ADay>7){ADay=1;}
 }
 else {
   if (ADay<1){ADay=31;}
   if (ADay>31){ADay=1;}
 }
 //Adjust the hour
 AHour+=hourAdjust;
 if (AHour<0){AHour=23;}
 if (AHour>23){AHour=0;}
 //Adjust the minute
 AMinute+=minAdjust;
 if (AMinute<0){AMinute=59;}
 if (AMinute>59){AMinute=0;}
 //Adjust the second
 if (alarmNum==1){
   ASecond+=secAdjust;
   if (ASecond<0){ASecond=59;}
   if (ASecond>59){ASecond=0;}
 }
 //Reset the alarm settings
 if (alarmNum==1){Clock.setA1Time(ADay, AHour, AMinute, ASecond, ABits, ADy, A12h, Apm);}
 if (alarmNum==2){Clock.setA2Time(ADay, AHour, AMinute, ABits, ADy, A12h, Apm);}
}
All of the previous steps were fairly painless, a bit of research and applying what I'd learnt. Not so with setting the alarm modes. This was a headache.
The alarm modes are held in memory in various locations and the DS3231 kindly collects this data, stores it in a byte and returns it to the user. In the previous codes this is the ABits variable.
There are a set of masks stated on the data sheet and I copied the constants from https://github.com/mlepard/ArduinoChicken/blob/master/roboCoop/alarmControl.ino
// These are the ALARM Bits that can be used
// They need to be combined into a single value (see below)
// Found here: https://github.com/mlepard/ArduinoChicken/blob/master/roboCoop/alarmControl.ino
#define ALRM1_MATCH_EVERY_SEC     0b1111  // once a second
#define ALRM1_MATCH_SEC           0b1110  // when seconds match
#define ALRM1_MATCH_MIN_SEC       0b1100  // when minutes and seconds match
#define ALRM1_MATCH_HR_MIN_SEC    0b1000  // when hours, minutes, and seconds match
#define ALRM1_MATCH_DY_HR_MIN_SEC 0b0000  // when hours, minutes, and seconds match
#define ALRM2_ONCE_PER_MIN     0b111   // once per minute (00 seconds of every minute)
#define ALRM2_MATCH_MIN        0b110   // when minutes match
#define ALRM2_MATCH_HR_MIN     0b100   // when hours and minutes match
Some places on-line suggest that you have to create a seven digit byte and set both alarms 1 and 2 at the same time. I discovered this isn't so from reading the DS3231 library. The alarm 1 reads the first four (from the right hand) digits of a byte sent to it, alarm2 reads digits 5, 6, & 7.
What I also found out from trial and error was not to use global variables, I didn't understand why at first but it seemed to work.
I was still hitting problems though. Sometimes the scrolling of the current status would work, sometimes the status would update, sometimes it wouldn't.
After posting online in the forum (https://forum.arduino.cc/index.php?topic=719176.0) cattledog highlighted that I could have dirty bytes that could be corrupting what I was sending to the DS3231 library. I explicitly set the bytes, made sure I didn't recall an old byte variable, and it all worked.
void setAlarmMethod(int alarmNum){
 if (alarmNum>0 && alarmNum<3) {
   if (alarmNum==1)
   {
     maxBlinkInt=1;
     showAlarmMethod(1);
   }
   if (alarmNum==2)
   {
     maxBlinkInt=1;
     showAlarmMethod(2);
   }
 }
}
void showAlarmMethod(int alarmNum) {
 String myString1="";
 String myString2="";
 byte ADay, AHour, AMinute, ASecond, ABitsOP=0b0;
 bool ADy, A12h, Apm;
 if (alarmNum==1){
   myString1 = "Alarm 1 Method:";
   Clock.getA1Time(ADay, AHour, AMinute, ASecond, ABitsOP, ADy, A12h, Apm);
   ABitsOP  = ABitsOP & 0b1111;
   if (ABitsOP==ALRM1_MATCH_EVERY_SEC) {myString2 = "Once per Second";}
   else if (ABitsOP==ALRM1_MATCH_SEC) {myString2 = "Seconds Match";}
   else if (ABitsOP==ALRM1_MATCH_MIN_SEC) {myString2 = "Min & Secs Match";}
   else if (ABitsOP==ALRM1_MATCH_HR_MIN_SEC) {myString2 = "Hr, Min & Sec Match";}
   else if (ABitsOP==ALRM1_MATCH_DY_HR_MIN_SEC) {myString2 = "Dy, Hr, Mn & Sec";}
   } else {
   Clock.getA2Time(ADay, AHour, AMinute, ABitsOP, ADy, A12h, Apm);
   myString1 = "Alarm 2 Method:";
   if ((ABitsOP>>4)==ALRM2_ONCE_PER_MIN) {myString2 = "Once per Minute";}
   else if ((ABitsOP>>4)==ALRM2_MATCH_MIN) {myString2 = "Match Minute";}
   else {myString2 = "Match Hour & Min";}
 }
 displayText(myString1 , myString2);
}
In the changeAlarmMethod function to can see that:
- Abits is explicitly set to zero
- For Alarm1 Abits is then masked to return the first four digits (&0b1111).
- For Alarm2 Abits is pushed to the right four places to return only digits 5, 6 & 7 (>> 4).
- For both alarms a new variable is created to hold the new alarm mode to ensure there isn't any contamination of data from the old variable
- For Alarm2 the new variable is pushed to the left four places to correctly set digits 5, 6 & 7 (>> 4).
void changeAlarmMethod(int alarmNum, int dir) {
 byte ADay1, AHour1, AMinute1, ASecond1, ADay2, AHour2, AMinute2, ABits=0b0;
 bool ADy1, A12h1, Apm1, ADy2, A12h2, Apm2;
 int AlarmBits;
 if (alarmNum==1){
   Clock.getA1Time(ADay1, AHour1, AMinute1, ASecond1, ABits, ADy1, A12h1, Apm1);
   ABits  = ABits & 0b1111;
   if (dir == 1) {
       if (ABits==ALRM1_MATCH_EVERY_SEC) {AlarmBits |= ALRM1_MATCH_SEC;}
       else if (ABits==ALRM1_MATCH_SEC) {AlarmBits |= ALRM1_MATCH_MIN_SEC;}
       else if (ABits==ALRM1_MATCH_MIN_SEC) {AlarmBits |= ALRM1_MATCH_HR_MIN_SEC;}
       else if (ABits==ALRM1_MATCH_HR_MIN_SEC) {AlarmBits |= ALRM1_MATCH_DY_HR_MIN_SEC;}
       else if (ABits==ALRM1_MATCH_DY_HR_MIN_SEC) {AlarmBits |= ALRM1_MATCH_EVERY_SEC;}
       }
   else if (dir == 0) {
       if (ABits==ALRM1_MATCH_EVERY_SEC) {AlarmBits |= ALRM1_MATCH_DY_HR_MIN_SEC;}
       else if (ABits==ALRM1_MATCH_SEC) {AlarmBits |= ALRM1_MATCH_EVERY_SEC;}
       else if (ABits==ALRM1_MATCH_MIN_SEC) {AlarmBits |= ALRM1_MATCH_SEC;}
       else if (ABits==ALRM1_MATCH_HR_MIN_SEC) {AlarmBits |= ALRM1_MATCH_MIN_SEC;}
       else {AlarmBits |= ALRM1_MATCH_HR_MIN_SEC;}
   }
   else {AlarmBits |= ABits;}
   Clock.setA1Time(ADay1, AHour1, AMinute1, ASecond1, AlarmBits, ADy1, A12h1, Apm1);
 } else {
   Clock.getA2Time(ADay2, AHour2, AMinute2, ABits, ADy2, A12h2, Apm2);
   ABits = ABits >> 4;
   if (dir == 1) {
     if (ABits==ALRM2_ONCE_PER_MIN) {AlarmBits = ALRM2_MATCH_MIN;}
     else if (ABits==ALRM2_MATCH_MIN) {AlarmBits = ALRM2_MATCH_HR_MIN;}
     else {AlarmBits = ALRM2_ONCE_PER_MIN;}
   }
   if (dir == 0) {
     if (ABits==ALRM2_ONCE_PER_MIN) {AlarmBits = ALRM2_MATCH_HR_MIN;}
     else if (ABits==ALRM2_MATCH_HR_MIN) {AlarmBits = ALRM2_MATCH_MIN;}
     else {AlarmBits = ALRM2_ONCE_PER_MIN;}
   }
   AlarmBits = AlarmBits << 4;
   Clock.setA2Time(ADay2, AHour2, AMinute2, AlarmBits, ADy2, A12h2, Apm2);
   byte newBits;
   Clock.getA2Time(ADay2, AHour2, AMinute2, newBits, ADy2, A12h2, Apm2);
 }
}
The constants used for the current status are shown below.
 // define some values used by the menu controller
const  int modeSHOWDATETIME = 0;
const  int modeSHOWALARM1 = 1;
const  int modeSHOWALARM2 = 2;
const  int modeSETDATE = 3;
const  int modeSETTIME = 4;
const  int modeSETALARM1ON = 5;
const  int modeSETALARM1 = 6;
const  int modeSETALARM1METHOD = 7;
const  int modeSETALARM2ON = 8;
const  int modeSETALARM2 = 9;
const  int modeSETALARM2METHOD = 10;
int currentMode = modeSHOWDATETIME;
I've created a simple casing/holder for the shield and breadboard. it is 2-piece for two reasons. Firstly, the frame around the LCD would have needed supports and scondly, I've found that the positions of the buttons is a bit erratic and so this design allows anyone replicating the design to tweak the LCD panel. The stl files are included.
One of the tings I noticed with this code was the amount of memory it used. I'm not great at understanding how to control memory but I did a couple of things after I wrote the instructions above:
- I changed all #Define to const as I had read it was better for memory. It had limited effect.
- I changed all integer flags to bytes to reduce memory usage, this had some effect.
- I removed global variables where they could be local variables, again this had limited effect.
Overall I went from using 55% of storage and global variables occupying 39% of dynamic memory to 53% of storage and global variables still occupying 39% of dynamic memory.
The next step with memory was to remove references to Serial from the SetUp function. This reduces the memory usage to 50% of storage and global variables occupying 30% of dynamic memory. So there is a lesson to comment out or remove all debugging statements once complete.
The finished code is shown below, if you can off any advice on improving it please let me know.
Further ReadingWhen I've used the RTC in projects I've found two issues:
- The status register of the DS3231 RTC doesn't appear to clear correctly, locking the RTC alarm into a low state, this is resolved at https://electronics.stackexchange.com/questions/445256/ds3231-stops-working-on-vbat
- The clock can get stuck, this is resolved at https://www.forward.com.au/pfod/ArduinoProgramming/I2C_ClearBus/index.html


Comments
Please log in or sign up to comment.