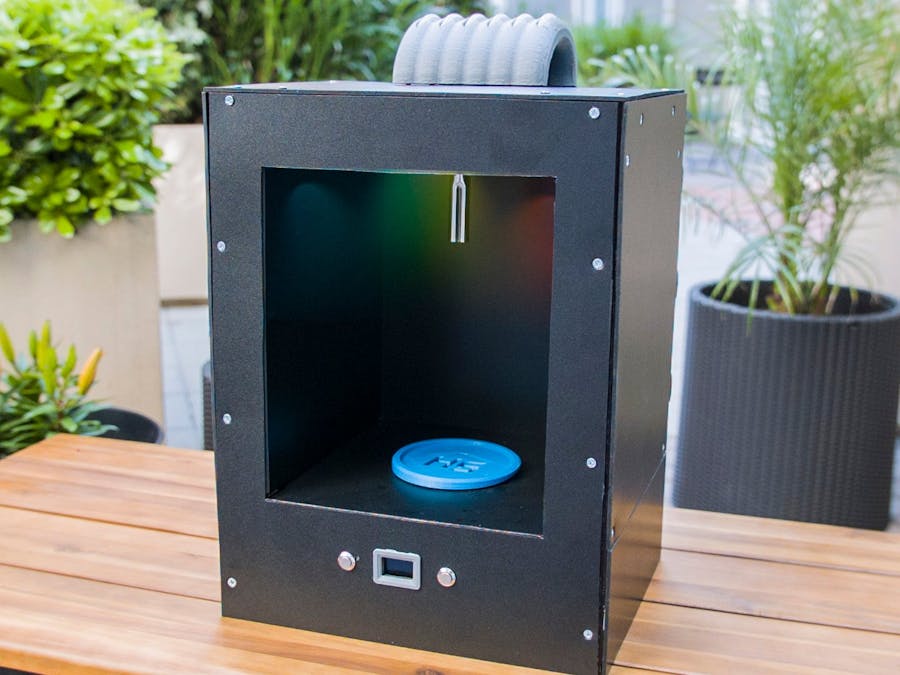
Tired of paying $12 for a small drink at the bars? Well be tired no more. You can have your very own personal bartender in your home, and also be the envy of your friends. We built a smart, Raspberry Pi powered bartender that can make drinks by mixing up to 6 ingredients together at the same time, so you can have anything from a rum and coke to a long island iced tea.
The bartender can be customized to make any number of drinks, can be expanded to mix more ingredients, and also has the potential for connectivity with Alexa and Google Home / Google Assistant.
The drinks can be configured on the bartender with two simple buttons and a screen, and you can add any number of drinks to the bartender's repository through the bartender's code.
Get all the 3D printable parts files for this project on our Patreon: https://www.patreon.com/posts/smart-bartender-37735749
Check out our video below to see how it works and how we built it:
Building the FrameFirst, we cut the following pieces of 1 by 2 wood:
- 4x 16" long
- 4x 9" long
- 6x 7.5" long
Note that the actual dimensions of 1 by 2s is 0.75" by 1.5".
Screw 2 of the 16" pieces, and two of the 7.5" pieces together to make the side of the bartender frame. Repeat this again to make the other side of the frame.
We first drilled pilot holes into the wood before screwing in the screws because we found this helped prevent the wood from splitting apart.
We then connected these two sides together using the 9" long pieces, using 2 to connect the bottom, and two to connect the top.
The electronics will sit at the bottom of the bartender, but we need a platform above the electronics to hold the drink. That's where the last two pieces of 7.5" wood comes in. We measured 3 inches from the bottom of the frame, and screwed in the 7.5" wood on either side of the bartender above the 3 inch mark.
We used two pieces of medium density fiber (MDF) board for two different platforms: one platform that the drink will sit on top of, and one platform where all the electronics will be mounted.
The MDF boards were cut using a jigsaw to the follow dimensions:
- Drink platform: 12" x 9"
- Electronics platform: 11-7/8" x 7-3/8"
The drink platform is simply going to sit on top of the ledge we screwed in near the bottom of the frame, in between the four vertical posts of the frame. So we also cut a 1.5" x 0.75" notch out of each corner of the drink platform for those four posts.
The drink platform should wedge nicely inside the bartender frame on top of the side supports. The electronics platform should slide in nicely from the side of the frame and rest on top of the bottom pieces of the frame.
The wood frame is only the skeleton of the bartender, but it definitely needs some skin. We decided to use some black PVC sheet material that was fairly easy to cut to size with a box cutter to the following dimensions:
- Front panel: 12" x 16"
- Left panel: 9.25" x 16"
- Right panel: 9.25" x 12-1/8"
- Access panel: 9.25" x 3-7/8"
- Top panel: 12.25" x 9-5/16"
- Back panel: 12" x 16"
- Inside side panels: 8-15/16" x 10.25"
Once the sheets are scored deeply enough with the box cutter, we were able to snap the pieces off, using an extra wood piece to help distribute the load.
Of course, the front panel needs a window in it where the drink will be inserted into the bartender. We cut out a 8.5" wide by 10" tall window in it that started just above where the MDF board is held inside the frame.
We then screwed in the side panels, but left the rest of the frame open to allow us to mount components and electronics in it before we seal it up.
Next we 3D printed a bracket to hold the drink funnel that will channel all the drink ingredients into the glass. Our 3D printer wasn't very big, so we split the bracket into two identical, mirrored parts which we then bonded together. All our 3D printed parts that we used for this project are included in this post for your use.
After it dried, we screwed the bracket into the underside of the top of the bartender frame, and dropped the funnel in, letting it simply rest loosely in the bracket.
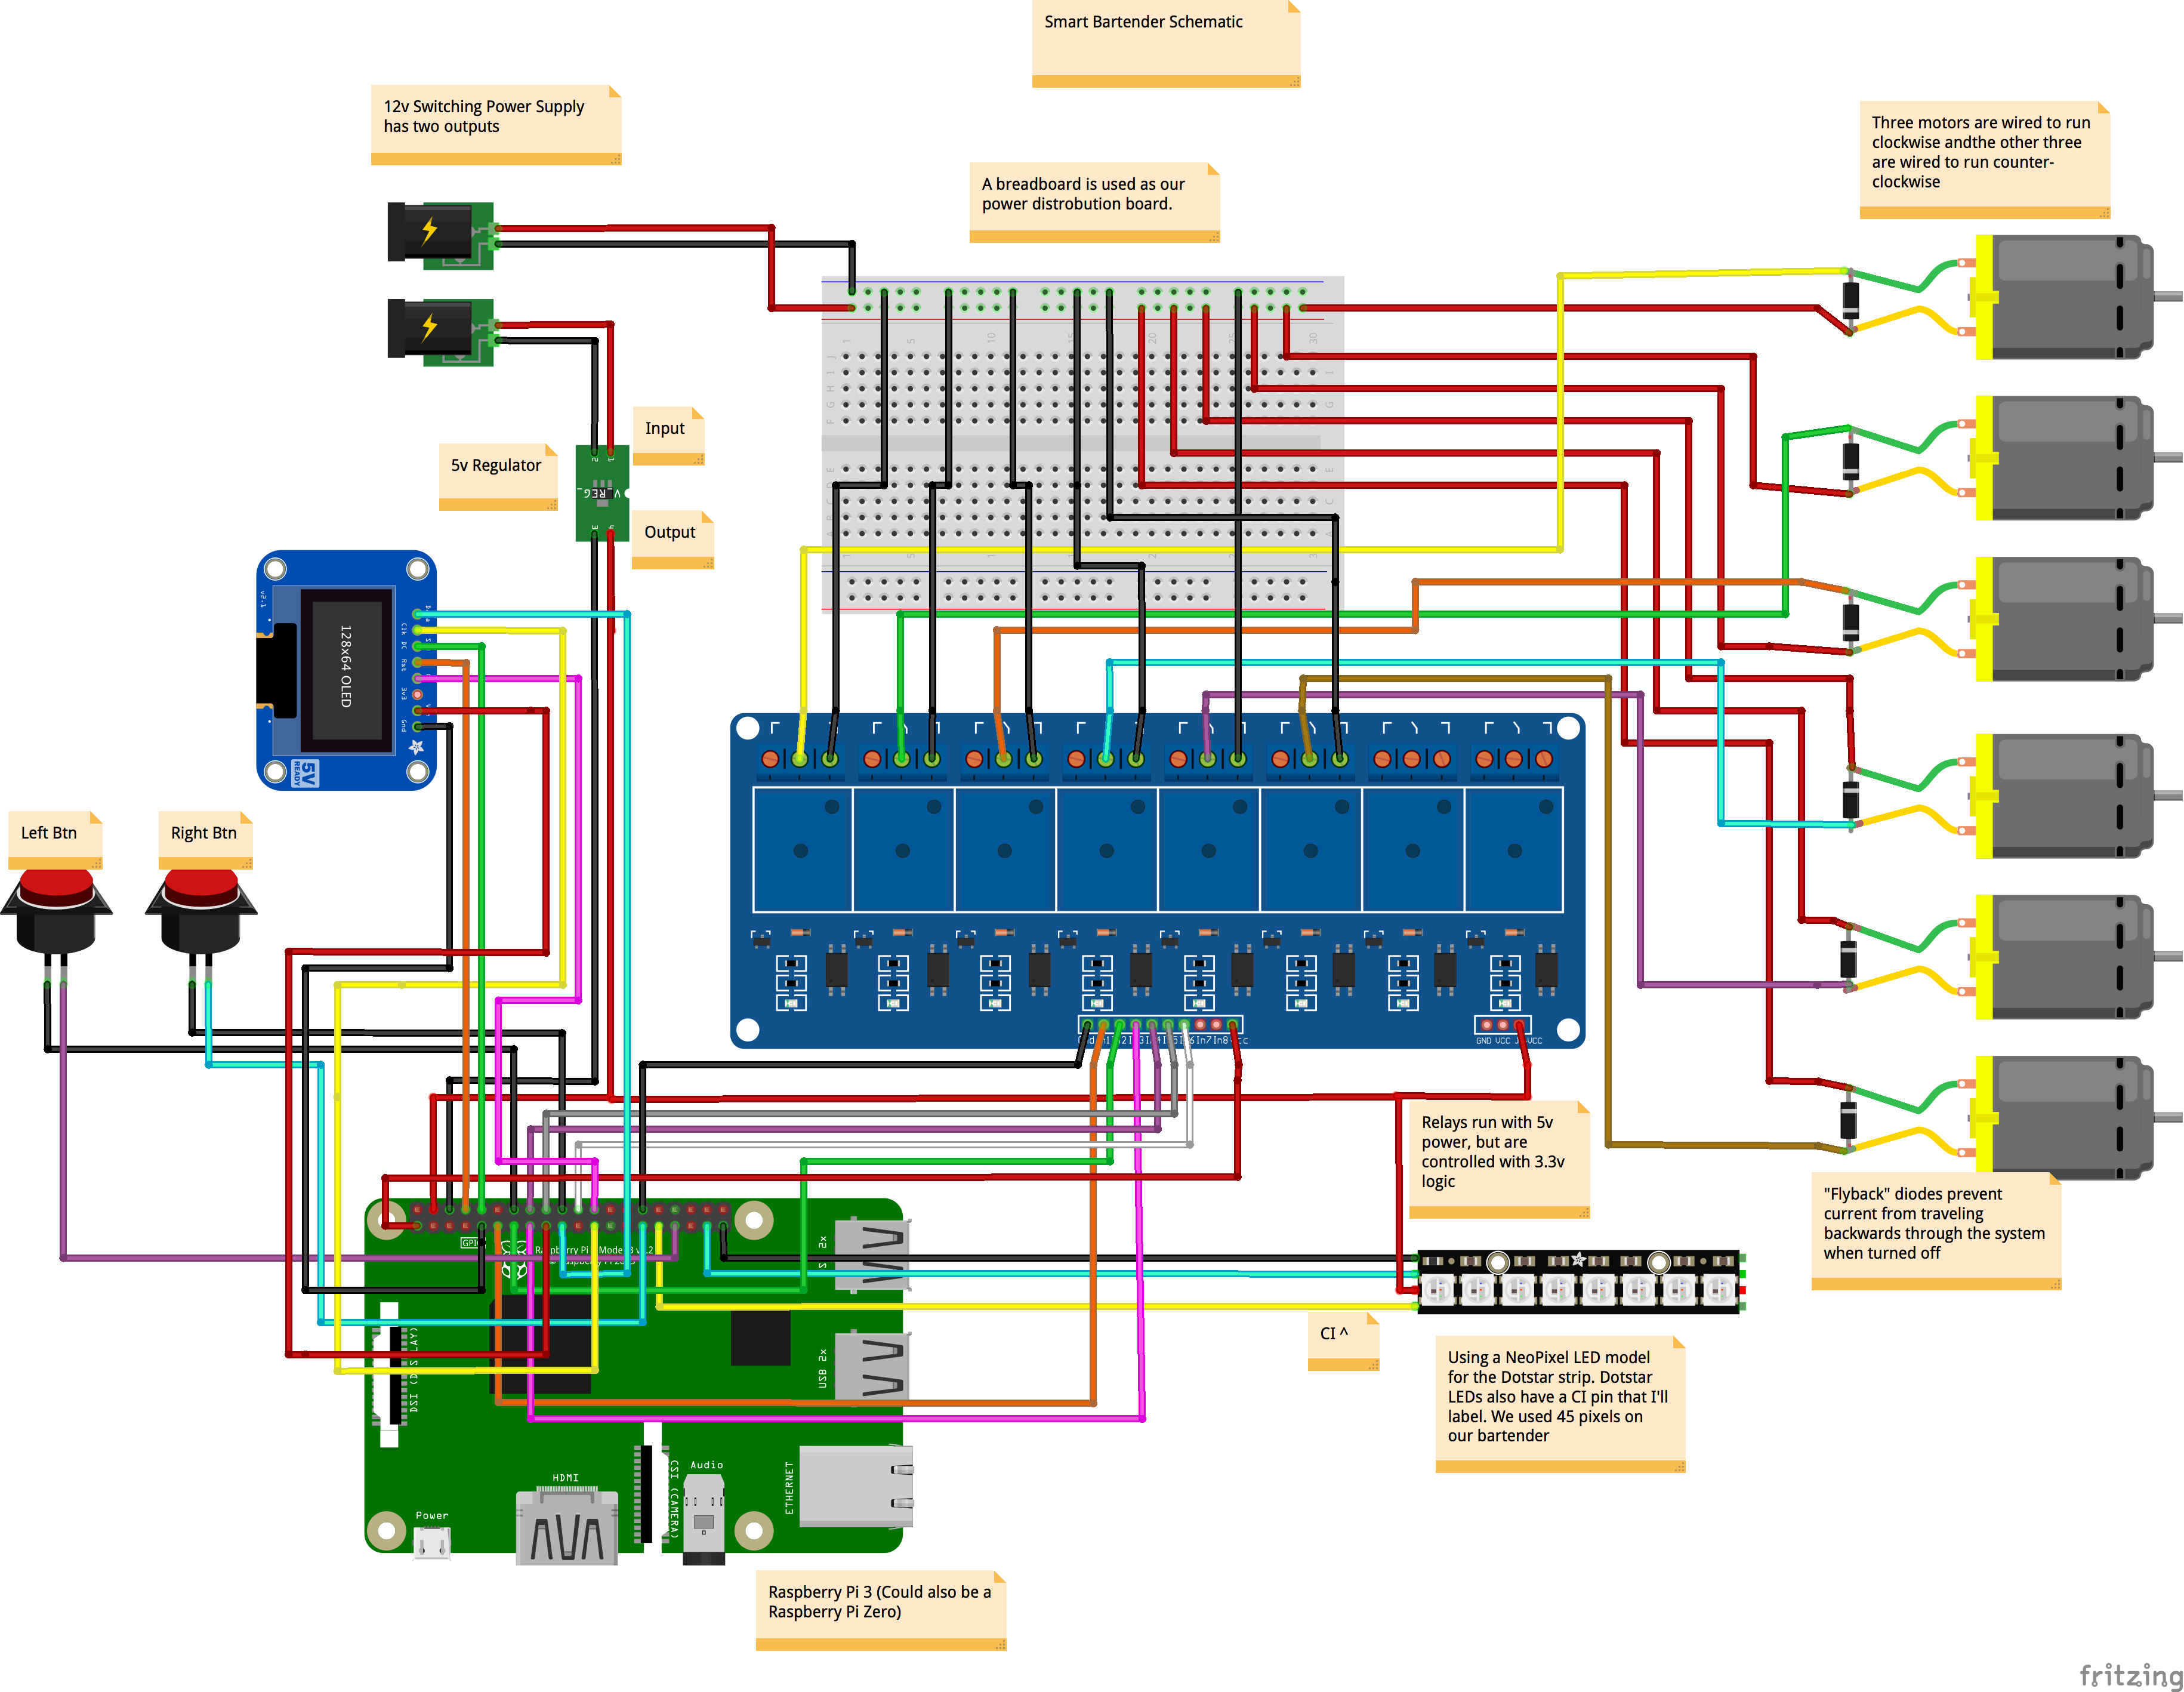
Next, we mounted the electronics on the the MDF board electronics platform using double-sided outdoor mounting tape. Refer to the circuit diagram to see how to connect everything up. All the parts are linked in the parts list as well.
There is room to add more pumps so that you can make crazier drinks if you'd like, but we attached six pumps to the back of our bartender for up to six different ingredients. Because of the way we wanted to mount our pumps, and the orientation of the tubes coming out of the pumps, we 3D printed some standoffs to allow us to mount the pumps without pinching the tubes against the surface of the bartender. But we first screwed in the back panel, and the pumps were screwed in through this panel and into the vertical wood posts.
There will be a lot of wires coming from the pumps into the electronics tray at the bottom of the bartender, so we drilled a couple half inch holes near the electronics; one hole for all the wires going to the pumps, and one hole for the thick power cable that will connect the power supply to the wall outlet.
We also 3D printed a couple bushings to cover up the jagged edges of these holes and to protect the wires and cables.
Whether it's food or drink, presentation is important, so we added a multi-color LED strip around the top of the frame to add a little bit of flash as the bartender is making a drink. We simply used our trusty outdoor mounting tape to stick it on there, and routed the wires between the outside side panel, and the inside side panel (which we will install later).
We 3D printed a manifold that routes the tubes from all six pumps into drink funnel. But first we had to drill six holes in the top panel of the bartender to allow the tubes to feed inside the bartender. So after 3D printing the manifold, we lined it up with the top panel, and traced out where we needed to drill the holes.
Once that was prepared, we made sure that the funnel was installed inside the bracket, and screwed in the top panel over it on top of the frame.
We then lined up some of our food-grade silicone tubing from each pump to through the manifold, and into the drink funnel to see how long they needed to be, and then cut them to length. We also cut six additional tubes that were long enough to route from the pumps to each of the ingredient bottles behind the bartender.
This is what the plumbing looked like behind the bartender after this was done. After this alignment was checked, we screwed the manifold into the top rear piece of the frame using the three holes on the back of the manifold.
Next we had to install the small screen that will display the drink menu and status and the two buttons to interact with the bartender. So we cut a rectangular hole in the front PVC panel underneath the drink window, and drilled four small holes around this cutout that corresponded to the holes on the board of the screen. The screen was attached to the back of the front panel with 4 small screws.
We also drilled two holes on either side of the screen to mount the buttons used to interact with the bartender. The buttons simply slipped into the holes and were fastened down from the back side of the panel with a hex nut.
To make things look a little nicer, we also 3D printed a border to place around the screen that we bonded onto the front panel with some glue.
See the circuit diagram for how to wire up the screen and pumps.
Wiring the PumpsNext we soldered black and red power wires to the two terminals on each pump. To prevent any residue current from flowing back into the Raspberry Pi, we also soldered a 1N007 diode across the terminals on each pump, as shown the the circuit diagram.
To prevent the back from looking too messy with all the wires, we tried to nicely bundle and route the wires together using some electrical tape. You can also see the two 3D printed bushings at the bottom of the bartender in the picture below.
Although this part wasn't necessary, it sure made our bartender look nicer, and also made it easier to know where to position a glass when making a drink. 3D printable files are included with this post for this cupholder with and without our logo.
The cupholder had three stubs on the bottom side which press-fit into corresponding holes that we drilled into the drink platform.
You're almost there! That's all for setting up the physical bartender and hardware. Now visit our Github page for details on how to set up the software in your Raspberry Pi to run the bartender.
Congratulations if you've made it this far! Now you can be the envy of your guests. But the great thing about this bartender is that it's also quite portable, so you can use it anywhere that you can find a wall outlet. If you haven't already, you can watch the video to see how you can use the buttons to navigate through the menus on the bartender screen.
Now go show off it off, and drink responsibly.
After you use the bartender, you'll want to flush out the pump tubes in order to avoid bacteria growth. There is an easy way to do this in the configuration menu. Hook all the tubes up to a water source, then navigate to configure->clean on the bartender screen and press the select button. All pumps will turn on to flush the existing liquid from the tubes. I take the tubes out of the water source halfway through to pump some air through the tubes and remove all water from the pumps. Note: make sure you have a glass under the funnel to catch the flushed out liquid.
Sanitation recommendations per FDA is 1 Tbsp bleach in 1 gallon water with a contact time of 2 minutes, then rinse thoroughly for the same time (recommended weekly).
Cheers,
Davis @ Hacker Shack


Comments
Please log in or sign up to comment.