Welcome to the second part of my AndroidThings tutorial. I wanted to have a way of learning more myself and also share some of the things I've picked up along the way about AndroidThings. This series is made for anyone who wants to learn more about AndroidThings and created by the HacksterMIA community. Hopefully this becomes useful for many others!
If you missed the previous part, I recommend you check that out before continuing as this next part will build on top of what was covered in the previous one.
With that lets continue!
RecapSo in the last part we went over how to setup Android Things on a Raspberry Pi 3 and how to make a LED blink. We took the beginning steps on diving into Android Things and make some great progress on learning some of the basics. With this next part we will take it a step further and expand a bit on what we've made so far.
Getting StartedSo before we start, lets just make sure we have what we need. Adding to our inventory from the previous tutorial, we will now also need a button!
It may not seem like a big jump, but in this next part we're going to change from having our LED blink over and over, to having our LED turn on based on the button being pressed. This is actually a significant jump as we are now introducing interaction with hardware in our Android Things project.
Hopefully you're excited to jump on in!
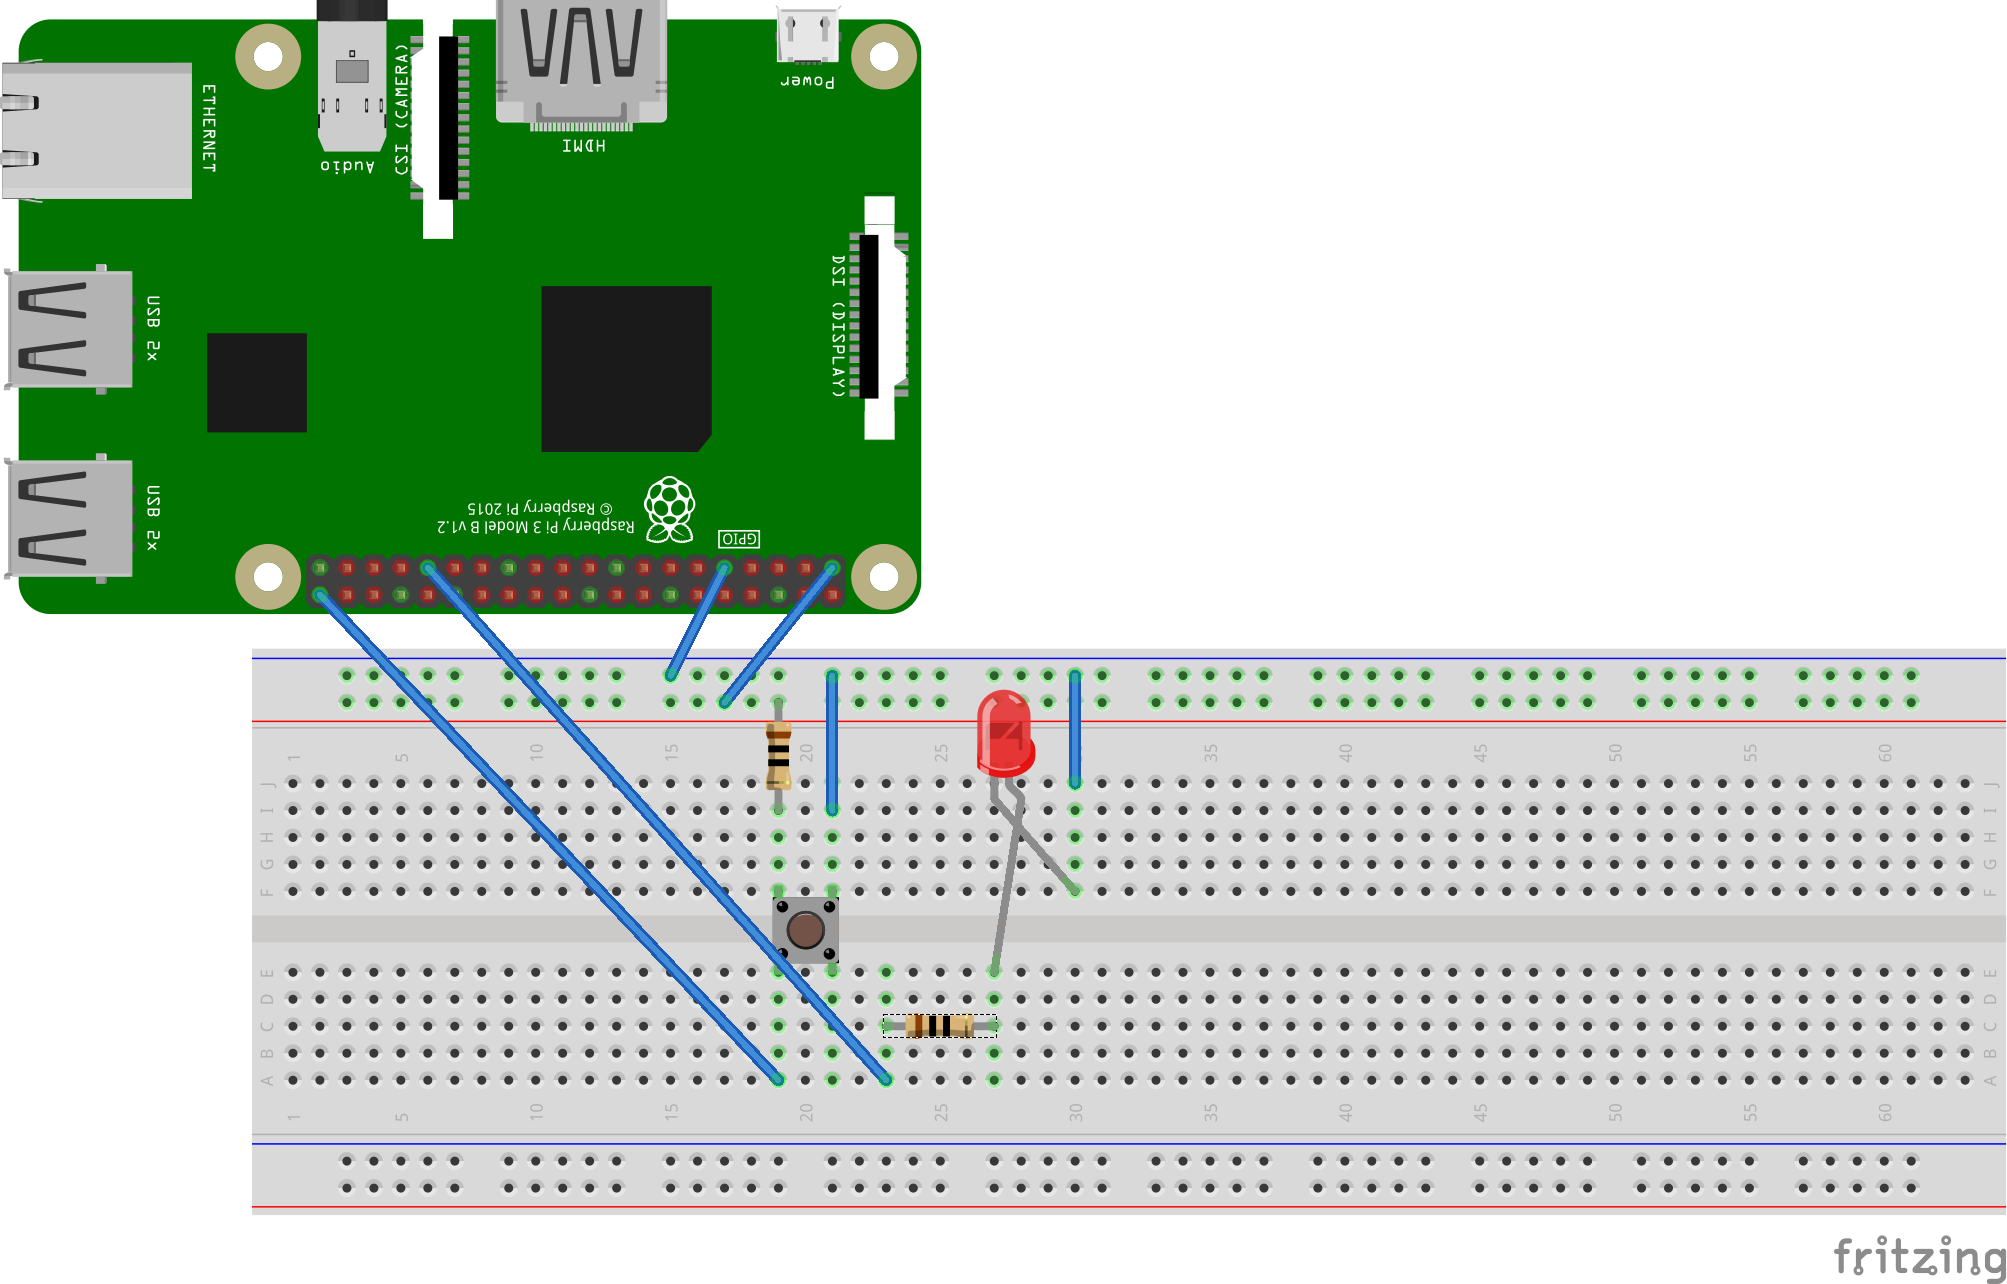
Updating The HardwareSo if you're following along in this series then up to now you should have a Raspberry Pi hooked up to a breadboard with a single LED. Next we'll update our layout by adding a button to the mix.
Follow the following schematic to setup your hardware:
Here's a look of what the changes should look like:
So now we have our hardware assembled, now we're ready to update the code in the project. Go ahead and open up the current project and if you would like to checkout the final version for this part go here.
Open up your MainActivity class and let's start by adding in ButtonInputDriver right after mLedGpio towards the top:
public class MainActivity extends Activity {
 private static final String TAG = MainActivity.class.getSimpleName();
    private Gpio mLedGpio;
    private ButtonInputDriver mButtonInputDriver;
This is what we are going to use to react to events produced by our physical button that we have added. Next let's move to the onCreate method and setup the new ButtonInputDriver. Update this next bit of code with the setup for the button:
Log.i(TAG, "Configuring GPIO pins");
mLedGpio = pioService.openGpio(BoardDefaults.getGPIOForLED());
mLedGpio.setDirection(Gpio.DIRECTION_OUT_INITIALLY_LOW);
Log.i(TAG, "Registering button driver");
// Initialize and register the InputDriver that will emit SPACE key events
// on GPIO state changes.
mButtonInputDriver = new ButtonInputDriver(
        BoardDefaults.getGPIOForButton(),
 Button.LogicState.PRESSED_WHEN_LOW,
 KeyEvent.KEYCODE_SPACE);
Next we're going to want to register the button driver. Right after the onCreate method go ahead and replace this onStart method. We no longer need the loop we had created before to make the LED blink since we are now going to make that happen based on the button. Make the changes like so:
@Override
protected void onStart() {
 super.onStart();
 mButtonInputDriver.register();
}
This registers the newly created button driver when the activity starts up. And because we are responsible developers, let's go ahead and jump down to the onDestroy method and make sure we unregister the button driver when the activity goes away. (Similar to what we had done for the gpio for the LED).
Update onDestroy with like this:
f (mButtonInputDriver != null) {
 mButtonInputDriver.unregister();
    try {
 mButtonInputDriver.close();
 } catch (IOException e) {
        Log.e(TAG, "Error closing Button driver", e);
 } finally{
 mButtonInputDriver = null;
 }
}
if (mLedGpio != null) {
 try {
 mLedGpio.close();
 } catch (IOException e) {
        Log.e(TAG, "Error closing LED GPIO", e);
 } finally{
 mLedGpio = null;
 }
 mLedGpio = null;
}
Awesome! So one last thing to clean up before moving to the fun part. Now that our loop is gone, we no longer need that sleep method we were using before. So go ahead and remove that chunk of code.
Now we're ready to put some action behind that button. Add the following chunk of code after the onStart method:
@Override
public boolean onKeyDown(int keyCode, KeyEvent event) {
 if (keyCode == KeyEvent.KEYCODE_SPACE) {
 // Turn on the LED
 setLedValue(true);
        return true;
 }
 return super.onKeyDown(keyCode, event);
}
@Override
public boolean onKeyUp(int keyCode, KeyEvent event) {
 if (keyCode == KeyEvent.KEYCODE_SPACE) {
 // Turn off the LED
 setLedValue(false);
        return true;
 }
return super.onKeyUp(keyCode, event);
}
This implements the onKeyDown and onKeyUp methods for the button driver and allows us to respond to events driven by the button. So let's break down a bit what we just added.
The onKeyDown method checks if a key has been pressed. If you recall, when we initially setup the button driver, we bound it to the key code Space.
@Override
public boolean onKeyDown(int keyCode, KeyEvent event) {
 if (keyCode == KeyEvent.KEYCODE_SPACE) {
 // Turn on the LED
 setLedValue(true);
        return true;
 }
 return super.onKeyDown(keyCode, event);
}
So the onKeyDown method checks if the key Space has been pressed, and if it has we turn on the LED.
The onKeyUp method, pretty much serves a similar function. It checks that the button has been released, unpressed, no longer pressed (whichever you'd prefer).
@Override
public boolean onKeyUp(int keyCode, KeyEvent event) {
 if (keyCode == KeyEvent.KEYCODE_SPACE) {
 // Turn off the LED
 setLedValue(false);
        return true;
 }
return super.onKeyUp(keyCode, event);
}
The method checks that the Space key code has been released and if that's true then it will turn the LED off.
Running the ProjectAfter that your final file should look something similar to this.
Once everything is looking good and the project builds successfully, we can run our newly updated AndroidThings project!
Reconnect your Raspberry Pi if you need to and after you have successfully connected your Raspberry Pi to your machine, you should now be able to deploy your updated project using Android Studio. Go ahead and click the run button and you should see a dialog window appear which will hopefully have your Pi listed. Select it and run! If all goes well, you should be able to press down on the button and see the LED light up! If not, then not to worry, maybe just back up a bit and run through some of the steps and see where things went off or leave some comments and I can try my best to help!
Wrap upYou did it! You have successfully completed the second part of the Android Things series and have taken some awesome steps in learning more how you can interact with the hardware you build up with your Raspberry Pi and make it do things. Congrats on making it this, and halfway through this series. If there are any points that seem confusing, unclear, or just plain nonsense, please leave me a comment or send me some feedback and I can clear things up or adjust the tutorial to make things better.
Thank you for checking out part 2 and I hope you continue through the next parts and complete this series. Part 3 will be coming soon and will take your current project to the next level with expanding the Android Things project to Android! (yeah an Android mobile phone!)


Comments
Please log in or sign up to comment.