/*************************************************************
  Download latest Blynk library here:
    https://github.com/blynkkk/blynk-library/releases/latest

  Blynk is a platform with iOS and Android apps to control
  Arduino, Raspberry Pi and the likes over the Internet.
  You can easily build graphic interfaces for all your
  projects by simply dragging and dropping widgets.

    Downloads, docs, tutorials: http://www.blynk.cc
    Sketch generator:           http://examples.blynk.cc
    Blynk community:            http://community.blynk.cc
    Follow us:                  http://www.fb.com/blynkapp
                                http://twitter.com/blynk_app

  Blynk library is licensed under MIT license
  This example code is in public domain.

 *************************************************************

  Output any data on LCD widget!

  App project setup:
    LCD widget, switch to ADVANCED mode, select pin V1
 *************************************************************/

/* Comment this out to disable prints and save space */
#define BLYNK_PRINT Serial


#include <ESP8266WiFi.h>
#include <BlynkSimpleEsp8266.h>
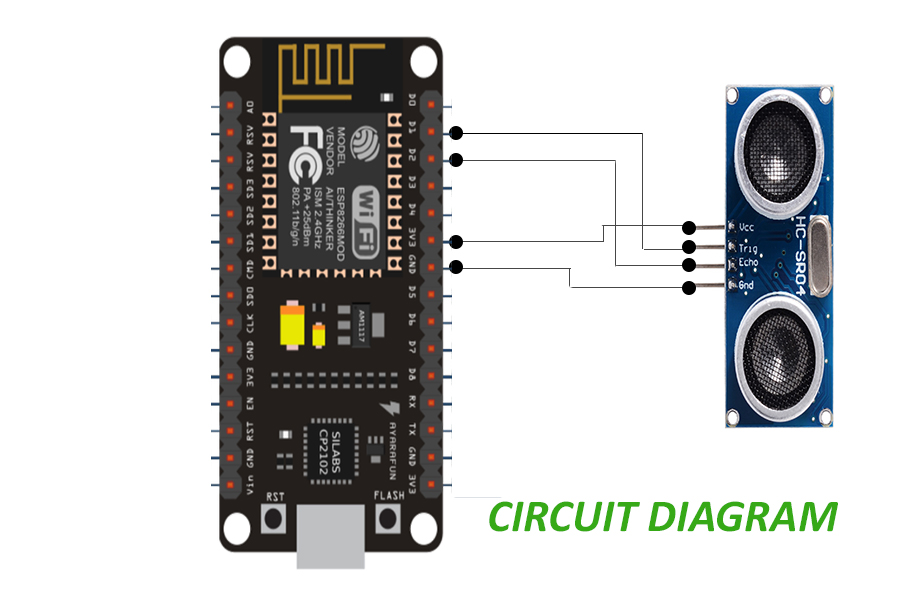
#define TRIGGERPIN D1
#define ECHOPIN    D2
// You should get Auth Token in the Blynk App.
// Go to the Project Settings (nut icon).
char auth[] = "Your auth token";

// Your WiFi credentials.
// Set password to "" for open networks.
char ssid[] = "your wifi SSID";
char pass[] = "your password";

WidgetLCD lcd(V1);

void setup()
{
  // Debug console
  Serial.begin(9600);
pinMode(TRIGGERPIN, OUTPUT);
  pinMode(ECHOPIN, INPUT);
  Blynk.begin(auth, ssid, pass);
  // You can also specify server:
  //Blynk.begin(auth, ssid, pass, "blynk-cloud.com", 8442);
  //Blynk.begin(auth, ssid, pass, IPAddress(192,168,1,100), 8442);

  lcd.clear(); //Use it to clear the LCD Widget
  lcd.print(0, 0, "Distance in cm"); // use: (position X: 0-15, position Y: 0-1, "Message you want to print")
  // Please use timed events when LCD printintg in void loop to avoid sending too many commands
  // It will cause a FLOOD Error, and connection will be dropped
}

void loop()
{
  lcd.clear();
  lcd.print(0, 0, "Distance in cm"); // use: (position X: 0-15, position Y: 0-1, "Message you want to print")
  long duration, distance;
  digitalWrite(TRIGGERPIN, LOW);
  delayMicroseconds(3);

  digitalWrite(TRIGGERPIN, HIGH);
  delayMicroseconds(12);

  digitalWrite(TRIGGERPIN, LOW);
  duration = pulseIn(ECHOPIN, HIGH);
  distance = (duration/2) / 29.1;
  Serial.print(distance);
  Serial.println("Cm");
  lcd.print(7, 1, distance);
  Blynk.run();

  delay(3500);

}


Comments
Please log in or sign up to comment.