


Hardware components | ||||||
| × | 48 | ||||
 |
| × | 48 | |||
 |
| × | 1 | |||
 |
| × | 1 | |||
 |
| × | 1 | |||
 |
| × | 1 | |||
 |
| × | 1 | |||
 |
| × | 1 | |||
Software apps and online services | ||||||
| ||||||
Hand tools and fabrication machines | ||||||
 |
| |||||
 |
| |||||
 |
| |||||
 |
| |||||
So recently I was diving into the world of DIY mechanical keyboard. For years I have no problem using my factory made staggered mechanical keyboard. But I want to try something new for me which is ortholinear layout. For those who just heard the word "Orthonlinear" here are some explanation from reviewgeek
“Ortho” is a Greek word meaning straight or rigid. It’s the same word we use as the base for orthodontics, the medical practice of straightening teeth practiced by an orthodontist. Combine it with “linear” to mean in a line, and you get ortholinear: an adjective that means something has a lot of straight lines.
There are already few company/people that already sell a ready to use ortholinear keyboard, one of the most likeable are Planck keyboard
This are the template that I wanna build. So After choosing the template, I list few requirement for the keyboard I wanna build, such as:1. Wireless Capability. Either with RF or BLE
2. PCB based Build, Handwired build will be time consuming for me
3. Easy to assemble
4. Compatible various kind of dev board
5. Cheap as possible
6. Easy to configure
2. PCB SelectionAt 1st I try to design my own custom PCB. But It will be a not very cost efficient because there will be trial and error. So decide to use an open source design.
After searching, I found a great website that focus on 40% keyboard which is https://www.40percent.club/, The site has many PCB layout to make a custom mechanical from a normal one to an out of the box keyboard like this pi day keyboard
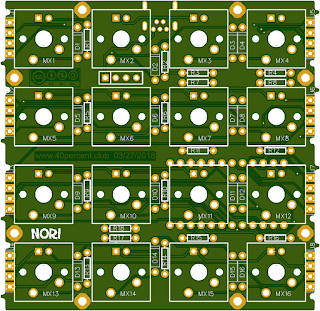
So, after hours reviewing which pcb design I want to print to a PCB service. I decide to print the Nori 4x4 layout. Because it is cheap to print (below 100mm x 100mm size) and it could be daisy chained to make a 40% ortholinear keyboard
After 1 week of waiting I finally receive my 5 nori PCB
I test out one PCB to make a macropad and it work flawlessly
To daisy chain the 3 PCB all I need to do is solder the extra coil I cut from the diode on edge of each edge of the PCB and continue with soldering the diode.
After that I solder the switches and the MCU, the footprint for the MCU is based on the Arduino Pro Micro board. Since I want this keyboard to be wireless so I use the nrf52840 dongle I got from the past hackster contest, and thankfully it fit the footprint of the PCB.
For the lipo charger I use the wemos battery shield from the past project to charge the 1000 mAh lipo battery also used from past project.
And here are the finished build
As for the case I print it at the local acrylic printing service.
4. FirmwareFor the firmware I choose the KMK firmware because it is to install and configure, and also it already had bluetooth support out of the box. and for the layers key I follow the default Planck configuration
I am pretty happy with this build although there are still need some minor improvement on the software and hardware since I forgot to add the battery monitor circuit to the PCB.


Comments
Please log in or sign up to comment.