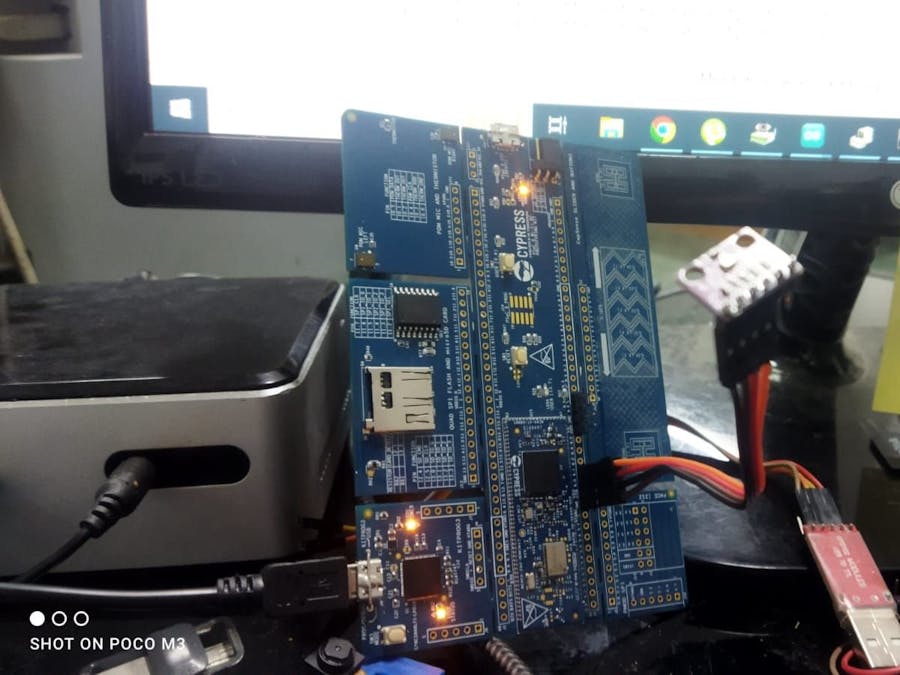
Home Assistant OS has become one of the people choice for open source smart home management software. It is supported by many other open source hardware and software. But there is one software that sometimes could be difficult to connect to Home Assistant, it is Micropython.
In this project page I will guide you to connect the PSoC™ 6 Wi-Fi BT Prototyping Kit: CY8CPROTO-062-4343W with micropython firmware to Home Assistant OS.
PreparationBefore going further, make sure you already have a device that already running the Home Assistant OS. If you are new to home assistant, there are a bunch of guide on youtube regarding the installation or you can visit the home assistant documentation if you preferred a written documentation.
On the hardware side follow along this guide to install micropython firmware on the PSoC™ 6 Wi-Fi BT Prototyping Kit: CY8CPROTO-062-4343W.
After the micropython is installed, switch the jumper pin on the CY8CPROTO-062-4343W like the picture below.
this step is important because it will give 3.3 v power needed for the external sensor.
Download thonny IDE and install it. After thonny is installed open the Application the choose the serial port from CY8CPROTO-062-4343W like the picture below
If everything run accordingly your thonny IDE should be look like this
In order to receive the data from the CY8CPROTO-062-4343W to the Home Assistant OS we are gonna use the MQTT protocol.
To get MQTT on Home Assistant you need to install the MQTT/mosquitto broker add on. Click setting
type mqtt on the seacrh bar the click install
On the hardware side open this link and paste it on the thonny IDE then save it as "umqttsimple.py" on the root of the micropython drive
For this project I am gonna use the BMP280 as test sensor. In order to use the BMP280 for micropython grab the library here and do the same thing like the step above
After all those is setup now we are ready to go to the next step
Configuration and TestingOn the Home Assistant setting open file/package manager open the configuration.yaml file and paste the code below
# Example configuration.yaml entry
mqtt:
  - sensor:
      name: "Temperature"
      unique_id: "temp1"
      state_topic: "homeassistant/office/temperature"
      unit_of_measurement: "C"
      value_template: "{{ value }}"
Back on thonny IDE paste this code below and save it on the root directory
from machine import Pin
import time
from umqttsimple import MQTTClient
import ubinascii
import machine
import micropython
import network

import gc
gc.collect()
last_message = 0
message_interval = 5
counter = 0
ssid = 'XXXXXXXX'
password = 'XXXXXXXX'
mqtt_server = 'xxx.xxx.xxx.xxx'  #Replace with your MQTT Broker IP
mqtt_port = 1883
client_id = ubinascii.hexlify(machine.unique_id())
print(client_id)
topic_sub = b'homeassistant/office/temperature'
topic_pub = b'homeassistant/office/temperature'
user = b'homeassistant'
password1 = b'xxxxxxxxxxxxxxx'

station = network.WLAN(network.STA_IF)
station.active(True)
station.connect(ssid, password)

while station.isconnected() == False:
  pass

print('Connection successful')
print(station.ifconfig())


def sub_cb(topic, msg):
  print((topic, msg))
  if topic == b'notification' and msg == b'received':
    print('ESP received hello message')

def connect_and_subscribe():
  global client_id, mqtt_server, topic_sub
  client = MQTTClient(client_id, mqtt_server, mqtt_port, user, password1)
  client.set_callback(sub_cb)
  client.connect()
  client.subscribe(topic_sub)
  print('Connected to %s MQTT broker, subscribed to %s topic' % (mqtt_server, topic_sub))
  return client

def restart_and_reconnect():
  print('Failed to connect to MQTT broker. Reconnecting...')
  time.sleep(10)
  machine.reset()

try:
  client = connect_and_subscribe()
except OSError as e:
  restart_and_reconnect()

while True:
  try:
    client.check_msg()
    if (time.time() - last_message) > message_interval:
      msg = str(counter)
      client.publish(topic_pub, msg)
      last_message = time.time()
      counter += 1
  except OSError as e:
    restart_and_reconnect()
change the wifi configuration accordingly and mqtt server IP based on your home assistant IP address and then run it. If everything run accordingly the you will the result like below
this means that your hardware has successfully make an mqtt communication to the home assistant OS.
to display the data from the hardware, Open the Home Assistant Dashboard and click the edit button
[pic here]
click add card and choose the mqtt device
choose gauge and search for temperature entity
then you will see the same data send from the hardware displayed on the Home Assistant Dashboard
The BMP280 sensor is using I2C interfaces and I already try the built in Hardware I2C library from the firmware but it doesn't. Thankfully when I try the SoftI2C library I can get the sensor reading successfully. This means SDA and SCL pin could be configured with any pin on the CY8CPROTO-062-4343W hardware.
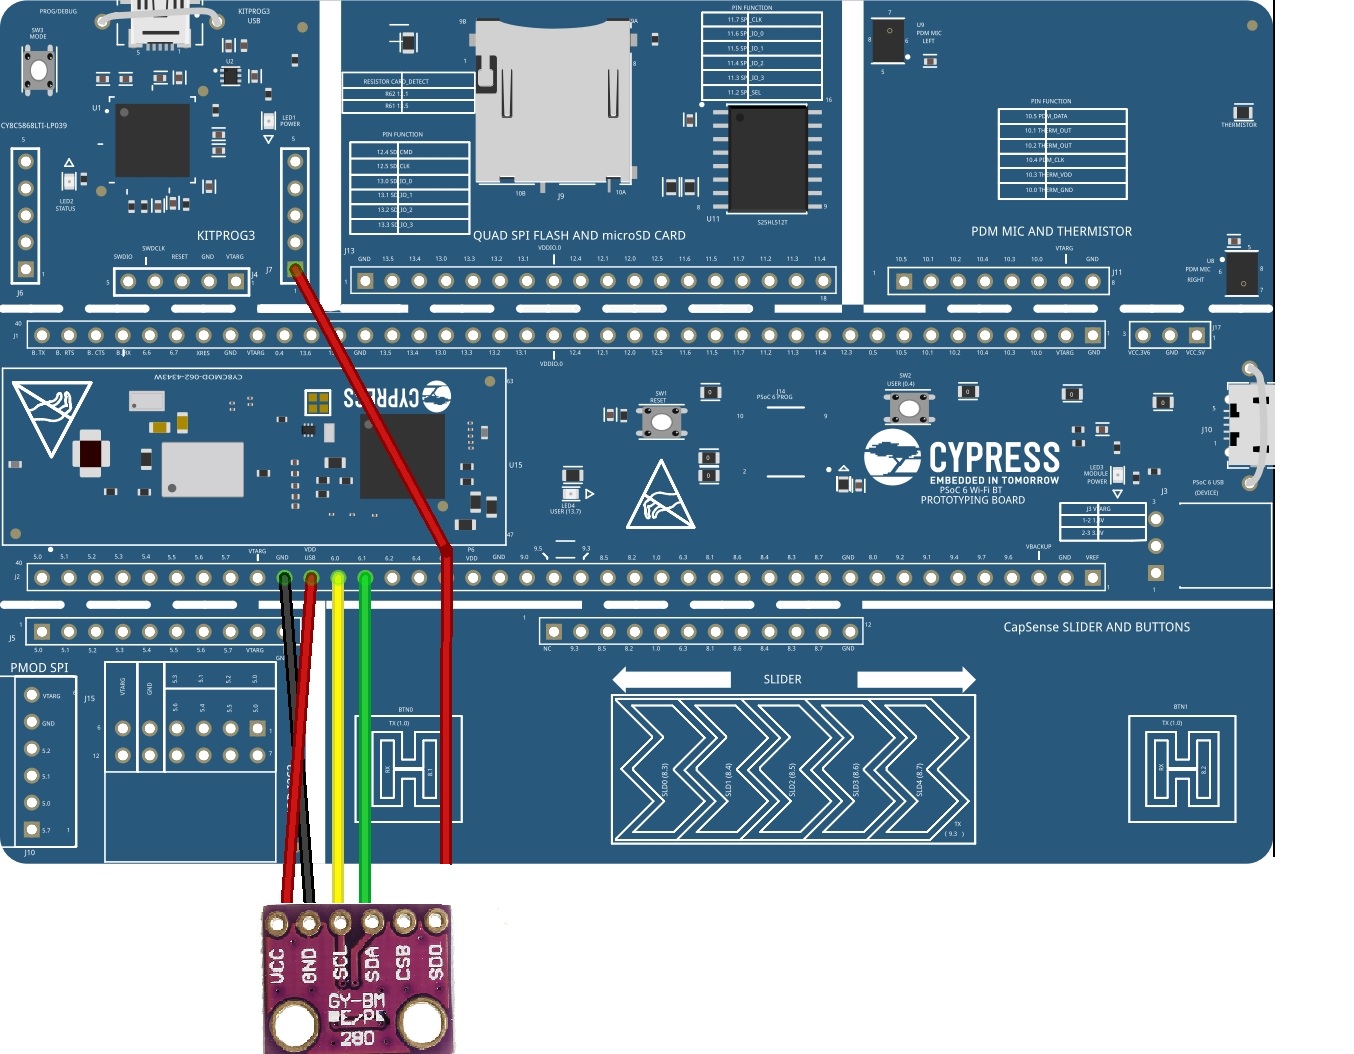
But for this project I am gonna use the configuration like the picture below
PSOC 6 BMP280
VDD USB <------------> VCC
GND <------------> GND
P6.0 <------------> SCL
P6.1 <------------> SDA
To test the sensor upload the code below
from machine import Pin,SoftI2C
from bmp280 import *
import time

bus = SoftI2C(scl='P6_0', sda='P6_1', freq=100000)
bmp = BMP280(bus)

bmp.use_case(BMP280_CASE_INDOOR)

while True:
    pressure=bmp.pressure
    p_bar=pressure/100000
    p_mmHg=pressure/133.3224
    temperature=bmp.temperature
    print("Temperature: {} C".format(temperature))
    print("Pressure: {} Pa, {} bar, {} mmHg".format(pressure,p_bar,p_mmHg))
    time.sleep(1)
Run the code then you will be presented with result like the picture below
Now after testing and everything is prepared, we are ready the send the sensor data the home assistant Dashboard. Simply upload the code below and run it on your thonny IDE, don't forget to change the wifi and mqtt configuration according to your configuration
from machine import Pin,SoftI2C
import time
from umqttsimple import MQTTClient
import ubinascii
import machine
import micropython
import network
from bmp280 import *
import gc
gc.collect()
last_message = 0
message_interval = 5
counter = 0

bus = SoftI2C(scl='P6_0', sda='P6_1', freq=100000)
bmp = BMP280(bus)

bmp.use_case(BMP280_CASE_INDOOR)

ssid = 'xxxxxxx'
password = 'xxxxxx'
mqtt_server = 'xxx.xxx.xxx.xxx'  #Replace with your MQTT Broker IP
mqtt_port = 1883
client_id = ubinascii.hexlify(machine.unique_id())
print(client_id)
topic_sub = b'homeassistant/office/temperature'
topic_pub = b'homeassistant/office/temperature'
user = b'homeassistant'
password1 = b'xxxxxxxxxxxxx'

station = network.WLAN(network.STA_IF)
station.active(True)
station.connect(ssid, password)

while station.isconnected() == False:
  pass

print('Connection successful')
print(station.ifconfig())


def sub_cb(topic, msg):
  print((topic, msg))
  if topic == b'notification' and msg == b'received':
    print('ESP received hello message')

def connect_and_subscribe():
  global client_id, mqtt_server, topic_sub
  client = MQTTClient(client_id, mqtt_server, mqtt_port, user, password1)
  client.set_callback(sub_cb)
  client.connect()
  client.subscribe(topic_sub)
  print('Connected to %s MQTT broker, subscribed to %s topic' % (mqtt_server, topic_sub))
  return client

def restart_and_reconnect():
  print('Failed to connect to MQTT broker. Reconnecting...')
  time.sleep(10)
  machine.reset()

try:
  client = connect_and_subscribe()
except OSError as e:
  restart_and_reconnect()

while True:
  try:
    client.check_msg()
    temperature=bmp.temperature
    if (time.time() - last_message) > message_interval:
      msg = str(temperature)
      client.publish(topic_pub, msg)
      last_message = time.time()
      counter += 1
  except OSError as e:
    restart_and_reconnect()
and congratulation, now you can add any sensor using micropython to the Home Assistant OS
With this project as a base project, I will try to developed a custom home assistant mqtt library for micropython So everyone could easily attach a sensor do minimum coding to send sensor data to Home Assistant OS


Comments
Please log in or sign up to comment.