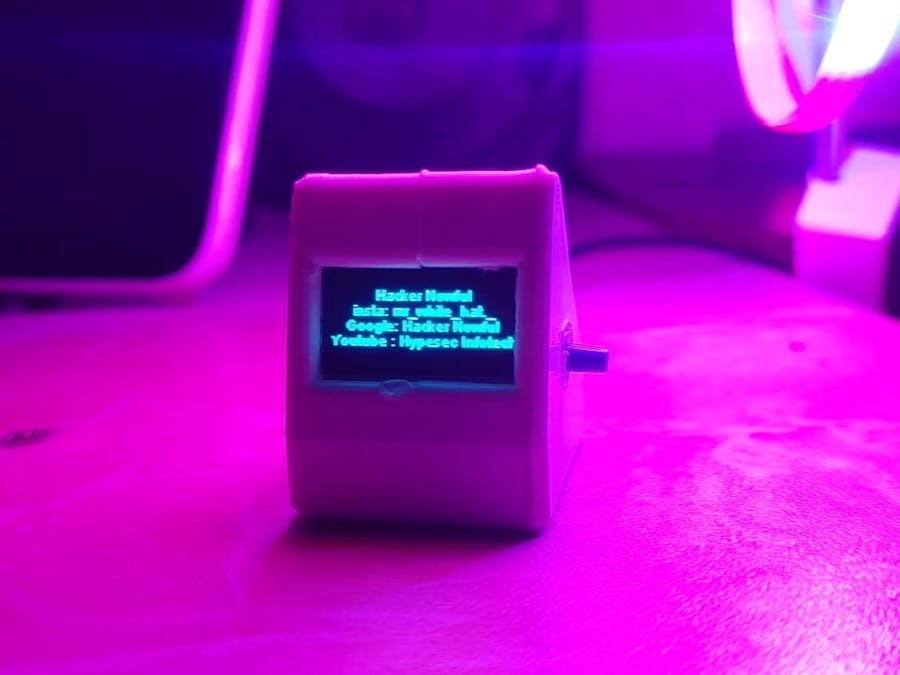
Wi-Fi packet monitor and Deauth DetectorIt's an Wi-Fi Analyzer, this tiny device scan your surrounding Wi-Fi network and display it on that SSD1306 OLED display. It shows your SSID name and channel number also once you find your SSID on that display then you can notice that your channel number [Example: (ch:6)] then it will automatically launch that packet monitor. In this device you can see that one push button is over there when you press that it will change the channel so once you fix that your channel number then it will show that what amount of packet is sending on your network then you have an option that is DA on your OLED display left side top corner when someone try to DEAUTH or jam your network it will show that and it's also turn on one LED to intimate us someone try to hack your network
Introduction
In this blog post, we will explore how to create a WiFi monitor using the ESP8266 microcontroller. The project involves detecting and analyzing WiFi packets, and specifically focuses on identifying deauthentication attacks. We will utilize the ESP8266WiFi library, along with the SSD1306 library for controlling an OLED display. So, let's dive into the details and get started!
Hardware Components
- ESP8266 [ node mcu or d1 mini]
- SSD1306 OLED display
- Push button
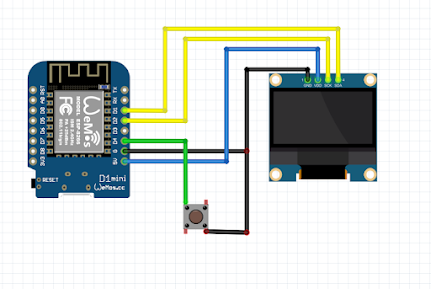
Circuit Diagram
Setting up the Circuit
- Connect the ESP8266 to the OLED display, push button based on the circuit diagram provided.
- Ensure all the connections are secure and properly soldered.
Flashing the Firmware
- Download the compiled binary (.bin) file for the WiFi monitor project.
- Connect the ESP8266 flasher to your computer.
- Open the ESP8266 flasher software (e.g., esptool, NodeMCU Flasher).
- Select the appropriate serial port for the flasher.
- Choose the downloaded.bin file as the firmware to be flashed.
- Configure any necessary flash settings (e.g., baud rate, flash size).
- Initiate the flashing process and wait for it to complete.
Uploading Code to ESP8266
- To upload a Code to ESP8266/d1 mini use a esp8266 flasher
- The Flasher and Program files are in our GitHub to Download file (Click Here)
- Just press that green button and download as zip then extract it
- In this thing there is a 2 files here. just install it depend on your configuration
- Then open that esp8266 flasher it looks like this
- Go to the config option then press that first setting icon and choose our downloaded bin file (packet_monitor.bin) from our GitHub
- Then go back to that operation section. Now connect your d1 mini or any other esp8266 module after you plug in that your device you can see that Com port option appear choose your port and click flash button that is it!
- IF nothing is shown on that display just press that reset button on your d1 mini board
Software Implementation
- Power on the circuit after flashing the firmware.
- The WiFi monitor will automatically start running and displaying information on the OLED screen.
Using the WiFi Monitor
- The OLED display will show available WiFi networks.
- The WiFi monitor will continuously scan the WiFi channels and display real-time statistics, including the current channel, total packets, deauthentication packets, and a graphical representation of packet counts.
- Press the push button to switch channels and update the displayed information accordingly.
Conclusion
- By following this guide, you have successfully built a WiFi monitor with deauthentication detection using an ESP8266. The flashed firmware allows the WiFi monitor to automatically start upon powering on the circuit, displaying real-time statistics on an OLED display. This can be a valuable tool for analyzing WiFi networks and enhancing network security.
- Remember to explore further possibilities, such as integrating additional features like logging, notifications, or remote monitoring capabilities. Experiment, learn, and continue to build upon this project to make it even more powerful and versatile.
Happy hacking!
hypesecinfotech
hackernowful
packetmonitor


_3u05Tpwasz.png?auto=compress%2Cformat&w=40&h=40&fit=fillmax&bg=fff&dpr=2)
Comments
Please log in or sign up to comment.