

You remember the movie by Warner Bros. "Happy Feet" where a single, very musical penguin took off and experienced adventures? You want to breathe life into your aging cat?
You are looking for a gift for Teens and Twens? Here you are right: check out the affordable Bot Kit from Elegoo, which is again fully (with a seal checked) with English documentation at a major online shop to order.
In the small case next to the illustrated, English-language documentation is still a small CD-ROM (which can be read with the usual CD drives). In addition, the color of the acrylic plates, which are selected with the purchase, which are protected with a protective film against scratches. We have reached help 1.
Help 1Get 4x AAA batteries or recharge your batteries as your own.
Look for nice people who will help you peel off the protective film of the acrylic plates - this makes out of the matt, shiny building blocks.
You will also find a big pair of pliers to hold the tiny nuts while fixing them with the Phillips screwdriver.
So we are already on page 4 of the documentation arrived and practice ourselves to look for the components and the corresponding correct screws: this succeeds thanks to the numbering of the bag with the nuts / bolts and the indication on the appropriate page quite simply.
Help 2Note the given hints in yellow: "Please use screws and use in bag #x". In addition, the quantity required and for safety's sake, the size is reprinted: "4x M3 * 10 Pan head machine screws".
Double check the symbols: finally the sweet robot stands on two legs. Check the arrangement of the motors and the alignment of the pre-drilled parts.
On page 8, you take the screws out of bag # 2.
For a dry run, you put the components on the preprogrammed board and can thus make an alignment / calibration of the SG90 engines. This is basically a good idea: before the parts disappear in a housing, perform a functional test.
Elegoo uses JST connectors as well as board labels, so no soldering is needed and plugging the connections is flawless.
On the underside of the board there are further components such as a switch, LED and IR. Protect your board with the enclosed packing material so that the components are neither kinked nor broken off.
Here you will also find a MicroSD card, which is intended for recording more - preferably copyright-free - songs.
In addition to the battery connection, the board also has a micro USB port, so I powered the board with a power bank (5V DC). It is striking that the effect of the switch has no meaning.
With the supplied USB cable, the board should be reprogrammed - I have not tested yet.
With the screws from bag # 6, the assembly of the two feet comes to an end. These are threaded screws, which still have a bit of play after screwing. These do not fit perfectly, which is perfectly fine.
Now the remaining 2 servos are inserted and fixed accurately in an acrylic plate.
This is followed by a new calibration test and the connection with the two ankles.
The two speakers are loosely inserted into a preparation.
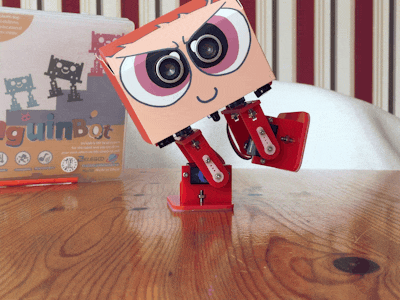
We are nearing the end of assembly and with the ultrasonic sensor we give the penguin the matching "eyes".
Help 4The acrylic plate will push through because the PINs from the sensor can not be laid flat. Uses the transparent template in between this has a precisely fitting recess for the PINs. Fortunately, the screws are long enough to unscrew their nuts. Use tweezers if needed.
Finishing all red components in the right position and then putting on the "shoes". This is the sticking of a protective film on the two foot plates meant.
You've probably found the switch on the bottom and have already tried it. Congratulations! Be sure to press the two leg servos again on the two upper servos. Not that the little guy still has to hobble.
I still had a couple of screws in a few bags and also some of the acrylic plates. This ensures that I could exchange something when needed.
As an optical finishing you can put the little one still a hood made of pre-punched cardboard - which works without glue. You can fold along the fold mark and push through the cardboard lips in pre-punched holes.
Further helpa.) Brian Mitov´s Unboxing & Assembing Tutorials as videos
b.) James Martels Test here on hackster.io
c.) Download Files from the Elegoo Download-Section
- Documentation in German, English, France and Japanese
- Start-Sketch and other Sketches for Infrared Control, Obstacle Avoidance, Play Music and Auto Follow
- Music-Handling with a brief introduction
d.) contact Elegoo - They have two E-Mail addresses: euservice@elegoo.com (EU / JP) and service@elegoo.com (US / CA).
Pricing & AlternativesFor about 50 Euros a complete DIY kit, which is ready for use by the "default" programming. A slightly more expensive DIY kit is offered by Elegoo as a car kit. The test can be found here.
A simple and therefore inexpensive entry could also be the Bristle-Bot for you.


Comments
Please log in or sign up to comment.