


Hardware components | ||||||
| × | 1 | ||||
 |
| × | 1 | |||
A month ago I finally received my C.H.I.P. seven months after I pledged to the successful Kickstarter campaign. During the last month, I have been playing around with the development board in various ways and I am really impressed with what the team has accomplished.
While trying to figure out what I could use the development board for I stumbled across the Node.js library Bleno developed by Sandeep Mistry, the guru of node BLE. The library allows you to implement BLE (Bluetooth Low Energy) peripherals in node.
This article shows you how to use your C.H.I.P. as an BLE peripheral and how to build a mobile application that connects to this service, reading data from the board. In this particular example we expose the board uptime, free memory and current load average, but you could easily change this to suit your needs and read anything you need.
The article will be divided in three parts, first part I will guide you in configuring your C.H.I.P. with the software and libraries needed in order to develop (second part) the node application that implements the peripheral. And lastly (part three), I will guide you in writing a mobile application that connects to the C.H.I.P.
In order to try this example you need the following tools:
- A C.H.I.P. development board - with super user access.
- iOS / Android phone with BLE support
- Evothings Studio software
Preparation
In order to follow this article I assume that you have super user/root access on your C.H.I.P., I also assume that you know how to open a terminal on the development board. If you don't have sudo access, learn how to give your super user access here. Throughout this article, I have started from a development board that was flashed with Debian.
Board Configuration
In order to get the Bleno library to run we need to install Bluez on the development board. Bluez is a Bluetooth stack for Linux. According to the creator of Bleno, the library works best with 4.xx versions of Bluez (rather than versions 5.x).
The first thing we are going to do is to check which version of Bluez that is currently installed. Do this by running the following command:
hcitool | grep ver
Most likely you have a 5.xx version installed on your C.H.I.P. so the first thing we will do is to downgrade the software to a 4.xx version.
The last 4.xx version to be released in June 2012 was the 4.101 release, so that is the version that we will install. You can find the release here and all releases here. The following command will download and uncompress the file.
cd ~
wget https://www.kernel.org/pub/linux/bluetooth/bluez-4.101.tar.xz
tar xfv bluez-4.101.tar.xz
cd bluez-
The next step is to build the binaries from the source code. In order to do that we need to install dependencies. You do that by running the following command:
sudo apt-get update
sudo apt-get install libbluetooth-dev libudev-dev libdbus-1-dev libglib2.0-dev build-essential git
You are now ready to try to build and install Bluez v4.101. Run the following commands in the Bluez-4.101 directory:
./configure
make
sudo make install
If everything went as planned you should have installed version 4.101 of Bluez on your development board. Verify that is the case by running the following command:
hcitool | grep ver
The next step is that we will verify that the BLE-chip is working. Run the following command:
sudo hciconfig
The output from the command should look something like this:
i0:   Type: BR/EDR  Bus: UART
        BD Address: 7C:C7:08:60:53:8A  ACL MTU: 1021:8  SCO MTU: 255:16
        UP RUNNING PSCAN
        RX bytes:41420 acl:960 sco:0 events:1086 errors:0
        TX bytes:33484 acl:807 sco:0 commands:174 errors:0
The interesting part now is the third line that says “UP RUNNING PSCAN”, that means that the BLE-chip is configured and drivers are loaded. If the third line said “DOWN” that would mean you need to start the device by running the following command:
sudo hciconfig hci0 up
sudo hciconfig
Verify in the output that the device is up.
If you are curious to learn how to manage the BLE-chip in the terminal, the programs hcitool and gatttool will be useful. The following command will for example scan for broadcasting BLE devices nearby:
sudo hcitool lescan
Connect to the devices you found using the gatttool software. I prefer to use the software with the option “--interactive”.
The next step is to install the latest version of Node.js (as of today v5.5.0). Since C.H.I.P. is based on an ARM7 core there is prebuild binaries available on Node.js homepage. You can find all node-releases, the files containing binaries that executes on the C.H.I.P. are the ones that have a name that contains armv7l. Start by downloading and uncompressing the file:
cd ~
wget https://nodejs.org/dist/v5.5.0/node-v5.5.0-linux-armv7l.tar.x
tar xfv node-v5.5.0-linux-armv7l.tar.xz
cd node-v5.5.0-linux-armv7l
You install node and npm on your development board by running the following command (be sure that you are in the node-v5.5.0-linux-armv7l directory):
sudo cp -R * /usr/local/
Verify that you succeeded to install node by trying the following commands:
node -v (should output v5.5.0)
npm -v (should output 3.3.12)
The last step in this preparation is to disable the bluetooth daemon. You do this by running the following command:
sudo systemctl disable bluetooth
sudo systemctl stop bluetooth
Verify that you disabled the device by running the following command and read the output:
sudo systemctl status bluetooth
You are now ready to move on to the next step and start developing the Node.js application that we will run on the board.
Part 2 - Node.js Application
First step in getting the Node.js application up and running on the C.H.I.P. is to clone the application from the Github repository. Run the following command in a directory where you would like to store the application.
git clone https://github.com/evothings/evothings-demos.git
The repository consists of two applications, the evothings-application is the mobile application that we will discuss in the following chapter and the chip-application that we will use in this chapter. The next step is to install the dependencies:
cd evothings-demos/chip-system-information/chip-application
npm install
If you have followed the initial steps in this tutorial all libraries required to build the application dependencies should be in place and the installation should succeed. Before explaining the application lets try to run it:
sudo node index.js
Source Code
Let's have a look at the source code, open the file index.js in an editor of your choice.
var bleno = require('bleno');

var SystemInformationService = require('./systeminformationservice');

var systemInformationService = new SystemInformationService();

bleno.on('stateChange', function(state) {
  console.log('on -> stateChange: ' + state);

  if (state === 'poweredOn') {

    bleno.startAdvertising(bleno.name, [systemInformationService.uuid]);
  }
  else {

    bleno.stopAdvertising();
  }
});
In the code above we ensure that the C.H.I.P. starts to advertise once the chip enters the state poweredOn. If it leaves that state the C.H.I.P. will stop to advertise its presence. We rely heavily on the Bleno library in this example, it enables us to define our own BLE-services in our node application
bleno.on('advertisingStart', function(error) {
  console.log('on -> advertisingStart: ' +
    (error ? 'error ' + error : 'success')
  );

  if (!error) {

    bleno.setServices([
      systemInformationService
    ]);
  }
});
Once the BLE-chip has started to advertise it emits the event advertisingStart, upon which we configure the services that we will expose to the user. In this case we only have one service, the SystemInformationService.
Lets have a look at the SystemInformationService, it is implemented in the file systeminformationservice.js, open the file.
var bleno = require('bleno');
var util = require('util');

var LoadAverageCharacteristic = require('./characteristics/loadaverage');
var UptimeCharacteristic = require('./characteristics/uptime');
var MemoryCharacteristic = require('./characteristics/memory');

function SystemInformationService() {

  bleno.PrimaryService.call(this, {
    uuid: 'ff51b30e-d7e2-4d93-8842-a7c4a57dfb07',
    characteristics: [
      new LoadAverageCharacteristic(),
      new UptimeCharacteristic(),
      new MemoryCharacteristic()
    ]
  });
};

util.inherits(SystemInformationService, bleno.PrimaryService);
module.exports = SystemInformationService;
In the code above we define the service to include the following three characteristics, LoadAverageCharacteristic, UptimeCharacteristic and MemoryCharacteristic. The service is given the UUID ff51b30e-d7e2-4d93-8842-a7c4a57dfb07 which we will use in the next chapter to connect to the service. The UUID was randomly generated using this web page.
In the next step we will look at one of the characteristics stated above, in this case the UptimeCharacteristic. Since all characteristics are implemented similarly, we will leave it to you to look at and understand how LoadAverageCharacteristic and MemoryCharacteristic are implemented. Open the file characteristics/uptime.js .
var bleno = require('bleno');
var os = require('os');
var util = require('util');

var BlenoCharacteristic = bleno.Characteristic;

var UptimeCharacteristic = function() {

 UptimeCharacteristic.super_.call(this, {
    uuid: 'ff51b30e-d7e2-4d93-8842-a7c4a57dfb09',
    properties: ['read'],
  });

 this._value = new Buffer(0);
};

UptimeCharacteristic.prototype.onReadRequest = function(offset, callback) {

  if(!offset) {

    this._value = new Buffer(JSON.stringify({
      'uptime' : os.uptime()
    }));
  }

  console.log('UptimeCharacteristic - onReadRequest: value = ' +
    this._value.slice(offset, offset + bleno.mtu).toString()
  );

  callback(this.RESULT_SUCCESS, this._value.slice(offset, this._value.length));
};

util.inherits(UptimeCharacteristic, BlenoCharacteristic);
module.exports = UptimeCharacteristic;
In this article we only make use of read characteristics, there are a lot of other possibilities available as well. The UptimeCharacteristic will upon read deliver the number of seconds that the board has been up and running wrapped in a JSON-object. The UptimeCharacteristic.prototype.onReadRequest contains the callback function that will be executed when a server tries to read the characteristic. In this case the method takes two parameters, offset & callback. The offset parameter contains a value that defines from what buffer offset data should be returned to the callback. If a new characteristic read is initiated the offset parameter is equal to zero and this initiates an update of the buffer (this._value).
In the last chapter you cloned the Github repository containing the applications. In this chapter we will have a look at the application in the evothings-applications directory. Evothings is a development tool that enables users to build cross platform IoT-applications using nothing but web technologies such as HTML and JavaScript.
In order to run the example provided you need to install the Evothings Workbench on your computer and the Evothings Viewer (iOS, Android) on your smartphone. There is more detailed instructions available on Evothings homepage.
Open the Evothings Workbench on your computer and press the Connect tab. In this tab you will connect your smartphone with your computer in order to enable live updates of your mobile application project. Press the GET KEY button to receive a key.
Open the Evothings Viewer on your smartphone and enter the key in the Connect Key field and press the Connect button. Now you have connected your workbench to your mobile phone and you are ready to start to develop your mobile application.
Download the Github repository and unzip it to a folder of your choice. Browse to the evothings-application directory and find the index.html file. Press the My Apps button in the Evothings Workbench and drag the file to the window. Now you should have an application named C.H.I.P. - System Information in your window, see the figure below.
If you press the Run button the application should load on your smartphone see the figure below.
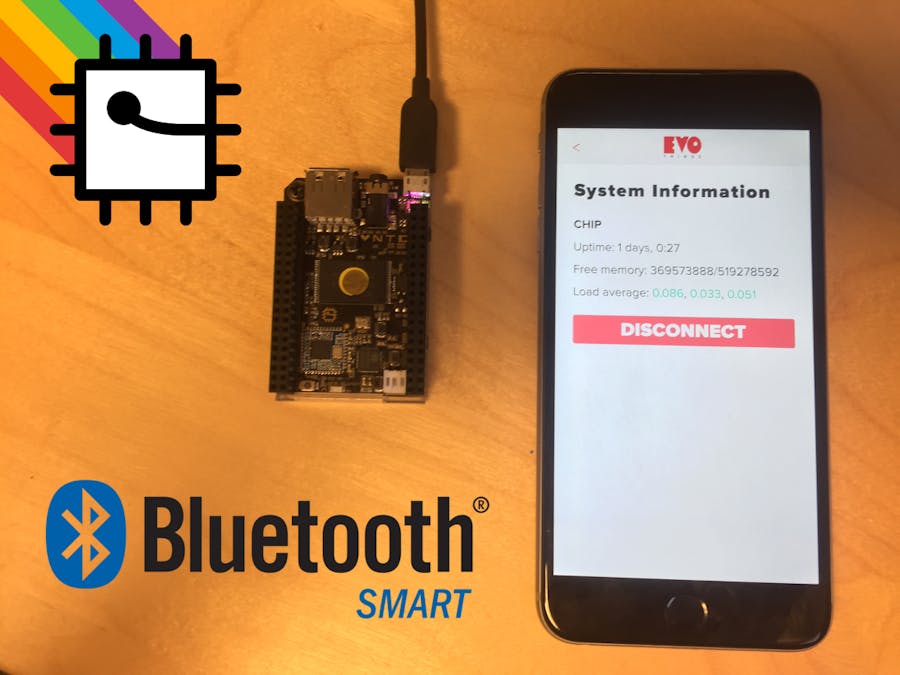
Press the scan button to start looking for advertising BLE-devices nearby. If you have the node application running on the C.H.I.P. you should find your device among the detected devices. Push that device and wait. The application now tries to establish a BLE connection between the C.H.I.P. and your smartphone. When it succeeds it will try to read the three characteristics (uptime, memory, load average) and present them on the screen see the figure below.
Source Code
The application mainly consists of three files, index.html which contains all the code connected to the user interface, app.css which contains the style sheets of the application and last, app.js which contains all the logic of the application.
Open the file index.html in a code editor.
The user interface consists of four views, startView, scanResultView, loadingView and systemInformationView. The startView consists of the initial view that is displayed to the user when the applications is launched. In the view there is a button that, when pressed, executes the app.startScan method in defined in app.js. The scanResultView presents the user with the BLE-devices found during scan and enables the user to connect to one of them. During the connection establishment the loadingView is shown until, the systemInformationView containing the data and a disconnect button is presented to the user. When the user presses the disconnect button the method app.disconnect is executed. In the initial state of the application only the startView is visible, the other views are hidden.
Open the file app.js in a code editor. This file contains all application logic. There is a clear path of usage in this application, first the user initiates a scanning by pressing the scan button presented in the first view. This executes the method app.startScan
app.startScan = function() {

  app.disconnect();

  console.log('Scanning started...');

  app.devices = {};

  var htmlString =
    '<img src="img/loader_small.gif" style="display:inline;vertical-align:middle">'+
    '<p style="display:inline">   Scanning...</p>';

  $('#scanResultView').append($(htmlString));

  $('#scanResultView').show();

  function onScanSuccess(device) {

    if (device.name != null) {

      app.devices[device.address] = device;

      console.log('Found: ' + device.name + ', ' +
        device.address + ', ' + device.rssi);

      var htmlString =
        '<div class="deviceContainer" onclick="app.connectTo(\'' +
          device.address + '\')">' +
        '<p class="deviceName">' + device.name + '</p>' +
        '<p class="deviceAddress">' + device.address + '</p>' +
        '</div>';

      $('#scanResultView').append($(htmlString));
    }
  };

  function onScanFailure(errorCode) {

    // Show an error message to the user
    app.disconnect('Failed to scan for devices.');

    // Write debug information to console.
    console.log('Error ' + errorCode);
  };

  evothings.easyble.reportDeviceOnce(true);
  evothings.easyble.startScan(onScanSuccess, onScanFailure);

  $('#startView').hide();
};
Initially the method shows the scanResultView and hides the startView. The function onScanSuccess is executed each time a new device is detected. The function extracts the relevant information about the device, builds a HTML and inserts the information in the scanResultView by appending a new HTML string. The function onScanFailure is executed if some error occurs during the scanning in which case the app.disconnect method is called. If a user presses any of the found devices the method app.connectTo is executed.
app.connectTo = function(address) {
  device = app.devices[address];

  $('#loadingView').show();

  app.setLoadingLabel('Trying to connect to ' + device.name);

  function onConnectSuccess(device) {

    function onServiceSuccess(device) {

      // Application is now connected
      app.connected = true;
      app.device = device;

      console.log('Connected to ' + device.name);

      var htmlString = '<h2>' + device.name + '</h2>';

      $('#hostname').append($(htmlString));

      $('#scanResultView').hide();
      $('#loadingView').hide();
      $('#systemInformationView').show();

      Object.keys(app.CHARACTERISTICS).map(
        function(characteristic){

          device.readCharacteristic(
            characteristic,
            app.CHARACTERISTICS[characteristic],
            function(error){

              console.log('Error occured')
            });
      });
    }

    function onServiceFailure(errorCode) {

      // Disconnect and show an error message to the user.
      app.disconnect('Wrong device!');

      // Write debug information to console.
      console.log('Error reading services: ' + errorCode);
    }

    app.setLoadingLabel('Identifying services...');

    // Connect to the appropriate BLE service
    device.readServices(
      [app.SYSTEMINFORMATIONSERVICE],
      onServiceSuccess,
      onServiceFailure
    );
  }

  function onConnectFailure(errorCode) {

    app.disconnect('Disconnected from device');

    // Show an error message to the user
    console.log('Error ' + errorCode);
  }

  // Stop scanning
  evothings.easyble.stopScan();

  // Connect to our device
  console.log('Identifying service for communication');
  device.connect(onConnectSuccess, onConnectFailure);
};
The method above starts by displaying the loadingView and hiding the scanResultView, cancels the ongoing scanning and tries to connect to the device. If the connection fails the function onConnectFailure is executed, this function is basically a wrapper to the app.disconnect method. If the connection attempt succeeds the function onConnectSuccess is executed, this function immediately tries to read the service app.SYSTEMINFORMATIONSERVICE. If the service can not be found it calls the function onServiceFailure which, again, basically is a wrapper to app.disconnect. The function onServiceSuccess is called if the read attempt succeeds. The application then immediately reads all the characteristics defined in the app.CHARACTERISTICS object. Each read is registered with a custom callback that handles the data and prints the data to the systemInformationView. The implementation of the callbacks can be found at the end of the file in the functions printUptime, printMemory and printLoadAverage.
app.disconnect = function(errorMessage) {

  if (errorMessage) {

    navigator.notification.alert(errorMessage, function() {});
  }

  app.connected = false;
  app.device = null;

  // Stop any ongoing scan and close devices.
  evothings.easyble.stopScan();
  evothings.easyble.closeConnectedDevices();

  console.log('Disconnected');

  $('#scanResultView').empty();
  $('#hostname').empty();
  $('#memory').empty();
  $('#uptime').empty();
  $('#loadaverage').empty();

  $('#loadingView').hide();
  $('#scanResultView').hide();
  $('#systemInformationView').hide();

  $('#startView').show();
};
The code above shows the implementation of the app.disconnect method. It is basically a wrapper for the evothings.easyble.closeConnectedDevices that executes the disconnect procedure. The last lines empties the dynamic data that the application added during the scanning and data fetching, hides all views but the startView that enables the user to start a new scan as described in previous parts of this article.
Part 4 - ConclusionThis is an article written with the intent of describing how to get started with building BLE applications for your C.H.I.P. Using the provided source code as a starting point you should be able to implement applications that satisfy your requirements. Using the Node.js, the Bleno library and the tools from Evothings you can start developing your IoT-solutions using nothing but web technologies.


Comments
Please log in or sign up to comment.