Arduino Microcontrollers are becoming famous these days due to their ease of use and vast application areas such as Automation, Robotics, Iot, Embedded systems, Weather and Agriculture applications (for smart irrigation systems) and many more. Its cheap and easy to program which is why these are best for newbies especially who want to learn and pursue their career in microcontroller and embedded design fields. Their easy interfacing with sensors and actuators is one of the attracting features.
Well this project I have started as a Hobby project. While reading some articles related to home automation especially related to Arduino, this application attracted me. Although its very basic and simple application but it has taught me a lot about Arduino usage and especially home automation. For those who want to learn controllers, I would suggest such application to start from as it clears many doubts and gives a startup to move towards a big application.
Equipment Required:The hardware required to make this application is as under,
- 1-Bread Board (Qty 1)
- 2-Arduino UNO Kit (Qty 1)
- 3-Arduino USB Cable (Qty 1)
- 4-LDR Light dependent Resistor (Qty 1)
- 5-Resistors (a few)
- 6-Smart Phone (Qty 1)
- 7-Leds (Qty 2)
- 8-Digital Multimeter (Qty 1)
- 9-Bluetooth HC05 Module (Qty 1)
- 10-Relay (Qty 1)
- 11-Connecting Wires (Depends in Application)
- 12-Thermistor (Qty 1)
- 13-16x2 Lcd (Qty 1)
- and a Light Bulb
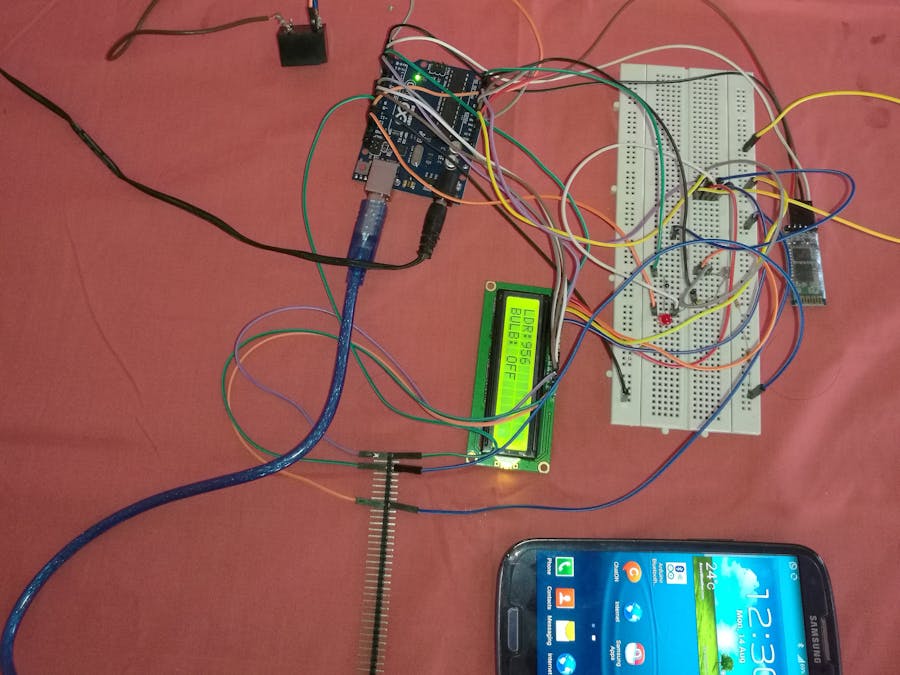
In this tutorial I have made an easy circuit based in LDR, Thermistor and other temperature sensor to monitor the temperature and light intensity. In this home automation example I have also connected a light bulb which is energized form main AC supply (220V) so that we could replace our ordinary light control with Arduino control. To control light bulb a Bluetooth device HC05 is also interfaced with UNO. Red led is used to blink when light value reaches a certain value. In coding a scalar value is selected so that if LDR value gets reaches that limit led starts glowing else this led will remain silent (off). This application is an example of automatic turning ON of lights in garden or corridor. This circuit could be replaced bulb circuit which is connected with relay and Arduino.
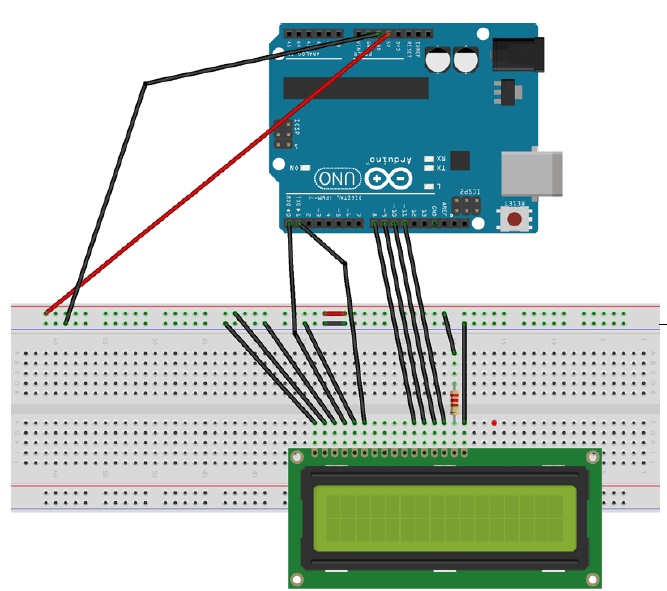
LCD: Pin Connections with Arduino UNO
The connections which are done for LCD are given below:
PIN1 or VSS to ground
PIN2 or VDD or VCC to +5v power
PIN3 or VEE to ground (gives maximum contrast best for a beginner)
PIN4 or RS (Register Selection) to PIN0 of ARDUINO UNO
PIN5 or RW (Read/Write) to ground (puts LCD in read mode eases the communication for user)
PIN6 or E (Enable) to PIN1 of ARDUINO UNO
PIN11 or D4 to PIN8 of ARDUINO UNO
PIN12 or D5 to PIN9 of ARDUINO UNO
PIN13 or D6 to PIN10 of ARDUINO UNO
PIN14 or D7 to PIN11 of ARDUINO UNO
LCD: Code:
#include <LiquidCrystal.h>
// initialize the library with the numbers of the interface pins
LiquidCrystal lcd(0, 1, 8, 9, 10, 11); /// REGISTER SELECT PIN,ENABLE PIN,D4 PIN,D5 PIN, D6 PIN, D7 PIN
void setup()
{
// set up the LCD's number of columns and rows:
lcd.begin(16, 2);
}
void loop()
{
// set the cursor to column 0, line 1
lcd.print(" IOT ENTHUSIAST");//print name
lcd.setCursor(0, 1); // set the cursor to column 0, line 2
lcd.print("Circuit Design");//print name
delay(750);//delay of 0.75sec
lcd.scrollDisplayLeft();//shifting data on LCD
lcd.setCursor(0, 0);// set the cursor to column 0, line1
}
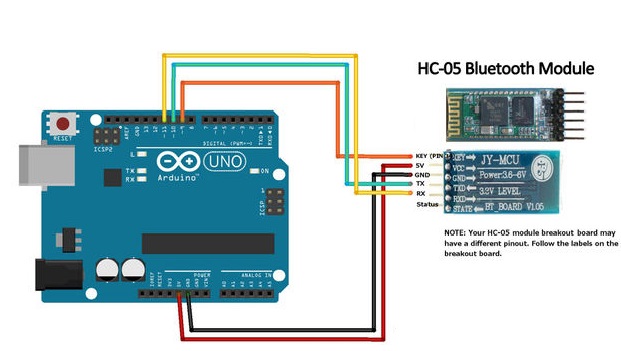
HC05: Pin Connections
HC05 GND ----> Arduino GND Pin
HC05 VCC (5V) ----> Arduino 5V
HC05 TX ----> Arduino Pin 10 (soft RX)
HC05 RX ----> Arduino Pin11 (soft TX)


_ztBMuBhMHo.jpg?auto=compress%2Cformat&w=48&h=48&fit=fill&bg=ffffff)


Comments
Please log in or sign up to comment.