Story:
Now-a-days everyone like to have home decorative with wide range of ceiling lights, flush mount lights, semi flush mounts, spot lights, wall mirrors, clocks, wall art and more. The home lighting system enhances the beauty of our home like never before. These systems are coming with LED's because they are Eco-friendly and power saving. The interesting thing is that many of the users are interested to have IoT kind of home lighting systems because they help-a-lot. The IoT my home lighting device designed with ESP8266 and Arduino with remote mobile app designed using Cayenne my devices will be helpful in various purposes. This device can fit and serve in any kind of place like for homes, shops, offices, schools, colleges, hospitals, function halls, meeting halls, etc. Cayenne app designing and controlling some actuators and reading data from sensors using arduino boards it is easy to access the IoT my home lighting devices remotely and it can be more helpful to every household and office purposes.
Now we will see step-by-step to construct the IoT my home lighting devices and its working in various applications.
Step 1: Components chosen to build IoT my home lighting devices can be shown step by step by constructing. Here I am going to use the Dot Printed Circuit Board (PCB) because it is inexpensive and to beginners it is easy to design for their home lighting device. I will cut a small portion on it marked with pencil at right corner shown in Fig 1.
Step 2: I have chosen the Male and Female Header connector pins to insert Sensors, Actuators and ESP8266 MCU for plug and replace which ever components are necessary in future. Fig. 2 show the male and female header connector pins use to interface relays, motors, solenoids, etc to read/write, enable/disable through port pins of MCU.
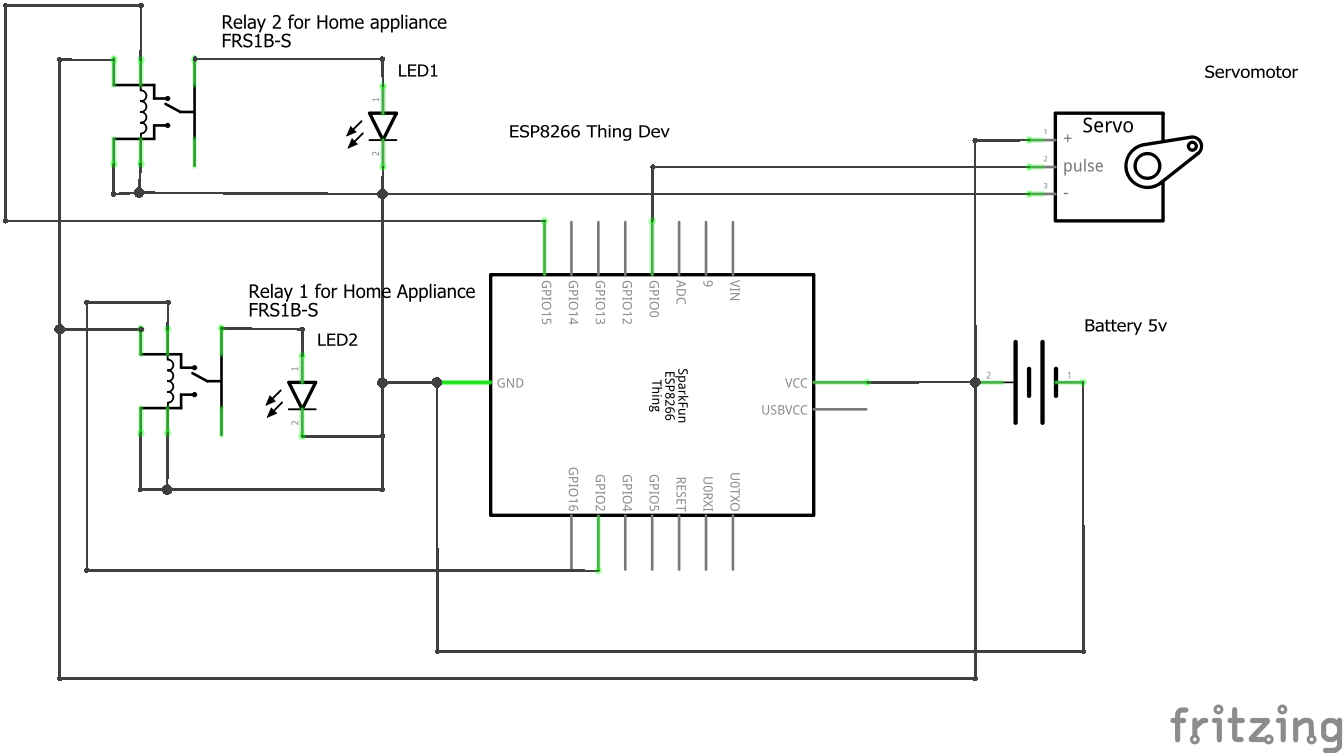
Step 3: PCB and schematic connection are shown in the following figure 3 &4 for IOT home lighting device. Circuit can be deigned on PCB board to interface or connect the sensors and actuators. The software to draw schematic circuit diagram I had used fritzing is available in the URL
Step 4: The header pins are inserted on the dot PCB and soldered firmly as our application circuit diagram to add sensors and actuators to ESP8266 Thing dev board. This header pins used to power the ESP8266, and read/write data for sensor, to actuators. According to our possible interface we can divide the port on ESP8266 for specific home appliances.
Step 5: Header pins are soldered to ESP8266 port pins to make ease in the application and for re-program convenience.
Step 6: Insert the ESP8266 board on the PCB shield to use in application it can be removed to re-program. This ESP8266 is more convenient for use because it has on-board power switch to turn ON/OFF the board during power the device externally. More details on ESP8266 module and libraries is available in https://www.sparkfun.com/products/13711 ensure to add/update libraries to your library manger in Ardunio IDE https://github.com/myDevicesIoT/Cayenne-MQTT-ESP8266 in the above link we have step-by-step procedure to add libraries you are beginners.
Step 7: Connecting wires are taken to interface grove relays to ESP8266 board
Step 8: Apply hot glue to fix the modules and component in the box so that will not disturb with our carry and the box will be safety from air expose.
The process of fixing the module with glue is shown in the video 1 IoT my home lighting device part1/5.
Step 9: The IoT home lighting device is now connected to my home tube light and fan to turn ON/OFF remotely using Cayenne My devices dash board. Video 2 shows how I had connected the IoT my home lighting device to tube light and fan in my home.
Step 10: The program can be done through Arduino IDE software and is available to download latest version https://www.arduino.cc/en/main/software. After uploading the program is ready we can insert the ESP8266 board in the application circuit to turn ON/OFF home appliances remotely. Fig. 11 shows the screen short image of uploading the program onto ESP8266 module. Program can be downloaded or reuse from the code attachments the program is done in arduino IDE
Once the program is ready and switch on the ESP8266 module the cayenne my devices mobile app will appear as shown in screenshot image fig. 12. the cayenne login link https://cayenne.mydevices.com/cayenne/login and mobile app is available in google play store https://play.google.com/store/apps/details?id=com.mydevices.cayenne&hl=en document on using cayenne is found in the URL https://mydevices.com/cayenne/docs/intro/
Step 11: After program the ESP8266 module is inserted on the circuit board to apply it for home appliances controlling remotely. To operate the home appliances remotely we need to customize the widgets in the cayenne dash board as we like but in the present project I am using Two button and a slider to turn ON/OFF tube light, street light, table lamp, fan and slider for servomotor to control the table lamp light direction. Video 3 shows programming, activating the home appliances remotely and step-by-step to customize the widgets in IoT my home lighting device. Fig. 13 show the screen shot image of the IoT my home lighting device to turn ON/OFF tube light and fan in my home. Channel '15' is used for light and channel '2' is used for fan in this lighting device.
Step 12: One more application to turn ON/OFF street light and schedule the light to turn ON and OFF automatically to the specified time schedule to repeat it for a day, week, month or year as our requirement. Fig. 14 & 15 shows the street connecting wire to control it remotely from anywhere.
Channel 2 is used to control the street light remotely.
Step 13: Screen shot image of street light controlling from cayenne my devices dash board is shown in figure 16. Video 4 shows the setting and using the cayenne dashboard to turn ON/OFF the street light remotely using ESP8266 thing dev kit.
Step 14: Remove the torch LED dome as shown in fig. 17 to construct the table lamp, it is easy project it at a particular direction using servomotor.
Step 15: Prepare the clam with aluminum sheet to fix it on the servomotor as shown in Figure 18 it is convenient to set and to direct the light to a particular direction.
Step 16: Cut the desired shape as you like to fit the torch dome in a box and to fit it on servomotor. Figure 19 show how to cut it from a useless box.
Step 17: Torch Led dome is Clamped and fixed on useless Allout box and is shown in fig. 20. This table lamp is home made to reduce the expenses and can utilize the waste thing for our showcase.
Step 18: Final table lamp from a waste box and torch dome light is ready to utilize for home lighting table lamp it is shown in fig. 21.
Step 19: Fig. 22 Platform to set the table lamp and directed it in 150 degrees. Servo motor is fixed firmly on the cardboard to direct the LED table lamp using ESP8266 module and cayenne dashboard.
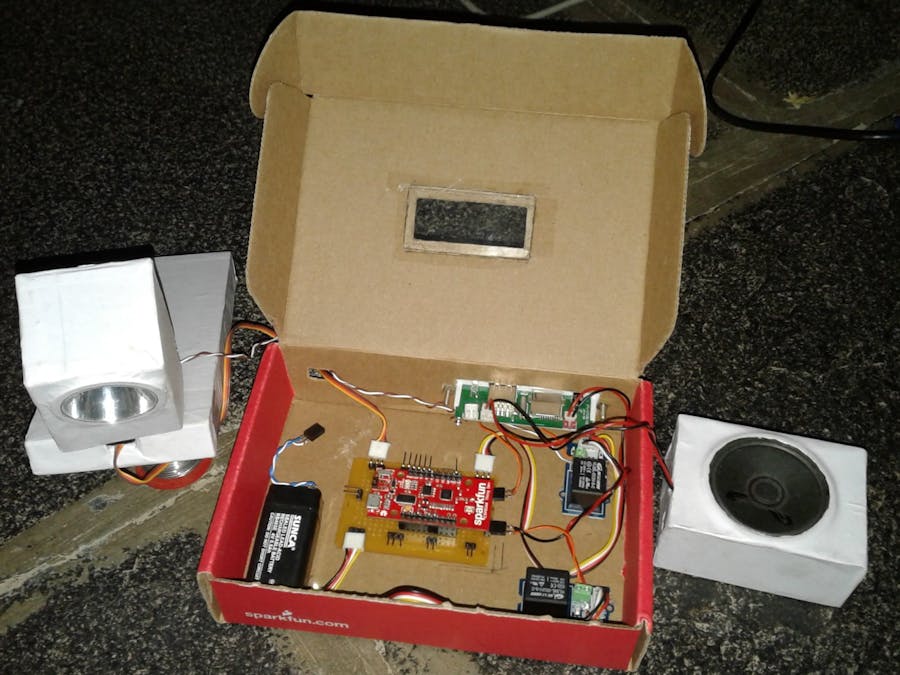
And the final setup looks like in the figure 23.
Step 20: Preparing speaker box for Mini mp3 player fig. 24 show the material used for this homemade speaker box.
Step 21: Now the table lamp and mp3 player is set in the IoT my home lighting device which is shown in fig. 25 & 26.
This appliances also can be controlled with cayenne dashboard remotely. Channel '15' is used for Lamp, channel '2' for MP3 player and channel '0' for Servomotor in this project.
Following fig. 27 & 28 shows the screenshot image of cayenne dashboard to operate the table lamp and Music player in mobile app and PC.
The video 5 show how to schedule the alarm from music box and direct the table lamp for our convenient direction to read or write at night time without disturbing the home mates.
Finally we can use this ESP8266 Thing Dev kit to interface home appliances like Living room, kitchen, bedroom, bathrooms, corridor street lights. ESP8266 is capable to control up to ten of appliances with this available channels. The appliances can be fans, motors, rice cookers, coffee makers, mosquito liquid vaporizers, geezers, plug, cooler, Air conditioner, music system, etc. IoT my home lighting device can be ease to install and can use in offices, colleges, restaurants, schools, industries, factories, shops, etc. This device is more useful to everyone and easy to operate in high secure to access by the unique or multiple user when the login ID is shared. I can operate my home appliances in India from New York city..


Comments
Please log in or sign up to comment.