Siemens, RS-Components and Arduino have gotten together to create an product for Education, Makers and Design engineers to get first hand experience with a platform designed to Industrial Standards but open enough to be familiar to a wide range of existing SBC users, weather that is from using an Arduino UNO, Arduino Yun, A Raspberry PI or another from the myriad of educational platforms out there.
Description of featuresSo lets tear it down:
Looking at the case it is made from Poly-carbonate reinforced with 10% glass fiber so nice and strong and made to last.
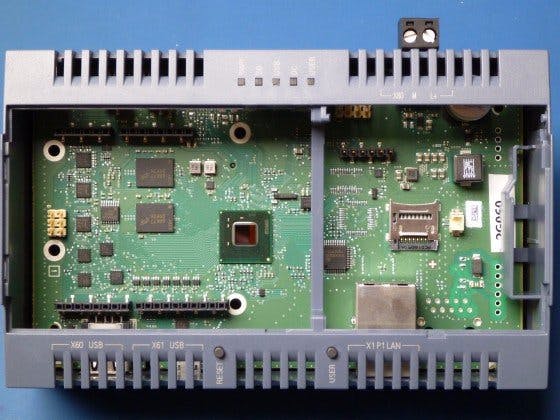
Flipping the lids we can clearly see the Arduino compatible headers supporting the numerous shields available. In the center you can see the Quark X1000 SOC, this runs at 400Mhz and has 512MBytes of ram attached. To the left of the arm you can see the 10bit ADC chip.
In the right section we find the SD card socket that can hold up to a 32GB SD card, I would suggest getting a good class 10 uSD card to improve overall reliability and responsiveness of the system. I personally like to use Samsung Pro or EVO cards, I have yet to have any issues with them and there very quick to flash.
The plastic pocket you see on the right is for an optional battery for the real time clock, the OS will need to reach out to the internet or be manually set on every boot if you don't have one but it is not included with the IoT2020 educational kit. It is easy to fit your own though.
On the insideAt the top of the right section you can see the TTL Serial header, this is used to connect a serial cable to your PC or other device; an FTDI 3V3 cable works well. You don't need to have all five wires connected, just TX, RX and a ground. CTS and RTS are not needed.
Now lets take the board right out:
With the board fully exposed we can see two jumpers in the upper left area, the one on the left controls if VIN is attached to the raw 24V supply or left unconnected (I would suggest to leave it disconnected), the one to the right of it controls if the Arduino pins use 5V or 3V3. So this will be set depending on the boards you will plug into the headers or devices you attach via jumper leads. Be aware of the device requirements you attach! You have been warned.
At the bottom you can see the two USB ports, the left is a host and can easily support a USB WiFi dongle. I have verified the Raspberry PI Official WiFi works well, the smaller connector supports console and USB com for Arduino sketches, etc.
In case you're wondering, the empty chip pads at the top right are there for a DUAL RS232/422/485 option, not included in the educational IoT2020.
Looking at the bottom of the board we can see the eSATA slot supporting expansion options like an Intel Express Centrino WiFi and Bluetooth module. Again I have already tested this and it works exceptionally well. You will need to drill out the antenna holes in the lower case though, and may need a card extender to reach the retainer at the bottom of the board.
You can find the flash images here once you have signed up to the Siemens site. Manuals and other support can also be found here. The WiFi card is an Intel Centrino Advanced-N 6235.
The USB WIFI is the official one for a Raspberry PI and can be found at RS here.


Comments
Please log in or sign up to comment.