

Hardware components | ||||||
 |
| × | 1 | |||
Software apps and online services | ||||||
| ||||||
| ||||||
This project will show how to connect a Raspberry Pi to IBM Bluemix and then connect a mobile app to Bluemix platform to monitor the data it receives. You could also connect your system with Twilio to trigger a message when temperature value exceeds the threshold. Concepts explained here are general and can be easily modified to suit your particular project needs. View Source
IoTIFY offers a virtual Raspberry with required sensors for your IoT projects, so you will not need a physical Pi.If you have a physical Raspberry Pi around, you can use that too, there are no changes to be made to the tutorial in that case, just follow it along :-)
What you’ll learn- Interacting with hardware, for example communicating with an I2C device and operating digital inputs and outputs.
- Interfacing with IBM bluemix, one of the leading IoT cloud platforms.
- Building and installing a simple Android App with Cordova and connecting to IBM Bluemix.
The project consists of an emulated Raspberry Pi connected to a digital temperature and humidity sensor from Sensirion (SHT21).
In this guide, we present an application of IoTIFY’s virtual lab that uses the Hello IoT project to create a temperature and humidity monitoring system where the user gets notified about sensor values in real-time via a mobile app.
Project ComponentsThe project consists of following components:-
- IBM Bluemix IOT Service: IBM offers its inhouse IoT messaging service based on MQTT protocol. It is available as part of the IBM Bluemix catalog. You will need to signup for an IBM Bluemix trial account and follow the configuration steps described in this guide.
- IoTIFY Hello IoT project: This is the complete hardware emulation of a Raspberry Pi connected to a temperature and humidity sensor, available in the IoTIFY virtual lab. You will need to signup at IoTIFY to access this.
- Android Mobile (Optional): In order to monitor this virtual hardware via a mobile app, we will need an Android mobile phone.
- Twilio Integration (Optional): Connect twilio services to send a message in case temperature exceeds a certain threshold.
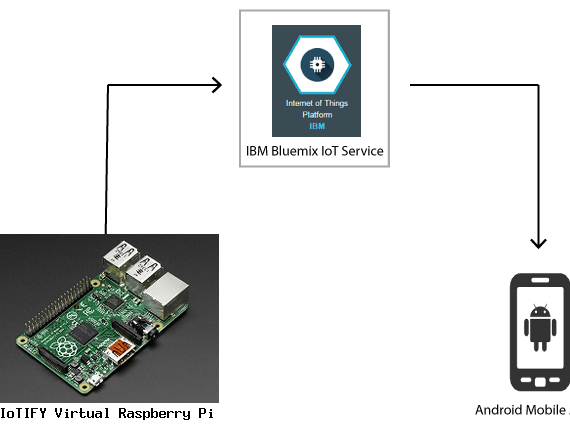
The reference architecture of the entire system is shown below.
As for the software, we have the following components in this project
- Raspberry Pi Python Script: This is a Python application which runs on the Hello IoT project. It monitors temperature and humidity values and publishes the readings to IBM IoT service.
- Cordova Android Mobile App: This is a Cordova-based Android mobile app which is used to monitor the Raspberry Pi remotely. We will build this app and showcase how to use it in conjunction with IoTIFY’s Hello IoT project.
The complete source code for this application is available on GitHub in this repository.
Refer to the README file for steps to configure and build the software components of this application.
So let’s dive in and build this application.
1. IBM Bluemix SetupFollow this guide to configure IBM Bluemix platform for this use case.
2. Setup Twilio account (Optional)To set up the Twilio service, first create an account at Twilio. During account registration, you will be asked to provide your mobile phone number and confirm its validity with a verification code sent via SMS. At the end of the registration process, you will be taken to the “Getting Started” page to build an application with Programmable SMS:
Then, you need to get a Twilio phone number: click on “Get a number” and you will be presented with a proposed number: click “Choose this Number”, take a note of the chosen number and then click “Done”.
The other information needed when creating an application that uses Twilio messaging service is your account SID and your auth token: to retrieve this data, go to the Twilio console home by clicking on the home icon in the left hand side menu:
In the console dashboard, the account details section shows your account SID and auth token:
Signup with iotify.io if you haven’t yet. The free account will have sufficient credits to run this project. Once you are logged into the IoTIFY main application, go to the virtual lab and click on the Hello IoT project:
Provide a unique name for your project and select “Raspbian Jessie” as target OS. Then click “Launch Project”.
The project takes 3-5 minutes to launch. The project state is shown in your virtual lab workspace and will automatically change to running once it is ready:
You could then simply click the Open button and it will open a new tab with the Workspace of the project:
The webview has a Raspberry Pi connected to switches and LEDs; it also contains a virtual temperature and humidity sensor, with knobs that allow adjusting sensed values. The virtual sensor is an emulated Sensirion SHT2x, connected to the Raspberry Pi via an I2C bus, so that you can interact with the sensor from the Rapsberry Pi terminal.
Open the console by clicking on the small console icon on the top left corner above the directory listing, circled in red in the figure below:
This will open a terminal with a Linux shell prompt, from which you can interact with the emulated Raspberry Pi:
Now we are ready to install the Python script which is the software application that runs on this simulation setup. But before that we have to install the following dependencies for it.
- ibmiotf: IBM IoT Python SDK
- twilio : Twilio Python SDK for integrating text messaging
We can install the above two dependencies through the Python installer ‘pip’, by typing the following commands in the Raspberry Pi console:
sudo pip install ibmiotf
sudo apt-get updatesudo apt-get install -y libffi-dev libssl-devsudo pip install twilio
If we have reached this far then, it is now time for some action. We are finally ready to run our application. But there is one last step to be performed, which is to configure the Python script so that it registers with IBM IoT platform service using the appropriate device id & authentication token that we created earlier.
But first, let’s clone the GitHub repository of this project in the project workspace so that we have access to the Python script.
git clone https://github.com/iotify/hello-iot-bluemix.gitcd hello-iot-bluemix
The repository contains all the project sources including the mobile app as well as the other files. For the Raspberry Pi application we are only interested in the ‘bluemix.py’ file:
Open the file by double-clicking it on the left-hand side explorer (if you don’t see the newly created hello-iot-bluemix directory in the file explorer, right-click on the root entry “raspberry” and then click “Refresh List”):
Double-clicking the file on the explorer will open a file editor in the workspace:
Now you will need following configuration values from IBM and Twilio to be inserted in the Python script bluemix.py for Raspberry Pi in the Hello IoT project:
Refer to the Python script configuration section in the README file for the steps to configure the Python script. These configurations are related to IBM IoT platform and Twilio.
Once the configurations are in place, save the file and run the script
sudo python bluemix.py
WARNING : Running the Python script without these configuration settings will lead to unexpected behaviour or termination of the program.
Configure and build the mobile appFor building the mobile app, you need to set up the build environment on your computer. The following instructions are valid for the Ubuntu distribution, but should apply with minimal or no modifications to other Linux distributions as well.
First, open a Linux terminal and clone the source code repository:
git clone https://github.com/iotify/hello-iot-bluemix.gitcd hello-iot-bluemix
Then, refer to the mobile app configuration section in the README.md file in the root folder of the source code, for the steps to configure the javascript file in the mobile app. These configurations are related to IBM IoT platform. Once the source code is configured with your IBM Bluemix account settings, you need to set up Node.js, Cordova and Android tools in your computer to be able to rebuild the app:
To install Node.js:
curl -sL https://deb.nodesource.com/setup_6.x | sudo -E bash -sudo apt-get install -y nodejs
To install Cordova and its dependencies:
sudo npm install -g cordovasudo apt-get install -y gradle
To install Android Studio, go to https://developer.android.com/studio/index.html and click on the “Download Android Studio” link; extract the contents of the downloaded zip file in a folder of your choice, then navigate to that folder in a terminal and execute the studio.sh script in the android-studio/bin subfolder:
./android-studio/bin/studio.sh
Follow the on-screen instructions of the Android Studio setup wizard, which will download and install various software components needed for building Android apps. At the end of the installation, a welcome screen indicates that Android Studio is ready to be used:
You can now close the Android Studio window, since our app wil be built using the command line.
Once Android Studio is installed, we can build the Hello IoT app: from the Linux terminal, navigate to the HelloIoTApp subfolder in the source code for the Hello IoT application and build the Android app:
cd HelloIoTAppcordova platform add androidANDROID_HOME=~/Android/Sdk cordova build android
After the build, the Android app package file is available at the location platforms/android/build/outputs/apk/android-debug.apk. To be able to install the application on an Android phone, we first have to enable USB debugging on the phone. The following instructions are known to work with Android version 5.1, but should apply with little or no modifications to other Android versions as well:
- In your Android phone, locate and open the Settings app:
- Tap the Developer options entry:
- Enable developer options by turning on the slider at the top of the screen, then turn on USB debugging:
You can now connect your phone to a USB port of your computer; if a diolog popup appears on your phone asking whether to allow USB debugging, tap OK. To install the IoT app on the phone, type the following command in the Linux terminal:
ANDROID_HOME=~/Android/Sdk cordova run android
The Hello IoT app is now installed in your phone and is launched automatically:
FINALLY!! , we are all set. Make sure that the Python script is running under the Hello IoT project. From the mobile app in your phone you can now remotely monitor your Raspberry Pi. You can change temperature and humidity values using the two knobs in the Hello IoT project Webview, and see these values reflected in the mobile app:
Before reading temperature and humidity values from the sensor, the Python script checks the status of GPIO 14, configured as input, and sends a temperature and humidity status update only if the GPIO is set to a low value. This feature can be used to pause sending status updates while keeping the script running: in the Webview, click on the GPIO 14 switch (initially set in the OFF position), to turn it to the ON position:
While GPIO 14 is in the ON position, the Raspberry Pi remains connected to IBM Bluemix but doesn’t read sensor values and doesn’t send status updates; as soon as the GPIO is switched back to the OFF position, the Raspberry Pi resumes sending periodic status updates.
If the sensed temperature reaches a critical level (whose value is set in the Python script at 40°C), the Raspberry Pi uses the Twilio messaging API to send an SMS to your mobile phone number (which you previously configured in the script) with the message “Critical temperature reached”. In addition, GPIO 24 will be switched to turn on the corresponding LED in the Webview:
The LED will be switched back off as soon as the temperature returns below the critical level.
You can also see the live temperature and humidity sensor readings on IBM IoT Service dashboard by clicking on the RASPBERRY_PI_001 device under the “DEVICES” sub-menu:
This concludes our tutorial on this proof-of-concept application; you can of course enhance it and add new functionalities as you see fit, both in the mobile app and in the program running in the IoTIFY virtual lab.
IoTIFY Team
 Sebastian Laiseca
Comments
Please log in or sign up to comment.