Is there anything better in the winter than a cozy fireplace in the house? If the fire is burning, it never gets cold!
That's why it's important to never let the fire go out. Once you forget the fire everyone will freeze.
You don't want to mess up with your roommates/family or friends, do you?
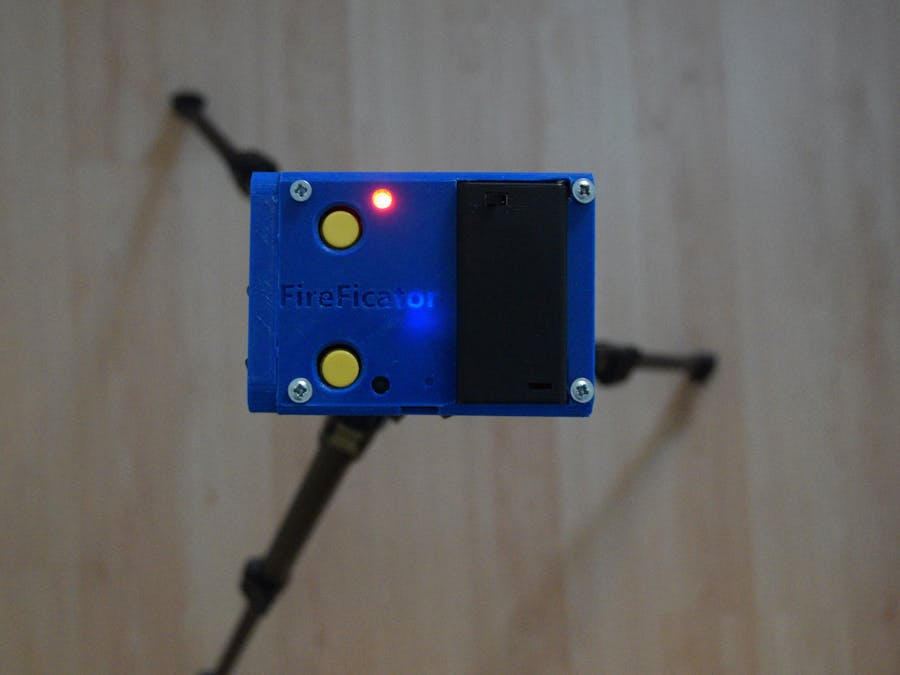
A little piece of technology might then be the perfect tool for you. With the FireFicator you never forget to put enough wood into your fireplace. Just place it in front of your fireplace and let it do the job. It gives you a notification when your fire is getting low. We also added a webpage for you so you can see how well your current fireplace is working. Checking your data might also help you to improve your wood consumption and wood quality.
Since we don´t want to destroy the cozy atmosphere of your fireplace we tried to only give our device subtle lighting. The diodes of the provided board shine through the FireFicator casing. The tripod of the FireFicator can also be placed on the side so the view of the fireplace is not disturbed.
One thing is for sure: Your fireplace will be more efficient using the FireFicator.
How to use it?The FireFicator is easy to build and easy to use. You can use a camera tripod to get it into the correct position. We mounted two laser diodes for the correct positioning. To personalize your FireFicator you can check out our webpage.
1. How to use the lasers to get into position:
Both lasers indicate the direction of the IR receiver. You can activate them by pressing the laser button. They should point into the glow of your fireplace. Next, you need to measure the correct distance to your fireplace. If the laser diodes make a vertical line, the distance is good. The distance to the fire should be about 80 cm.
2. How to calibrate your FireFicator:
With the second Button you can calibrate your FireFicator for your personal fireplace. By pressing this, you change the value once a notification is sent. The limit value can be checked in the provided webpage. You can also use the green and red LED for an estimation of the limit. Here is the color code:
Red and green LED are turned off: The program is not running. Restart your device. If the board is not reacting at all the battery might be low. Charge it using a Micro-USB cable.
Only green LED is on: Fire is burning. No notification will be sent.
Green and red LED are on: Fire is getting low. Notification will be sent soon!
Only red LED is on: Fire is turned off. Regarding on your personal settings a notification will be sent to you now. For more information check section: Personalize your FireFicator
3. Connect the FireFicator to the internet:
Currently you have to open a Hotspot with following login credentials:
Network name: AndroidAP
Network password: cefh0731
Connect your FireFicator by entering following webpage:
https://5db1f8f8cff1ae000693759e.onlosant.com/login.
Put in following login credentials:
Email Address:test.user@example.com
Password: @FireFicator19
4. Personalize your FireFicator
After you have successfully logged in you can change the settings for your notification. You can enter an Email address or your Slack account and how often you want to be reminded. On the screen you can also see more details such as your sensor data in a diagram and the battery level. Don´t forget to charge the FireFicator from time to time using the Micro-USB Port.
What's left:Important: The FireFicator only charges when the battery package is turned “ON”! The charging is indicated by an orange charging LED of the particle board.
If you want to build your very own FireFicator we have provided to you a step-by-step-instruction including schematics, CAD models and more. You can find it in the section: How to build it.
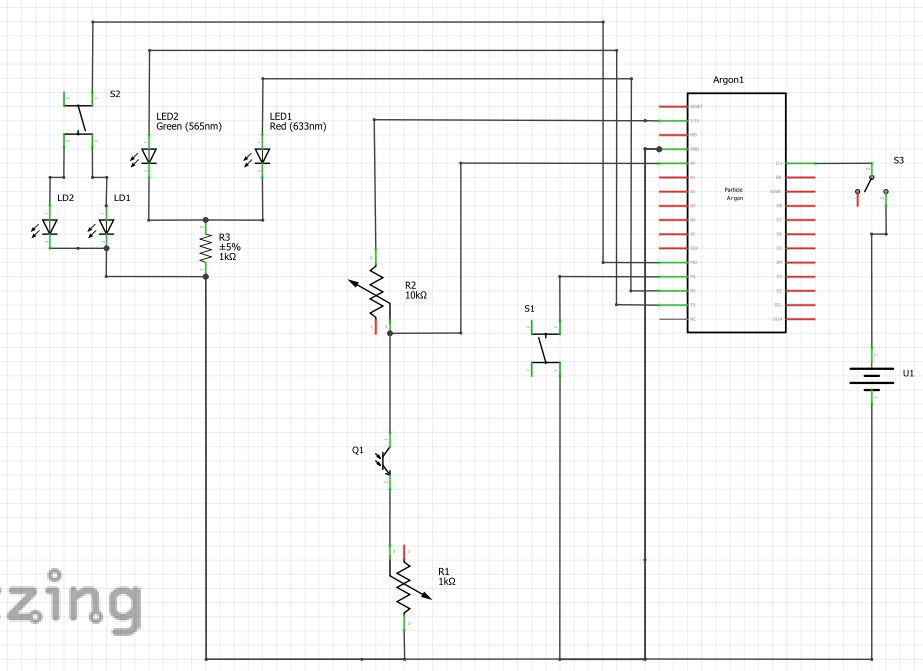
How it works:The Particle Argon Board is equipped with an infrared transistor. The transistor detects infrared light emitted by the flames or the ember. If the intensity of the light is high, the voltage of the sensor drops. If it is low, the voltage rises. The Particle-Board measures the voltage and calculates the mean. The calculation is necessary because small flame pulses should not affect the measured signal.
Depending on the difference between the limit value and the mean value the LEDs are set. The Argon board checks aswell the buttons. If the left button is pressed the limit changes to the current mean. With the laser button you can turn on the laser LEDs which are used for positioning the FireFicator.
Every 20 seconds the signal from the ADC, the time since startup, the battery voltage, and the limit are transmitted to Particle.io and Losant. Losant checks if the value of the infrared transistor exceeds the limit and if necessary sends a notification to the user. The notification is only sent when the notifications on the website are enabled and the sensor value exceeds the limit for more than one minute. If desired, you can set a reminder to 5, 15, 30 or 60 minutes.
Attention: The settings are saved on the Losant-Website. If you turn the particle off and on again the settings like e-mail address are still logged. It is possible that you get notifications of the old settings.
How to build it?We tried to build our FireFicator with as little components as possible to get as many functions as possible. The calculated price of all the needed components is 41.84 €. We would like to use a different hardware than the Particle argon board (it´s priced at 32.76 € by far our most expensive part) and get the price down to under 11 €.
We would like to show the whole step-by-step-instruction including the losant program. Sadly we couldn´t find an option to share our losant program. The losant program is responsible for the front-end and the back-end of our webpage and the particle board. We are currently working on an alternative to the particle board so we may be able to share the whole project using a non-proprietary solution. If you need the losant program feel free to contact us and we will try to find a solution for you.
1) Print the casing of the FireFicator using a 3D printer. Using the FireFicator without the casing is not possible. The positions of the IR receiver and the laser diodes are fixed and can't be reached without our casing. The casing can be found on thingiverse (link can be found below). If you have troubles printing the casing, you can send us a message and we will try to find a solution for you.
2) Prepare the breadboard. Make holes in the edges of the breadboard to fix it to the casing. Also make two holes for the battery package. Don´t forget to check if the top of the FireFicator casing fits on the bottom part.
3) Open the battery package and cut out the inside bridge. Instead of AA batteries we will use a 3.7 Volt battery package. It fits into the battery casing when the inside bridges are cut out. Solder the battery package to the contacts of the AA batteries (Don´t screw up with the poles!). Make sure the switch of the casing is always turned OFF!
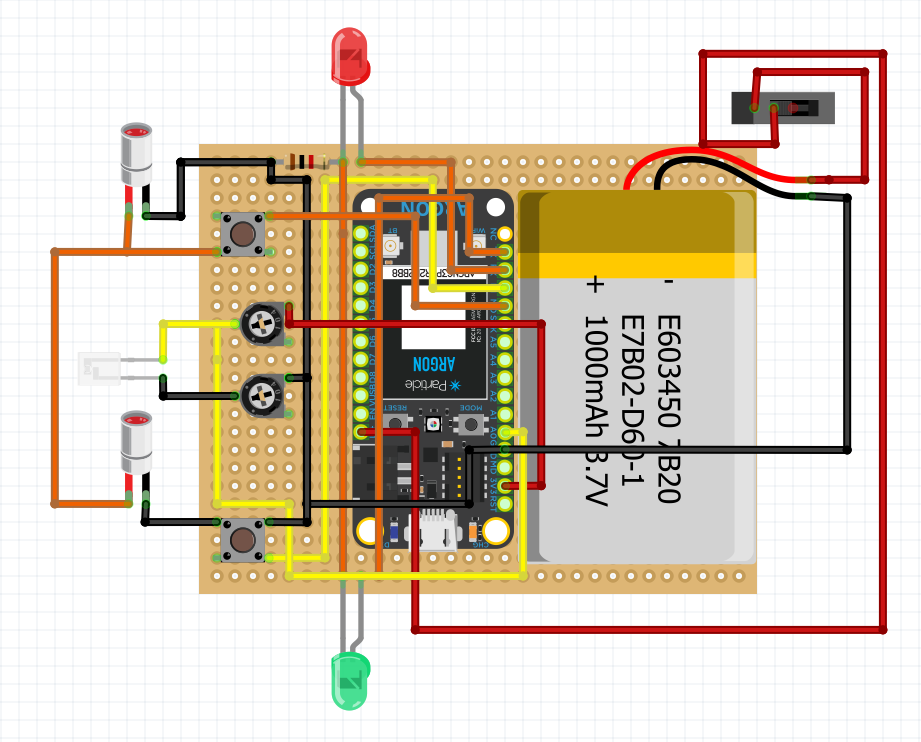
4) Locate all the parts on the front side of the breadboard and solder them to the breadboard (IR-Transistor, LEDs, Potentiometers, switches, Lasers, battery package). The position is critical since most components have specific holes in the FireFicator casing. Solder the battery package last. The schematics are linked below. The positioning can be done similar to the picture shown before. You can also use the layout. Download our Fritzing model for more content.
5) Solder all the connection to the particle board on the back of the breadboard. You can also put the missing components on the back of the board.
6) Once all the soldering work is done you can close the casing with the screws. Congratulations! Your FireFicator is ready to go!
7) Setup the Particle board following our instructions in Setup Particle Argon and Connect with Losant.
8) You might have to update your FireFicator when you are using it for the first time. It takes up to 30 minutes. For more information you can check the webpage of particle : https://docs.particle.io/argon/
9) Upload the code to the board that is linked below.
10) That´s it! Congratulations you just build your very own FireFicator. Now, you can continue with the chapter: How to use it to get the full experience of the FireFicator.
If you have any trouble building your very own FireFicator you can send us a message.
Setup Particle Argon and Connect with Losant:1) Follow the Instructions on https://particle.io/setup or on https://docs.particle.io/quickstart/argon/
· Important: Connect the Board via the Hotspot mentioned above.
2) Go to https://console.particle.io/devices and write down or copy the Device-ID
3) Go to https://www.losant.com/ and Click on „Start Building“. You need to login or register first.
4) If redirected to the Sandbox navigate to „Devices“
5) Add a new Device, choose „Standalone“ and a enter a name for the Device. At the field „key“ type „particle_device_id“ and paste the ID from 2) to „Value“. Variables of the device can be defined under „Attributes“.
6) Switch back to Particle.io and go to „Web IDE“ and „Settings“. Copy the „Personal Access Token“.
7) Next go to Losant, click on „Integrations“ and a new Integration. Choose „Particle“ as „Integration Type“ and paste the Token into „Acess Token Template“. As „Event Name“ add „climate_reading“. Save your Integration.
8) In your personal workflow you need to add a Particle-Node and choose the the Integration from 7) as Integration
9) Start building your workflow with your defined variables. To use them a few things need to be considered. See https://www.losant.com/blog/how-to-integrate-particle-with-losant for more details.


_zhWsCcSEcl.jpg?auto=compress%2Cformat&w=48&h=48&fit=fill&bg=ffffff)


Comments
Please log in or sign up to comment.