Download the Vivado web installer from: Here
To create a new project first click "File -> New project"
Click next and then name your project.
Select RTL Project and click next.
Select the Kria Board as the Default Part.
Then click next and Finish.
Create Block DesignIn the left hand side of Vivado, under "IP INTEGRATION" select "Create Block Design".
The design name can be anything but click okay and it will generate a Blank Block Design.
Create the Fan PortThe Next stage is to create the a port that will be connected to our fan pin
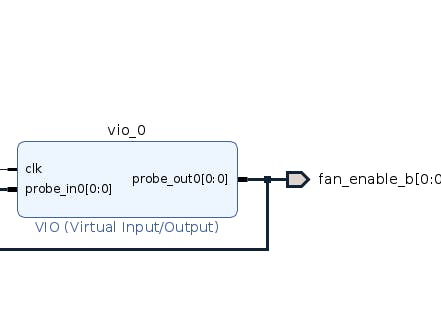
Add a VIO by pressing ctrl+i and selecting VIO
Connect the VIO to the fan pin as shown above
Insert a Zynq Ultrascale+ MPSocAdd a Zynq Ultrascale+ MPSoc by pressing "ctrl+i" and selecting from the drop down menu.
Double click on the Zynq IP Block and disable AXI HPM0 LPD.
Connect the Zynq IP Block as shown above.
Add fan_pin ConstraintsCopy these TCL commands into the TCL Console to assign the fan_pin port to the physical fan pin:
set_property IOSTANDARD LVCMOS33 [get_ports {fan_enable_b[0]}]
set_property PACKAGE_PIN A12 [get_ports {fan_enable_b[0]}]Under "program and Debug" click the generate bitstream. once this has been completed we can connect our Jtag to the board and run our bitstream.
Install Lynsyn Lite DriversFor this tutorial I will be using the "Lynsyn Lite" which can be purchased from: Sundance
Clone the Lynsyn Lite repository:
git clone https://github.com/EECS-NTNU/lynsyn-host-software.gitInstall dependencies:
Ubuntu 18.04 and before:
sudo apt install build-essential qt5-default libqt5sql5-sqlite libusb-1.0 git

Ubuntu 20.04:
 sudo apt install build-essential qt5-default libqt5sql5-sqlite libusb-1.0-0-dev git
Navigate to folder and compile:
cd lynsyn-host-software
make
Install compiled drivers:
sudo make install lynsyn_xvc Open up vivado and go to Flow --> Open Hardware Manager.
Select "Open target" and select "Auto Connect"
Right click "localhost (0)" and select " Add Xilinx Virtual Cable (XVC)"
click okay, this will connect the KV260 to Vivado
Right click xck26_0(1) and select "Program Device..."
you will find the files you need inside
Vivado/Fan_Toggle/Fan_Toggle.runs/impl_1/Select your bitstream wrapper with extension ".bit", this should auto populate our "debug probes file".
click program and Vivado will start uploading the bitstream.
Double click on xck26_0 and select both vio_o and System Monitor.
under hw_vio_1 click the plus icon and select both available IO options
You can now see the input and output probes from the VIO and the Temperature monitor.
By changing the output probe to a value of 1 you will see the temperature rise as the fan is turned off.


Comments
Please log in or sign up to comment.