

Hardware components | ||||||
_zhWsCcSEcl.jpg?auto=compress%2Cformat&w=48&h=48&fit=fill&bg=ffffff) |
| × | 1 | |||
 |
| × | 1 | |||
| × | 1 | ||||
| × | 1 | ||||
 |
| × | 1 | |||
 |
| × | 1 | |||
 |
| × | 1 | |||
Software apps and online services | ||||||
 |
| |||||
 |
| |||||
My desk is in my basement by a bay window, and since my house is really old, the insulation and temperature down there is constantly very weird and it is always freezing cold. I have a space heater right next to my desk for this exact reason. I wanted to create a better way to regulate and control my desk setup including my PC and and space heater. I settled on a project that would allow me to automate this process using the Amazon Alexa Echo Dots that we have around the house as well as trigger it remotely using the Alexa app. I wanted to be able to tell Alexa that I was home and she would automate this process by booting everything up. I wanted there to be some nuance as well so I figured I could add another component to regulate the heater and that was in the form of a temperature sensor. The goal was to create a fully automated controller for my desk arrival processes.
Temperature SensorI first started setting up the temperature sensor because I knew that was going to be a key component of the project.
I used the PietteTech library and created a test for the temperature sensor. Full testing code for the sensor can be found in the Code Section: DHT22 Temperature Sensor Testing.
I ran into the issue that occasionally the sensor would read occasionally an absurd value such as -2 degrees if checked too frequently so I knew I had to account for that later.
My solution was to keep a separate value that only updated upon a valid value
if(currentTime - prevTime > 30000){
        int result = DHT.acquireAndWait(2000);
        serverTemp = DHT.getFahrenheit();
        if(serverTemp>0){
            accurateTemp = serverTemp;
        }
        Particle.publish("servertemperature", String::format("%.1f", serverTemp));
        Particle.publish("accuratetemperature", String::format("%.1f", accurateTemp));
        prevTime = currentTime;
}The next step was connecting my Amazon Alexa to a Webhook post request service in order to interact with the Particle Argon. I settled on IFTTT, and connected my Amazon account to it and set up the applets.
To connect the IFTTT integrations I used the Particle cloud and Spark.functionParticle.publish to call functions using a particle token and then attached the Webhook post request to the IFTTT triggers as well as my functions in my code.
Wake PCOn Lan
I then needed to find a way to start my PC remotely. I knew this was possible using the Wake On Lan features, but I had to get it to work with the Particle environment. Luckily, I found this project to help me get started. I then worked through the code and condensed it down to only the functions that were necessary to me. This code takes a given raw MAC address, converts it to bytes and then sends the wake packets to the PC through the specified MAC address. Full testing code can be found in the Code Section: Wake On Lan Testing.
Other notes:
For testing purposes I installed and used Homebrew on a different computer in order to install the wakeonlan command and test the capabilities separate from the Particle Environment.
I also needed to adjust my bios and settings to allow for the Wake On Lan to properly function, and did these three things based on my motherboard manufacture's instructions:
1. Set "EUP 2013" as Disabled in the BIOS Power Management menu.2. Enable “Resume By PCI or PCI-E Device” in the Wake Up Event Setup.3. In Windows device manager, go to “Network adapters” -> "Power Management” tab, and checked in the boxes [Allow this device to wake the computer].
Heater FunctionalityMy first idea to control the heater was using a smart outlet or relay to control outlet power to the heater and connect that to Alexa. This was however not an option as my heater has a digital not manual power switch. This means that cutting the outlet power and then reinstating it would not properly turn the heater on and off. Instead I decided on using infrared signals to control the heater as it has an IR led remote as an option to control and therefore I could somehow replicate the signals to send at my disposal.
After settling on using infrared communications I set up a system to test receiving and then sending IR signals and used an Arduino compatible remote for testing.
Using this remote and my IR send and receive nodes, I was able to successfully duplicate the IR signal received from the remote. IR transmission have specific sets of encoding parameters that are most of the time common and can be used to easily replicate signals. This specific remote used the most common encoding of NEC. Full testing code can be found in the Code Section: IR Transmit Testing, IR Receive Testing and IR Transmit and Receive Testing.
The problem came along when I was trying to replicate the signals of my personal remote.
These signals were way more complicated to replicate. I couldn't just say that I was going send an NEC code and give it a simple hex value to send. Sending the hex value is only possible because the encoding type is known. After a lot of research I determined that I had to instead send the raw signals from the remote, without any simplifying values as the Lasko company remotes did not have any public encoding type that I could use. I had a different version of a Lasko heater upstairs in my house and confirmed my suspicions, as that remote too had an unknown encoding. I then recorded the different raw signals from the remote that controlled all of the functions of the heater that I needed.
unsigned int oncodePower[143] = {1250,415,1250,415,423,1250,1247,448,1223,427,422,1256,423,1258,422,1257,423,1257,421,1257,423,1256,1248,7026,1250,416,1254,412,422,1250,1248,406,1264,427,422,1260,421,1257,423,1257,422,1256,423,1258,422,1256,1249,7066,1251,399,1267,416,421,1249,1250,419,1252,427,422,1260,420,1258,421,1258,423,1257,422,1256,436,1242,1250,7032,1250,416,1250,418,421,1249,1250,420,1250,428,422,1258,423,1256,421,1259,422,1258,422,1257,422,1255,1249,7028,1250,417,1250,416,421,1249,1250,418,1253,425,428,1254,422,1257,423,1257,422,1258,421,1260,419,1257,1248,7028,1248,416,1251,417,420,1250,1251,418,1251,427,422,1259,422,1257,423,1256,423,1267,412,1258,426,1252,1250};
unsigned int oncodeSwitch[119] = {1250,411,1255,411,425,1244,1253,414,1255,421,427,1254,427,1252,428,1250,426,1253,1251,423,427,1253,426,7849,1253,411,1254,417,421,1245,1253,415,1255,422,427,1255,424,1254,426,1252,429,1247,1256,422,427,1253,428,7891,1253,410,1255,410,426,1247,1254,414,1254,423,427,1255,426,1255,424,1255,426,1249,1256,422,428,1251,429,7857,1253,411,1255,411,427,1244,1255,414,1256,419,429,1254,428,1251,428,1255,424,1251,1254,421,428,1253,428,7851,1255,410,1256,410,427,1245,1253,414,1257,422,428,1253,427,1252,429,1253,424,1251,1254,422,427,1254,426};
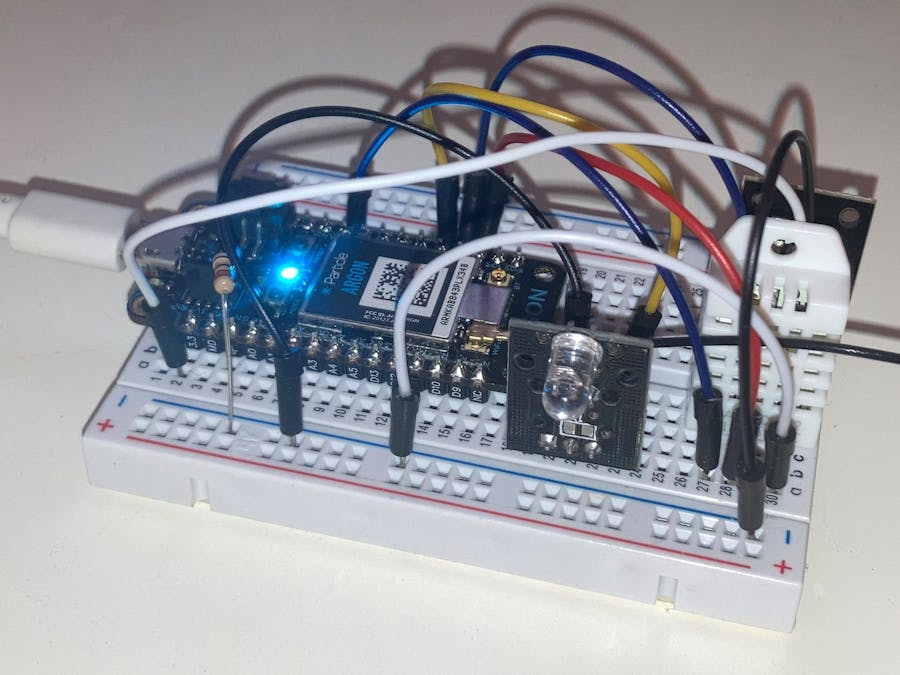
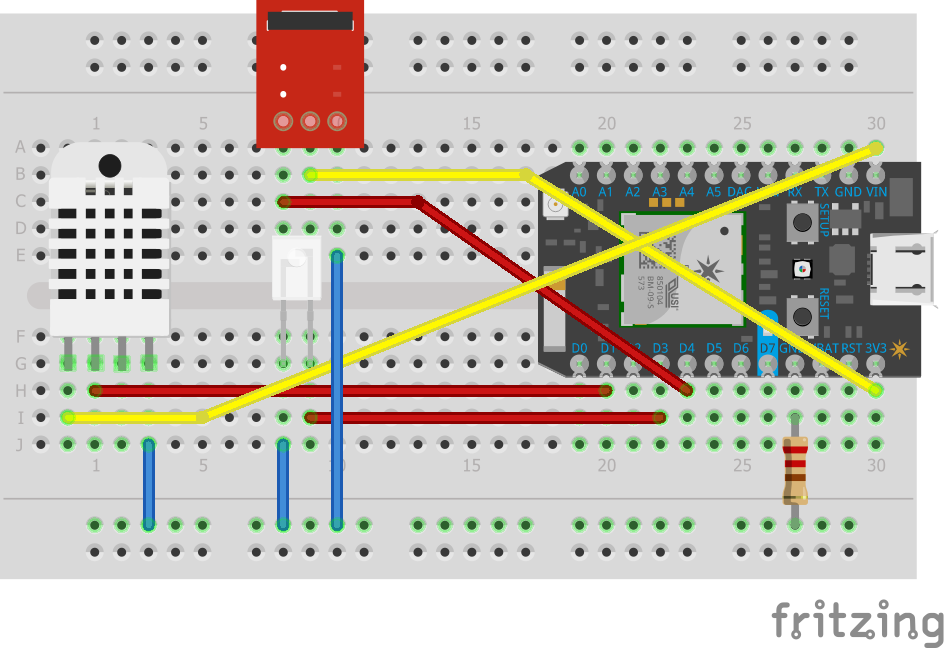
unsigned int oncodeOsc[143] = {1247,415,1250,417,422,1249,1249,420,1250,427,423,1257,424,1257,423,1257,1249,427,422,1259,422,1258,423,7804,1250,416,1250,416,422,1251,1250,420,1250,435,415,1260,423,1260,421,1256,1252,438,412,1260,422,1258,424,7857,1250,416,1251,416,424,1252,1249,420,1251,438,413,1259,423,1259,423,1256,1252,429,421,1260,424,1260,422,7818,1248,433,1237,417,422,1251,1251,422,1250,428,422,1258,426,1257,426,1256,1251,429,422,1262,421,1261,422,7810,1249,418,1250,418,421,1251,1253,420,1252,427,423,1260,424,1259,423,1259,1250,427,423,1262,422,1261,421,7812,1250,414,1255,415,422,1252,1252,419,1252,427,423,1262,423,1261,422,1258,1252,427,422,1262,422,1258,425};I reattached the temperature sensor and consolidated my IR devices to a single breadboard for testing.
Due to there being two different setting on my heater, I use the temperature sensor to determine if the heater is even needed when I boot my PC (below 72 degrees).
int wakeHost(String param) {
    String MACaddress = "00:d8:61:aa:73:7a";
    Particle.publish("test","got to wake host");

    char szMacAddress[80];
    MACaddress.toCharArray(szMacAddress,80);
    Particle.publish("test", szMacAddress);
    if(accurateTemp < 72.0){
        deskStart = TRUE;
    }
    checkHIGHTemp = TRUE;
    return wake(szMacAddress);
}
The sensor also checks if the temperature gets too hot (above 67 degrees) and then switches it to low mode.
if(highTempOverride || (checkHIGHTemp && accurateTemp > 67.0)){
        irsend.sendRaw(oncodeSwitch,119,38);
        checkHIGHTemp = FALSE;
        highTempOverride = FALSE;
        Particle.publish("test","sentTEMPIR");
    }


Comments
Please log in or sign up to comment.