


Hardware components | ||||||
 |
| × | 1 | |||
 |
| × | 1 | |||
| × | 1 | ||||
| × | 1 | ||||
Software apps and online services | ||||||
 |
| |||||
 |
| |||||
| ||||||
| ||||||
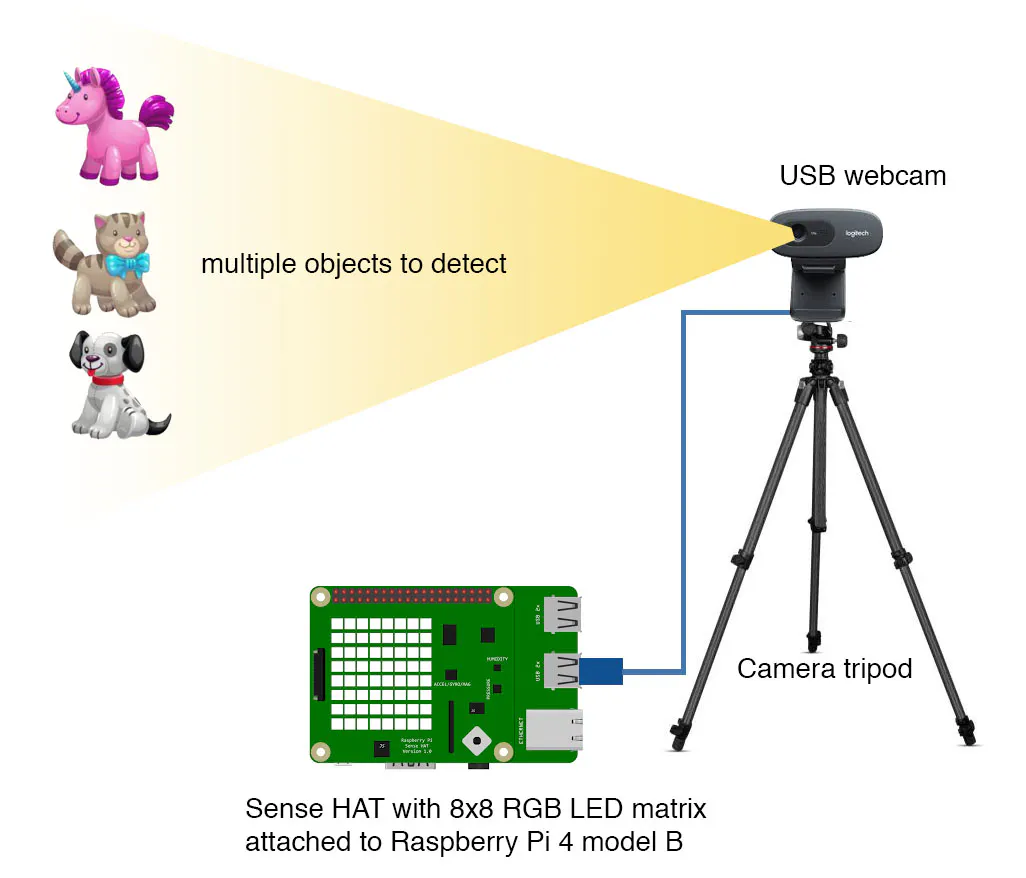
This project uses Edge Impulse’s FOMO (Faster Objects, More Objects) object detection algorithm. The object detection ML model build and performed by selecting the grayscale Image block and FOMO Object detection with 2 or more output classes (e.g. armadillo and bee). This project takes advantage of FOMO’s fast algorithm (2ms in this project) to detect multiple objects coordinates while using a single board Linux-based computer such as the Raspberry Pi with USB webcam in this project.
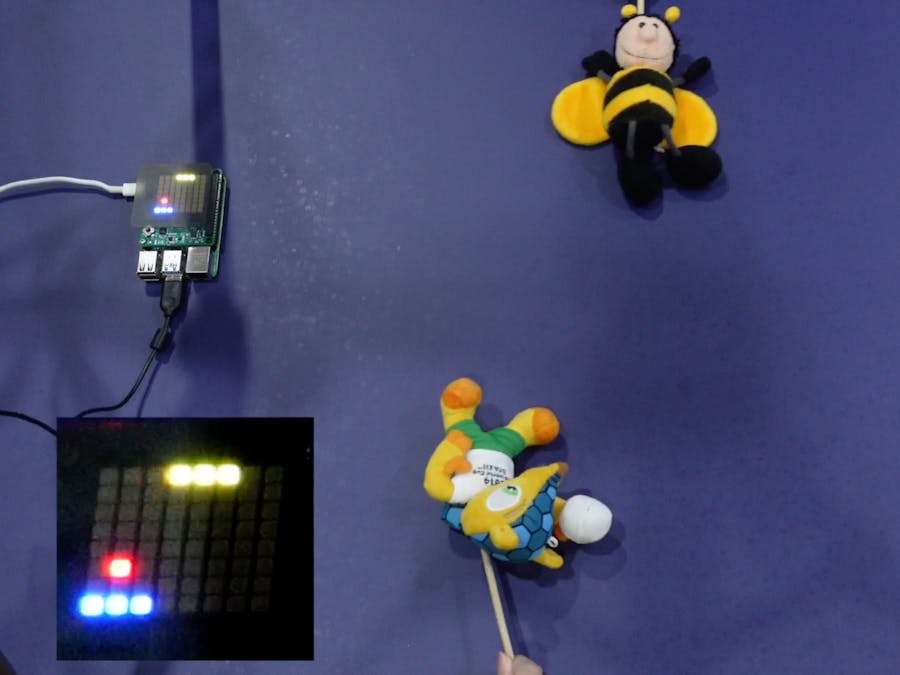
The ML model is also embedded into our Python Pong game so that it can detect which players and their real time positions. We make this dynamic coordinates input as y coordinates (pong bat) on the 8x8 RGB LED matrix. In our testing sometimes there's still minor inaccuracy in the type of object. But I am confident with more data variation acquired, this idea can be developed further for more complex AR game and animation applications.
This project consists of 5 steps:1. Preparation
2. Data acquisition and labelling
3. Training and building model using FOMO Object Detection
4. Deploy and test object detection on the Raspberry Pi
5. Build Interactive Pong game in Python
Step 1: PreparationPrepare your Raspberry Pi with the updated Raspberry Pi OS (Buster or Bullseye). Then open your Terminal app and ssh to your Pi. Install all dependencies and Edge Impulse for Linux CLI by following the guide here
Take pictures of the objects from above (e.g. armadillo, bee, turtle, duck or other plush toys) in different positions with backgrounds of varying angles lighting condition to ensure that the model can work under different conditions (to prevent overfitting). In this project we use a smartphone camera to capture the images for data collection for ease of use.
Note: Try to keep the size of objects similar in size in the pictures, significant difference in object size will confuse the FOMO algorithm.
As you might already know, this project uses Edge Impulse as the Machine Learning platform, so we need to login (create an account first) — go to Edge Impulse and create a new project.
Choose Images project option, then Classify Multiple Objects
In Dashboard > Project Info, choose Bounding Boxes for labelling method and Raspberry Pi 4 for latency calculations.
Then in Data acquisition, click on Upload Data tab, choose your files, auto split, then click Begin upload.
Now, it’s time for labelling. Click on Labelling queue tab then start drag a box around an object and label it (arma or bee) and Save. Repeat.. until all images labelled. Make sure that the ratio between Training and Test data is ideal, around 80/20.
Once you have dataset ready, go to Create Impulse and set 96 x 96 as image width - height (this help in keeping the model small in memory size). Then choose Fit shortest axis, and choose Image and Object Detection as learning blocks.
Go to Image parameter section, select color depth as Grayscale then press Save parameters.
Finally, click on Generate features button, you should get a result just like the one below.
Then, navigate to Object Detection section, and leave training setting for Neural Network as it is — in our case is quite balanced pre-trained model, then we choose FOMO (MobileNet V2 0.35). Train the model by press the Start training.. and you can see the progress
If everything is OK, you should see something like this:
After that we can test the model, go to Model testing section and click classify all. If the accuracy result is more than 80%, then we can move on to the next step — deployment.
(If accuracy result is not as good as expected, re-start with quality datas/photos, correct labels, or just change Learning rates setting)
Step 4: Deploy the trained model and test it on the Raspberry PiNow, we can switch to Raspberry Pi. Make sure your Pi has installed all dependencies and Edge Impulse for Linux CLI (as in Step 1) and connect your USB webcam.
Via terminal ssh and type:
$ edge-impulse-linux-runner

# add --clean (if you have more than one projects)
During this process you will be asked to log in to your Edge Impulse account.
This will automatically download and compile your model to your Pi, and start classifying. The result will be shown in the Terminal window.
You can also launch the video stream on your browser. Type: http:// YOUR Raspberry Pi IP ADDRESS:4912
Then you can see how this live classification works:
Now, the objects (arma and bee) have been successfully identified with x, y coordinates in real-time (Wow! very short time per inference—> up to 2ms).
Until this step, we’ve taken out data and trained an object detection model in Edge Impulse platform and running that model locally on our Raspberry Pi board. So, it can be concluded that it was successfully deployed.
Step 5: Build Python pong game
Final step...
We took the idea and modified from a simple classic Pong Game. With the Pong Python code, the library from Sense HAT and combining it with the classify sample code from Edge Impulse, it becomes a simple but interesting AR game.
For more detail, you can check our Python files <pong_1_objects.py> and <pong_2_objects.py2> in Code Attachment section below.
Because we use Python, so we need to install the Python 3 Edge Impulse SDK and clone the repository from the previous Edge Impulse examples. Follow the steps here.
You also need to download the trained model file so it is accessible by the program we are running.
Type this to download it:
$ edge-impulse-linux-runner --download modelfile.eimMake sure that your/our program <pong_1_objects.py> and <pong_2_objects.py> is placed in the correct directory, or just put in /home/pi directory.
Now, play the game! Power on Pi with camera and start this Python code with eim model file embedded, then move our toy to slide bat to bounce the ball in LED matrix display.
Run the program with embedded model file using this command:
$ python3 pong_1_objects.py ~/modelfile.eimAnd for even more fun, try the 2 players Pong game:
$ python3 pong_2_objects.py ~/modelfile.eimThis Pong game can detect which players are playing.
Finally, we have successfully implemented Edge Impulse FOMO object detection model and run interactive Pong game in Raspberry Pi. With the speed and accuracy that we obtained, we are confident that this project can also be develop in more complex AR game or animation applications
Feel free to leave a comment and thank you!


Comments
Please log in or sign up to comment.