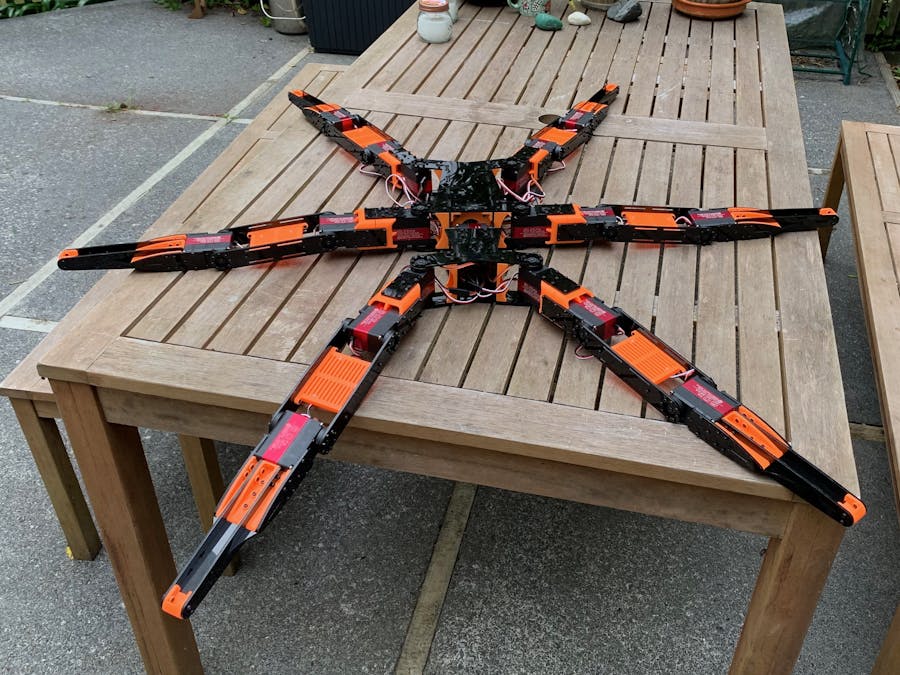
Some time back in 2016 I started on a circuitous journey to build a hexapod robot. I had stopped working for OSH Park about a year before and was working on a more "enterprisey" client project. The project was interesting enough, but I missed mucking around with electronics. I also missed my old hobby of building (and mostly crashing) electric radio controlled helicopters, which I had abandoned when my children arrived in my life for time/cost reasons.
I figured that between these various skills I had enough working knowledge to be dangerous in the area of hobby robotics. I started by printing this hexapod at the Te Puna Mātauranga o Aotearoa - The National Library of New Zealand's sadly discontinued 3D printing service. I bought a bunch of $3 9 gram servos from HobbyKing and set about building it. Unfortunately for me the assembled device was too small and flimsy to carry the electronics I had hoped to pack onto it, and the build tolerances were too loose to make it easy to program repeatable poses. In short I just wasn't happy.
At some point I also had a vision of myself riding a hexapod around town. Probably after watching Big Hero 6 with my kids - and this bot wasn't going to cut it.
First I spotted these 11kgcm torque servos at HobbyKing and started trying to design around them. One of the main problems with "standard size" servos is that they're anything but standard and also that they have a difficult shape to work with. I started by trying to design a hinge around it that could handle load without putting undue mechanical strain on the servo itself. At the time I didn't have a 3D printer, so I ordered one from 3D Hubs. Of course it cost $120 and took two weeks to arrive. It also relied on a number of flanged bearings and screws. In short, it was too big, too complex and too expensive to make. It did lead to my discovery of NZ Miniature Bearings - which is an absolutely fabulous website which I find incredibly calming to browse.
After this I started researching robotics servos and found the amazing DSServo RDS5160 servo - capable of up to 60kgcm of torque and sensibly sized with easy to model attachment points. As soon as I got my hands on some I immediately had a vision in my mind of how this thing would work. It was also around this time that I found myself between jobs with a little cash to spend, so spend it I did. I bought a Tarantula Pro 3D printer and a 3018 Pro CNC router and started quickly iterating on designs. Taking my sizing queues from the 30mm width and 12mm mounting grid from the new servo choice things started to come together quickly.
Despite being well on my way towards a design I liked, I wasn't happy with the results I was getting from the routed acrylic parts. The 3018 is a fun little machine, but even with incredibly low feeds and speeds the NEMA17-sized steppers tend to skip steps at the slightest back pressure from the spindle and it was incredibly noisy and messy. I started researching laser cutters.
I bought this incredibly cheap X/Y gantry from AliExpress and outfit it with a supposedly 10 watt laser that I got in the bundle when I bought the 3018. I started experimenting with it, but got deeply unsatisfactory results. Although the laser was putting out a lot of heat, it was not possible to focus it to a point fine enough to get a good result. The excess heat was also causing the material to warp, so that wasn't going to do.
So, I started looking around again and came across the folks at Endurance Lasers building low cost diode lasers. I got a good deal on Black Friday and ordered one. Of course by this point I had spent about twice as much as if I'd ordered a "K40"-style CO2 laser from AliExpress. You live and learn.
Of course, once I had the laser sorted I was able to rapidly get cracking on building some legs.
The more astute amongst you may have noticed an extra servo in middle of the bot's body. That's because my kids love Fortnite, and I wanted to add something a little fun for them.
With the build finished I turned my attention back towards the electronics and software. I had planned on running the peripherals directly from a Raspberry Pi Zero W and even wrote a bunch of drivers for them for Elixir, but in the end I decided that the tight control loops and integration I want to do really needed the help of an external micro. That's when I remembered I had an OSH Park edition Teensy 4 sitting in my cupboard left over from my days working there. This fantastic little board is a 600MHz Cortex-M7 which is more than enough to get my job done. Additionally, it's well supported by Platform.IO and even has an RTOS available. Unfortunately I also have to dredge my C and C++ programming skills back from deep deep cache - it's been at least 15 years.
So this is where we're at for now. There'll definitely be more to this story and I'll keep you posted.


Comments
Please log in or sign up to comment.