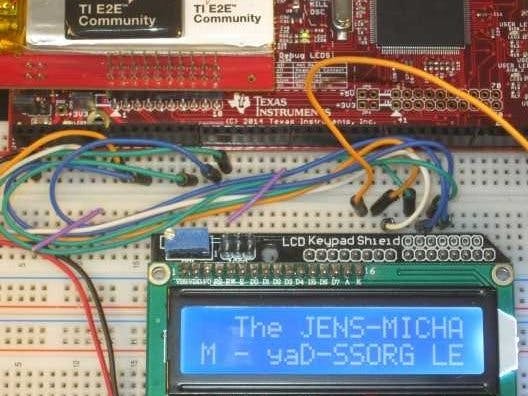
Hitachi compatible LCD displays are one of the most common character based displays around. This design is a sample program that shows how to drive such a display from a Hercules LaunchPad.
The display is showing a message in snake-like style. Text is snaking across the screen from the left bottom corner to the left top corner. The text on line 2 is backwards and moves towards the right. It then moves over to the top line, and moves right to left to give the impression that it is a long serpentine.
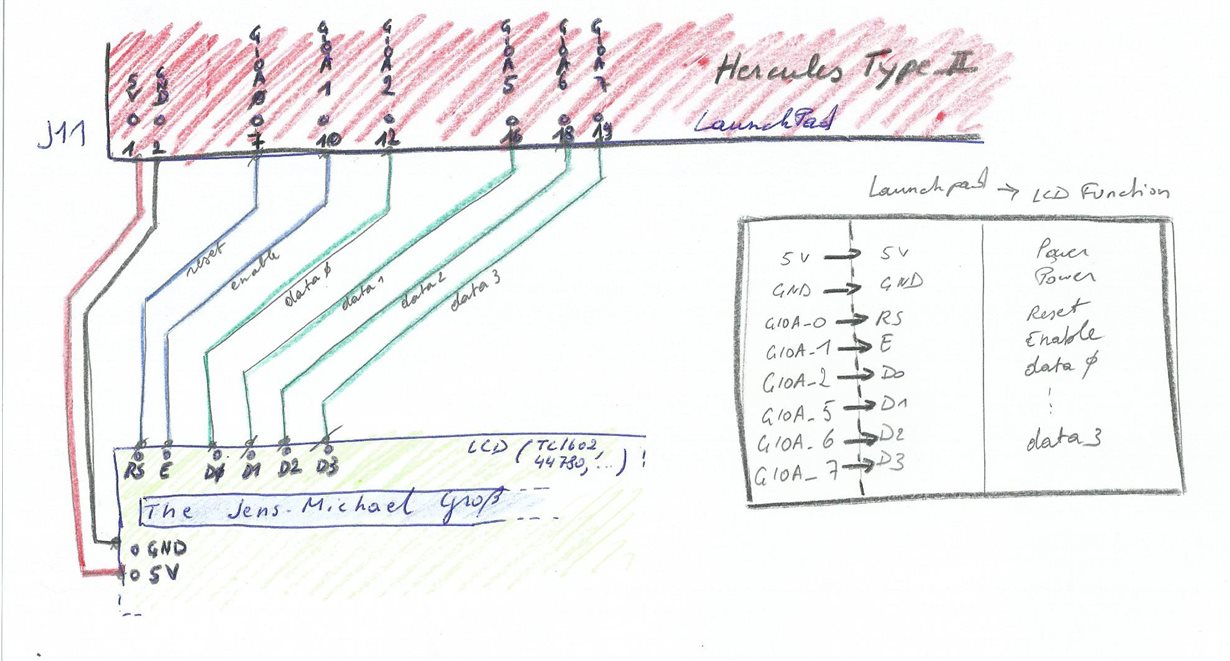
HardwareYou'll need a Hercules LaunchPad. We've tested on a TMS570, RM42 and RM46. You'll need a 16x2 LCD display (TC1602, 44780, ...). I'm using one that's mounted on a SainSmart board here, but there are many compatibles around. And you'll need 8 wires. That's it.
Make the connections as shown in this image:
We're using the minimal number of connections to make it work. For these displays that is a reset, an enable and 4 data lines.
SoftwareTo drive the display, we'll be using two libraries that I've published before for the Hercules family. The source code is available on GitHub so you have plain view on what's happening inside. But let's first look at the algorithm.
The text serpentine
We'll need three mechanisms to scroll the text:
- a pointer (offset in the string) to the beginning of the visible text. We'll increase it to get the scroll effect
- a piece of code that takes the first 16 characters and puts them on line 1 of the LCD
- a piece of code that reverses the next 16 characters and puts them on line 2.
Scrolling through these three steps generates that snake-like scrolling effect. We'll have to reset the pointer after we've dragged the full text serpentine across the display.
Here is how I translated this in code:
   while(1) {
   	 lcdSetCursor(0,0);            // move to the beginning of the first line
   	 memcpy(sBuff, &(sBanner[uBannerLoop]), 16 );
        lcdPrint( sBuff);
   	 lcdSetCursor(0,1);            // move to the beginning of the second line
   	 for (uBackLoop = 0; uBackLoop < 16; uBackLoop++) {
   		 sBuff[15-uBackLoop] = sBanner[uBannerLoop+16+uBackLoop];
   	 }
        lcdPrint( sBuff);
        uBannerLoop++;
        if (uBannerLoop  == 93) {
       	 uBannerLoop = 0;
        }
   	 for(uWaitCounter=0; uWaitCounter < 7000000; uWaitCounter++); //wait sometime.
    }
I've created a TI E2E Forum post earlier on the driver. You can read about it (and how to use it) on this link: http://e2e.ti.com/group/launchyourdesign/m/boosterpackcontest/665691 note to self: port above blog to hackster.io.
At the end of this article I've posted the link to the source code for this driver.
Configuration in HALCoGenI'm assuming here that you know how to use HALCoGen and Code Composer Studio. Texas Instruments has a number of great tutorials on how to get started with these tools. There is only a very limited set of activities to do to make it work (very few steps): on the driver tab, enable the GIO driver.
On the PINMUX tab, take care that the pins you connected to the LCD are marked as GIO.
Generate code and create the CCS project (I always do a build at this point, just that I'm sure that my project builds before starting to write code).
Add the LCD driver to Code Composer StudioAdd the following.h files to your include folder: https://raw.githubusercontent.com/jancumps/hercules_libraries/master/lcd/include/44780.h
https://raw.githubusercontent.com/jancumps/hercules_libraries/master/GioUtils/include/gioutils.h.
Add the following.c files to your source folder: https://raw.githubusercontent.com/jancumps/hercules_libraries/master/lcd/source/44780.c
https://raw.githubusercontent.com/jancumps/hercules_libraries/master/GioUtils/source/gioutils.c
Replace the content of your sys_main.c with this one: https://raw.githubusercontent.com/jancumps/hercules_lcd/master/sys_main.c
Build and run. That's it.


Comments
Please log in or sign up to comment.