This year 2020 is transcending as the worst year of modern human life due to the prolonged epidemic outbreak caused by the new coronavirus of 2019 (COVID- 19). This novel community health problem has led to a collapse of the health system and the economic slowdown in each and every part of the world, affecting equally the way we relate to each other, how we live and how we work. According to pandemic scientists, this type of event is likely to happen again and again, so we must develop technologies that can help solve or mitigate these problems.
During the pandemic, robotics has played an important role, because as many will know, one of the advantages that robots have is the ability to work in extreme environments harmful to humans, such as nuclear disasters, natural disasters, deep mines and finally environments with a high load of unknown pathogens such as the SARS-CoV-2 virus responsible for covid-19.
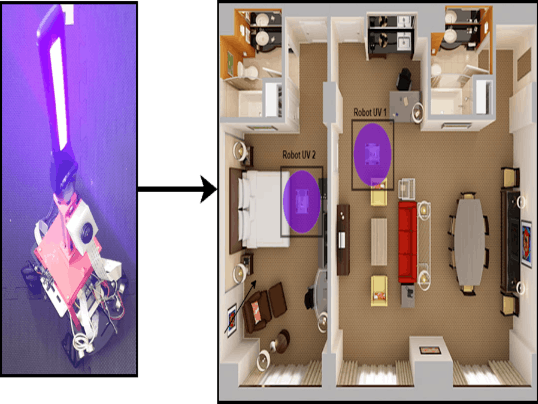
Fortunately, we are in an era where anyone can build a robot in their home that follows a few short instructions. In addition, there are large communities of expert programmers, such as makers, with whom it is possible to find the help needed to build the programs. However, during this time when the pandemic is more latent, many of the technological developments are focused on the construction of large and robust robots to be used in shopping malls or large public entity buildings, when most of the population would like to have one of these robots for the disinfection of their own homes. Devices that are capable of eliminating not only the current Covid-19 virus, but also other viruses, bacteria and fungi. In these cases, a large robot like the one shown in figure 1, would not be the most suitable considering its size and price in the market.
That's why my solution is based on home disinfection robots, like a vacuum cleaner robot or a vacuuming robot with an ultraviolet (UV) lamp. These robots are small and affordable for people who want to keep their homes clean and disinfected.
These robots have certain peculiarities in terms of disinfection processes, such as the ability to communicate with each other. This communication allows coordination in the disinfection and optimizes the time to perform this task. To do this, I have relied on artificial intelligence (AI) tool called multiagent systems (MAS). MAS allows the creation of entities capable of communicating with each other, perceiving, and acting within an environment. The basic unit of a MAS is an agent which controls each of the robots. In this way, we give the robot an autonomous, intelligent, and social character.
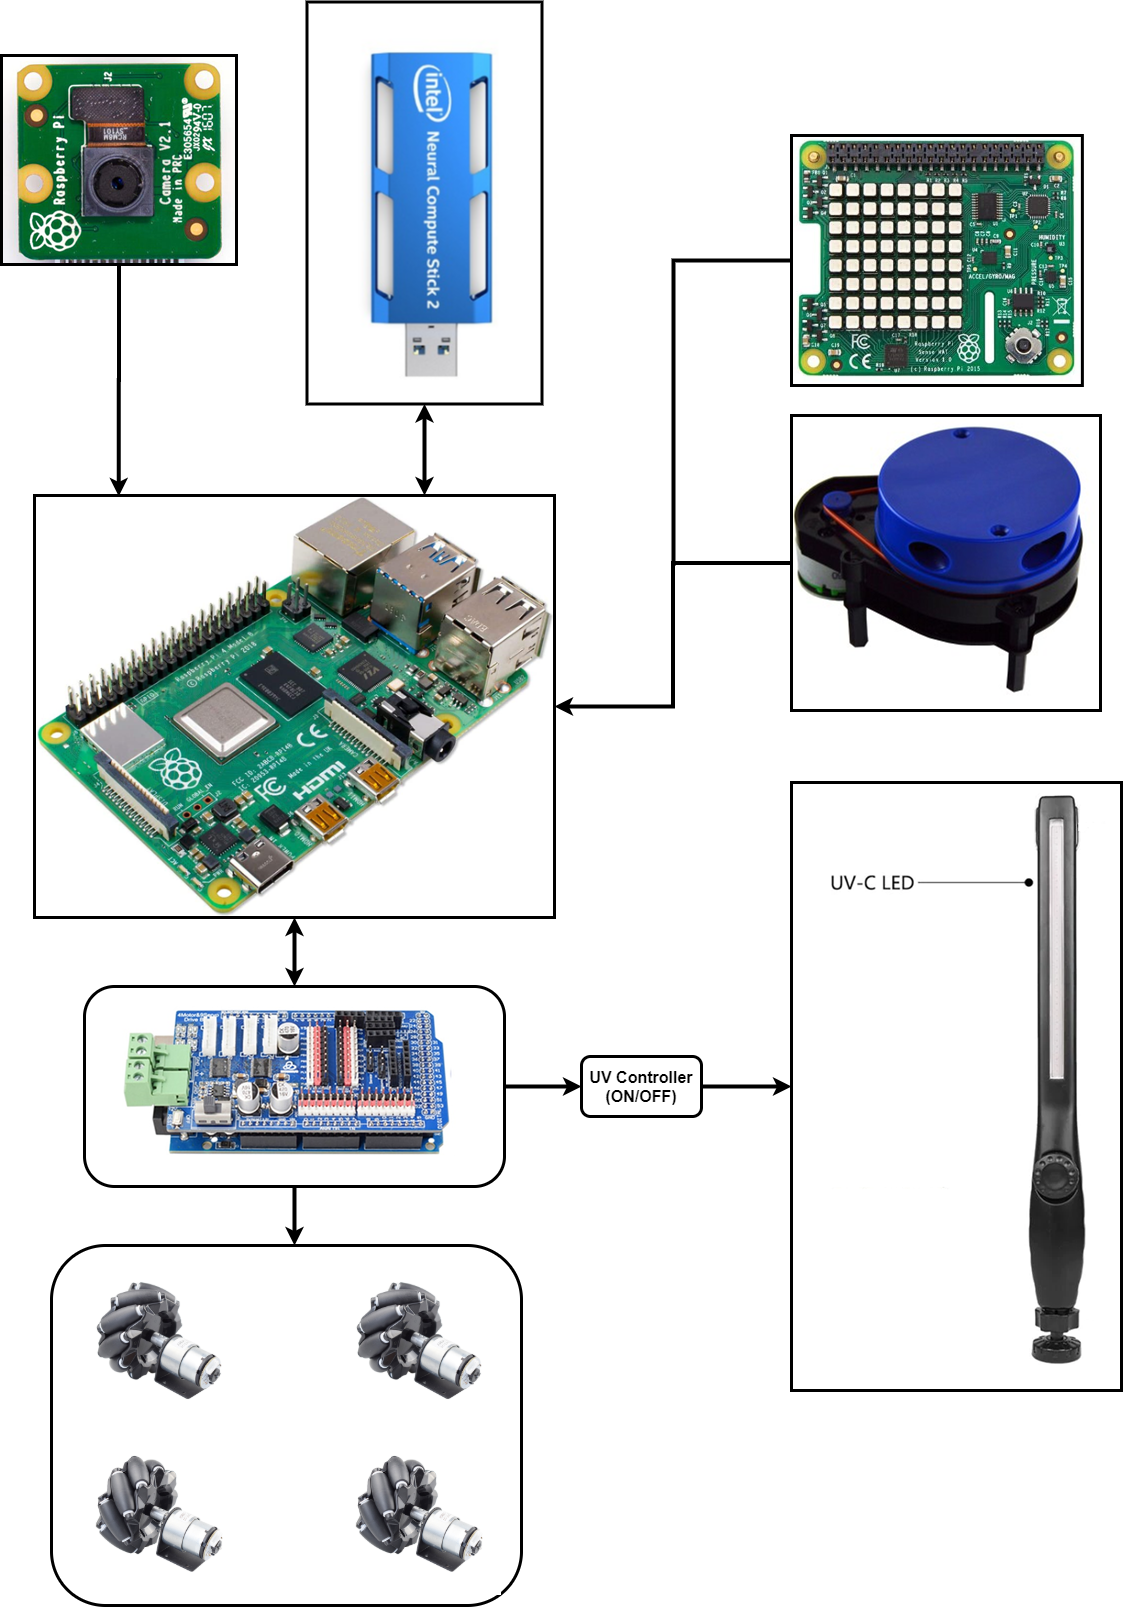
FeaturesOne of the characteristics of the MAS is that it behaves like a container for other AI, machine vision and low-level control tools. Using this capacity, each of the agents (robots) incorporates artificial vision tools, object and person recognition systems. For this purpose, the OpenVino tool and the Intel Neural Computer Stick 2 were incorporated for all the robots that were built with a Raspberry Pi 4. However, this neural stick allows the use of deep learning models to detect people, objects, places, etc. This vision and classification tool is used as a measure of protection against burns from UV exposure by detecting the presence of a human being in the vicinity of the agent, so that the agent is able to deactivate the lamp. At the same time and as a redundant protection measure the robot has a PIR sensor that detects the movement and the infrared radiation emitted by humans. Therefore, with the output of each of these two protection systems the agent will have enough information to deactivate the UV lamp.
Robotbuilding
The robots were built using platforms with omnidirectional wheels to facilitate navigation in complex environments. They also have a YDLIDAR X4 for mapping and navigation, an Arduino Mega 2560 for improved low-level control and/or a Raspberry Pi 4 or Jetson Nano where the agents live. Figure 2 shows one of the 3D designed models.
Figure 3 shows a 3D representation of the robot inside a kitchen.
The robot is a modular robot that is easy to modify and/or update, being possible to change lamp types, height, among others. In the upper part of the robot, the UV lamp(s) are fixed, which will help the disinfection. Due to the complexity of disinfecting a household, the lamp can be oriented at a 45-degree angle and rotated 360 degrees. This allows us to disinfect areas such as the bottom of the toilets or the bottom of the tables (Figure 4).
As mentioned above, the robot has two Neural Computer Stick 2, these give the robot the ability to introduce machine learning algorithms allowing the robot to recognize objects and/or in the future determine which objects are more sensitive to be contaminated and therefore spend more time in the disinfection process (Figure 5).
Figure 6 shows the robot with its Sense-Hat, using its magnetometer, gyroscope, and accelerometer, allowing the robot to navigate and position itself better. All this is very important when doing mapping and SLAM.
To achieve this navigation, it is important that the robot has tools that allow it to detect obstacles and map the location to position itself within its working environment. For this purpose, a Lidar has been incorporated that will allow it to do SLAM, cartography. Figure 7 shows an example of the real lidar making a SLAM approval.
Figure 8 shows the lower part of the robot with each of the elements included in the robot, such as the Lidar, the Intel Neural Computer Stick 2 and the rest of the hardware that makes the robot work.
All the robots are programmed in two levels: The lowest level, based on Arduino mega 2560 was programmed with the Arduino IDE and the top-level control (i.e. machine vision, message-passing between agents or navigation) was programing with Python 3.7. Also, the robot can be controlled using ROS, however, these prototypes are controlled by using a robotics control and simulation tool that I am currently developing, where the core for simulation and control is Pybullet. This allows not only to control the robots but also to make simulations with physical constraints (gravity, friction) or collision detection. Figure 9 shows the simulation in a kitchen where the green lines represent the virtual Lidar of the robot and the blue ones the collision of the Lidar beam.
One of the advantages of integrating a simulator into the robot control system is that it will allow to develop strategies that maximize the disinfection process and to determine the power of the lamps, as shown in the following figures 10 and 11 (the lidar has been deactivated).
As already mentioned, the robot has the ability to recognize objects by using the OpenVino system and its two neural sticks 2. However, the number of objects it can recognize will depend on different needs, i.e. which objects are most likely to have a high probability of bacterial, viral or fungal contamination. The disinfector could then determine whether the UV exposure times of these objects are increased by evaluating which objects are most susceptible.
These could be some examples to illustrate this project:
A data set must be created for the robot to recognize these objects. To build this dataset we automatically use the following library for Python: Bing Image Downloader. To install this library we type this from the command terminal: pip install bing-image-downloader
Once the library is installed, what we do is download the images from our dataset which in our case are:
0 Bottle
1 Cup
2 Person
3 Sink_Bathroom
4 Toilet
To make this download we use the following script:
from bing_image_downloader.bing_image_downloader.downloader import download

query_string = ["Person", "Unknow","Cup", "Toilet", "Sink_Bathroom", "Bottle"]

for i in query_string:
    download(i, limit=200, output_dir='dataset', adult_filter_off=True, force_replace=False)
This will create a folder called dataset and inside this folder we will find some subfolders with the names of the classes to be classified (Figure 13).
Up to this point, we have our data set ready to be trained. This process can be done using a MobileNet network through Keras and Tensorflow or we can perform such training online using the tool teachable machine (Figure 14).
We simply add the number of classes and upload the images corresponding to each class and train.
The results of the training process can be seen in the following graphics:
On the other hand, Figure 16 shows the confusion matrix obtained through the application of the teaching machine and Figure 13 shows the confusion matrix obtained through my mobile network training.
We can observe a certain relationship between the two confusion matrices, however, my confusion matrix is normalized between 0-1. Based on these results, we can conclude that the robot would be able to identify the objects to which the user wants the robot to dedicate more time to perform the disinfection.
Once we have our model trained the next step is to convert it to the format to be used with Openvino. This process requires some important steps, the first one is to install Openvino, for which we refer to the instructions given by Intel. The installation steps vary according to our operating system (In my case, my operating system is Windows 10).
Once the Openvino is installed, the next step is to create a ventilation environment:
We create the environment: python3 -m venv openvino

We activate the environment: .\openvino\Scripts\activate
Once installed, the next step is to find the files that Openvino has installed:
C:\Program Files (x86)\IntelSWTools\openvino\deployment_tools\model_optimizer\install_prerequisitesBeing within an environment, it does not allow us to install as --user the necessary requirements, so we modify the files. The first one is install_prerequisites we look for the word --user and we remove it. Once we have edited this file we can install the prerequisites.
Once everything is installed and we have our model in .h5format, the next thing is to convert this model into a .pb model. To do this, we use the following code:
import tensorflow as tf
 from tensorflow.python.keras.models import load_model
 # Tensorflow 2.x
 from tensorflow.python.framework.convert_to_constants import convert_variables_to_constants_v2

model = load_model("../KerasCode/Models/keras_model.h5")

 # Convert Keras model to ConcreteFunction
 full_model = tf.function(lambda x: model(x))
full_model = full_model.get_concrete_function(
  tf.TensorSpec(model.inputs[0].shape, model.inputs[0].dtype))

 # Get frozen ConcreteFunction
 frozen_func = convert_variables_to_constants_v2(full_model)
frozen_func.graph.as_graph_def()

 # Print out model inputs and outputs
 print("Frozen model inputs: ", frozen_func.inputs)
 print("Frozen model outputs: ", frozen_func.outputs)

 # Save frozen graph to disk
 tf.io.write_graph(graph_or_graph_def=frozen_func.graph,
  logdir="./frozen_models",
  name="keras_model.pb",
   as_text=False)
This will return a file "XXXX.pb", well, the next thing is to look for this script mo_tf.py in the folder where Openvino was installed. Once in this folder, it is important to create a folder (if you want) that is called models and from the command terminal (cmd), we write this:
python mo_tf.py --input_model model\keras_model.pb --input_shape [1,224,224,3] --output_dir model\If all goes well, we'll have to have these files at the end of this process:
- keras_model.bin
- keras_model.mapping
- keras_model (XML)
- labels.txt


_wzec989qrF.jpg?auto=compress%2Cformat&w=48&h=48&fit=fill&bg=ffffff)


Comments