This project aims to showcase some of the capabilities of Cypress PSoC Analog Coprocessor kit and at the same time creates a device which might prove itself useful for visually impaired people.
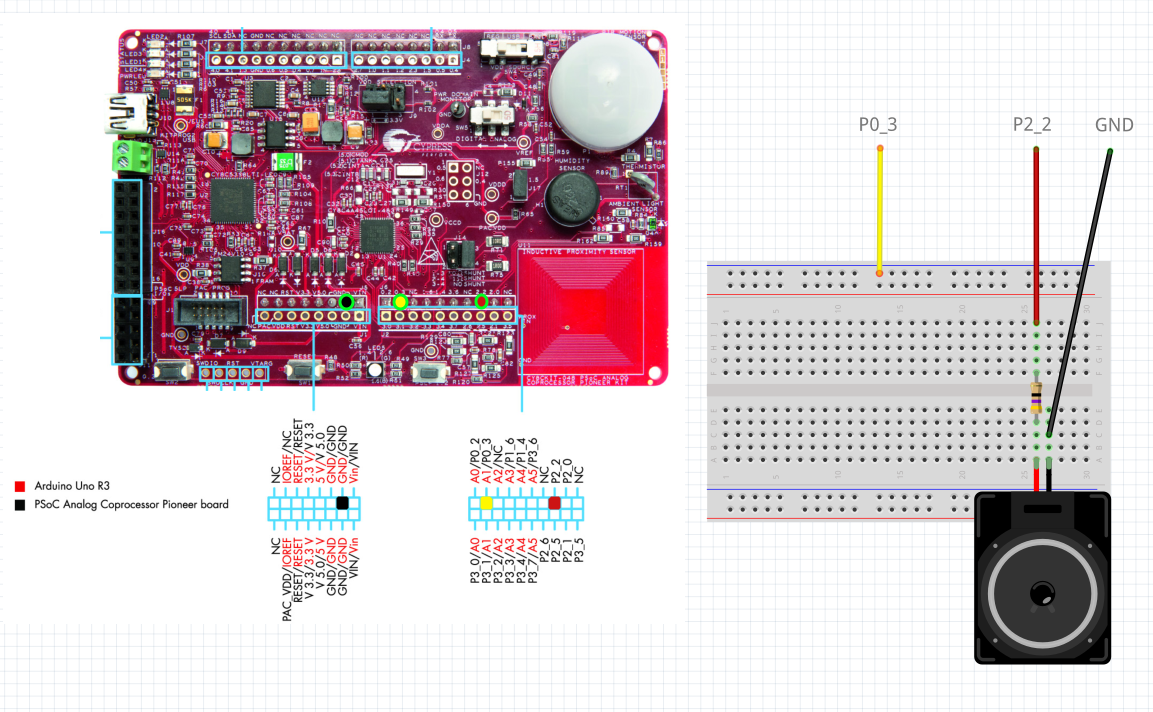
Quick startDownload project archive and import project into PSoC Creator. Connect speaker and proximity sensor single wire according to wiring schematic.
Build project (ignore LFCLK warning for now) and upload it into PSoC Analog Coprocessor Pioneer kit. Touch sensor wire and the device will announce time. If you will hold touch for longer time the device will also announce current temperature. Please note that if sound volume is too low, you may need to try a different speaker or connect headphones or amplified speaker instead.
If you are wondering how to set correct time, why is the clock so wildly inaccurate or how to use your own voice samples, please read on.
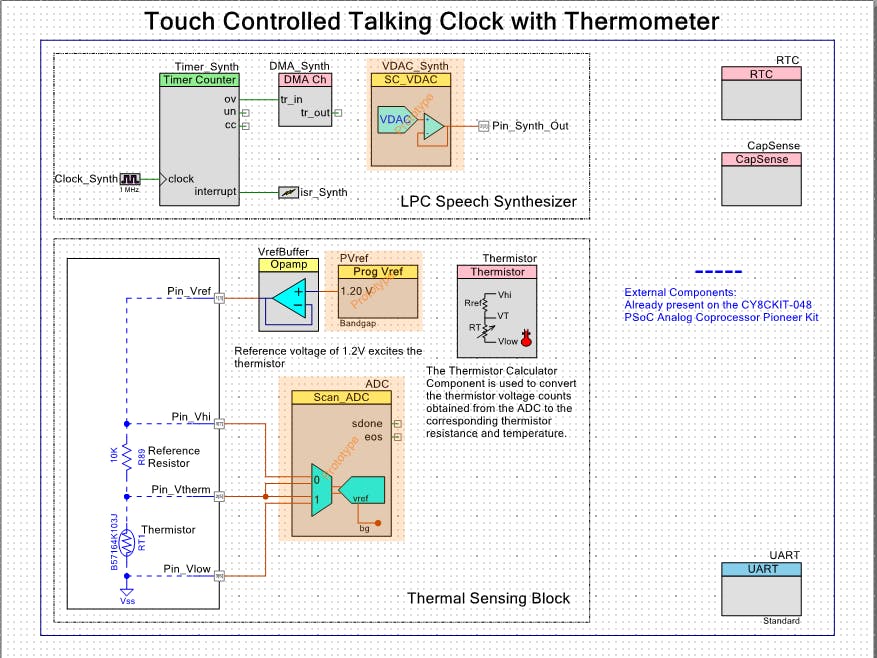
How does it all workThis project makes use of several PSoC Analog Coprocessor components and ready-built blocks. CapSense technology is used for proximity detection, RTC clock component is keeping time, thermometer block measures current temperature, UART communicates with user and speech synthesizer library pronounces almost comprehensible words while using a few more hardware components.
Speech synthesizerArguably the most interesting part of the project is speech synthesizer library. The library uses time tested Linear Predictive Coding (LPC) audio codec which produces good enough quality speech at very low bit rates. Also it is not very resource intensive which makes it ideal candidate for low memory devices.
LPC synthesizer code is based on very innovative Talkie library for Arduino. Code was ported to PSoC environment while moving as much functionality as possible into hardware components. New extension also allows use of DMA transfer of computed samples to VDAC thus even more decreasing load of system processor.
Synthesizer library source code is split into two parts. LPC_synth module is project independent and can be reused as-is in another project. It is also possible to use this module as a basis for custom PSoC Creator speech synthesizing component. LPC_synth module supports reading data from program flash memory and also from FRAM if available (requires FRAM_I2C component).
Second part of synthesizer library is module called custom_synth. It holds sound samples and project-dependent functions. See source code files custom_synth.h and custom_synth.c for an example implementation. Project archive also includes source sound samples in WAV and LPC encoded binary format.
How to perform LPC encoding of your own soundsWhile it is possible to use Talkie library's own LPC encoder, its author claims it is not production ready yet. Another option is software application called QBoxPro. This is an old program which was built for Windows 3.1 (!) but it is still somehow usable nowadays. Please keep in mind this is a 16-bit Windows application which means it is not possible to run it in 64-bit Windows environment. You will need to have a 32-bit Windows computer or virtual machine available. QBoxPro runs fine on 32-bit Windows XP and reportedly it is possible to use it also on 32-bit Windows Vista or Windows 7 (untested).
Text file containing following tips is included in project archive.
You can download QBoxPro from this location. You will also need a copy of BWCC.DLL dynamic runtime library which is available at several internet sites. Since QBoxPro doesn't have an installer, it is necessary to perform installation manually:
- Copy QBoxPro files into C:\QBOX directory
- Move QBOXPRO.INI to C:\WINDOWS
- Find BWCC.DLL (tested with 1.3.14.1) and copy to C:\QBOX
- Launch QBoxPro and exit via Project.. -> Exit
- Edit C:\WINDOWS\QBOXPRO.INI, find LPCNB=12, change to LPCNB=10
QBoxPro can only encode 16-bit PCM WAV files with sampling rate 8 kHz. If your recordings use different format, you can use for example Audacity to convert them. To encode WAV into LPC format perform following steps in QBoxPro:
- Create new project
- Project Settings: Set Alignment: Byte, Sampling Frequency: 8 kHz, Coding Table: 5220
- Add WAV file: Project... -> Add Files...
- Click Process... -> Medium bitrate -> OK
- Click Edit... -> Concatenations -> Insert... -> Concatenation...
- Enter sample description -> OK
- Click Insert... -> Phrase... -> OK
- Click Format... -> LPC 10V, 4UV -> OK
- Optionally save project: Click Project... -> Save
Your LPC encoded samples will be stored in project directory in files with.BIN extension. You can write a simple script to convert those files into hexadecimal strings or perform manual "conversion" using for example HxD Hex Editor and Notepad++:
- Open BIN file in HxD
- Copy hex view into Notepad++
- Search and Replace <space> with <space>0x
You can find an example of BIN files and their hex-string counterparts in project archive and custom_synth.c file.
Setting correct timeTime setting is performed via serial terminal. First find out kit's current serial (COM) port number:
Then configure your favorite serial terminal application. For example Putty configuration:
After connecting to the kit press Enter key, you should see the following prompt:
(Press H for help)
READY
Pressing 'H' key brings up following help menu:
[D] Display data
[T] Say time
[E] Edit time
[M] Say temperature
Pressing 'D' displays current time and temperature:
Current time is 4:14:19 PM
Current temperature is 23.80 deg C
Pressing 'T' and 'M' announces current time or temperature.
Press 'E' to edit time, enter new values or just press Enter to keep current value:
Hours [4]:5
Minutes [17]:18
AM/PM [P]:
It is also possible to use 24 hour time format. Time format switching is performed by configuring RTC component in PSoC Creator. It is necessary to rebuild project after any format change.
You may have noticed that the clock is not very accurate. This is caused by the fact that RTC clock is by default based on PSoC ILO which claims -50 / +100% accuracy. This is also the cause of the PSoC Creator useful LFCLK warning during project build.
Is there any other option? Fortunately there is! PSoC also supports Watch Crystal Oscillator (WCO) clock source which is much more accurate. What is even better: WCO is already present on PSoC Analog Coprocessor Pioneer kit. Why not use it by default then?
The problem is that using WCO requires hardware modification of the kit. Correct WCO connection and operation would be enabled by moving zero ohm resistor R149 to position R138 and zero ohm resistor R150 to position R30. Unfortunately this modification disconnects any other connection to PSoC pins P4_0 and P4_1. Doing so you would disconnect onboard FRAM and any other I2C device connected to those PSoC pins.
The modification is fully reversible by moving aforementioned resistors back to their original position. Should you decide to perform the modification, the following picture shows location of WCO and resistors on PCB:
After performing hardware mod you should also modify system clocks in project and rebuild the project.


Comments
Please log in or sign up to comment.