


Hardware components | ||||||
 |
| × | 1 | |||
 |
| × | 1 | |||
| × | 1 | ||||
(You will need to have gone through the initial setup of your device described on the particle site here)
This is the most straight forward part of the project, wiring up the photon to the relay and getting it powered up. The Photon itself can be powered via the USB socket on the board using a 5v, 1A supply (the chip will run on less amps, but won't have enough juice for the relays). The relay module can be powered from the Photon board by connecting the Vin and Gnd pins to the relay's +5v pin Gnd pins respectively. Then connect pins D0 and D1 to both the IN1 and IN2 pins on the relay in any order.
1. Set up your Project
To get started open up android studio and create a new blank project. To add all the needed Particle libraries open up your build.gradle file and add this line to your dependencies then rebuild the whole project
compile 'io.particle:cloudsdk:0.3.1'Add this permission to your AndroidManifest.xml
<uses-permission android:name="android.permission.INTERNET"/>Lastly create 2 new activity classes
- StartActivity.java
- RemoteControllerActivity.java
2. Create the Layout XML Files for the Screens
We'll get the 2 screens our app will have done before the rest of the code. Create 2 new layout files under src/res/layout.
- activity_start.xml - add one button "connect_btn"
- activity_remote.xml - add 4 buttons "heat_button_off", "heat_button_on", "aux_button_on", "aux_button_off"
You can style the rest whatever way you want.
3. Building the Main Activity
First thing that has to happen when we start the app is we load StartActivity and press connect to logon to the Particle Cloud then connect to our device. Add a listener to the connect button and create a method called logon() which you will call from the listener. The method will first logon on the Particle cloud via and API call.
sparkCloud.logIn("YOUR_LOGIN_EMAIL", "YOUR_PASSSWORD");
mDevice = sparkCloud.getDevice("YOUR_DEVICE_ID");
If this is successful we attempt to connect to our device then open up the RemoteControllerActivity, passing our device id with the intetnt, once a connection is established.
// Checks if we can connect to device after logging on
    if(mDevice.isConnected()){
        Intent intent = new Intent(StartActivity.this, RemoteControlActivity.class);
        intent.putExtra(ARG_DEVICEID, "YOUR_DEVICE_ID");
        startActivity(intent);
    }else{Toaster.l(StartActivity.this, "Unable to connect device");}
4. Building the Remote Controller Activity
This activity will allow you to turn on or off both relays by calling functions on the device itself, and highlight whichever button the relay state is set to. First off in the onCreate use the following to quickly check the relay states and highlight the appropriate buttons.
if(getAux()==0){
    this.auxOn.setBackgroundColor(Color.MAGENTA);
    this.auxOff.setBackgroundColor(Color.LTGRAY);
}else{
    this.auxOff.setBackgroundColor(Color.MAGENTA);
    this.auxOn.setBackgroundColor(Color.LTGRAY);
}

if(getHeat()==0){
    this.heatOn.setBackgroundColor(Color.MAGENTA);
    this.heatOff.setBackgroundColor(Color.LTGRAY);
}else {
    this.heatOff.setBackgroundColor(Color.MAGENTA);
    this.heatOn.setBackgroundColor(Color.LTGRAY);
}
We add onClick listeners to all 4 buttons which will each call a function on the device to write to the relay and then then on a successful write it will change the button colors to highlight the updated relay state.
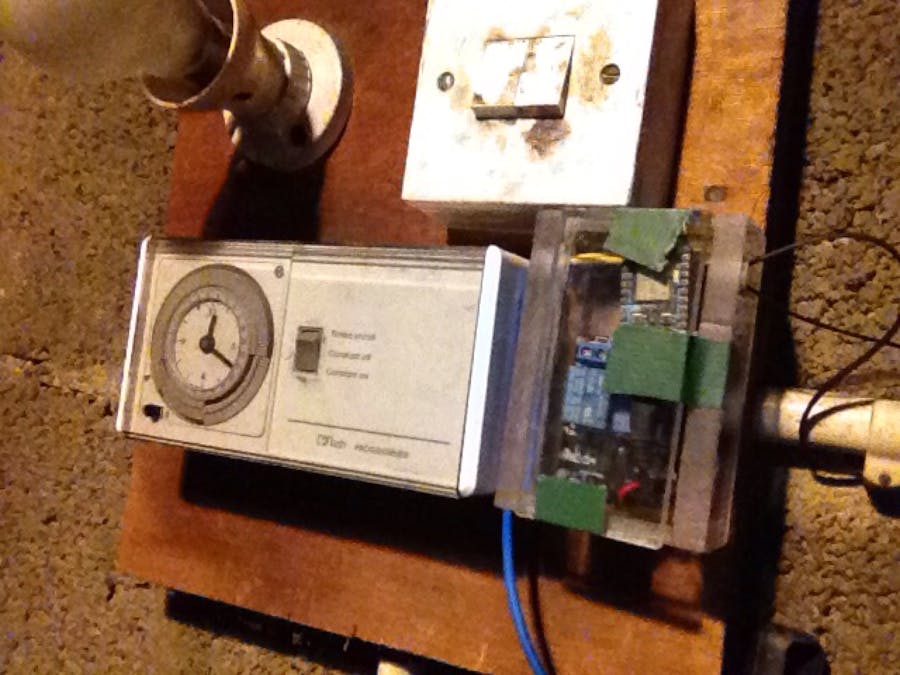
To finish it all off, I used some perspex to make a pretty little box for mounting it next to the heating timer on the wall and wiring up the mains fee to the relay then voila!


Comments
Please log in or sign up to comment.