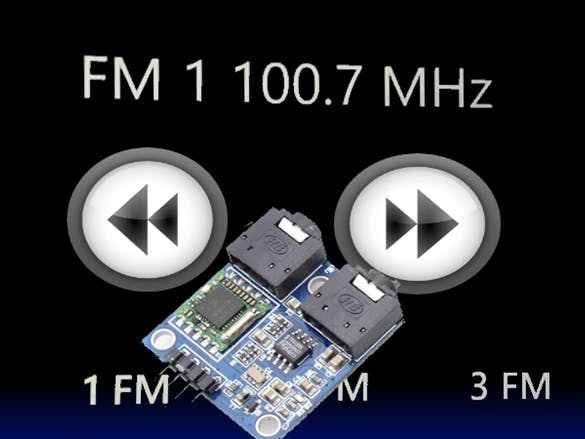
FM Radio TEA5767
To create a simple app for hearing locals radio stations, just connect an I2C TEA5767 to your Raspberry Pi 2 (RPI2). TEA5767 is a module that uses the I2C serial protocol and it is ideal for connecting to an RPI2. No I2C background knowledge is needed. To learn more about I2C click here. For more information about the TEA5767 click here.
Creating a new project in Visual Studio
1. Select a Blank App (Universal Windows) and write an appropriate name.Type in a caption for this image
2. Make sure to set the ‘Remote Debugging’ setting to point to your device and select ARM. Note: this app requires physical I2C ports and will not work if running in an emulated environment.
3. Add a Windows IOT Extension for the UWP as a Reference in the Solution Manager. (Reference Manager -> Universal Windows -> Extensions)
Connect the I2C TEA5767 to your device
Components needed:
We need to hook up power, ground, and the I2C lines to the TEA5767. Those familiar with I2C know that normally pull-up resistors need to be installed. However, the Raspberry Pi 2 already has pull-up resistors on its I2C pins, so we don’t need to add any additional external pull-ups here. See the Raspberry Pi 2 pin mapping page for more details on the RPi2 IO pins.
Note: Make sure to power off the RPi2 when connecting your circuit. This is good practice to reduce the chance of an accidental short circuit during construction.
The TEA5767 has 4 IO pins, connect them as follows:1 Connect to ground on the RPi2 (Pin 6)
-
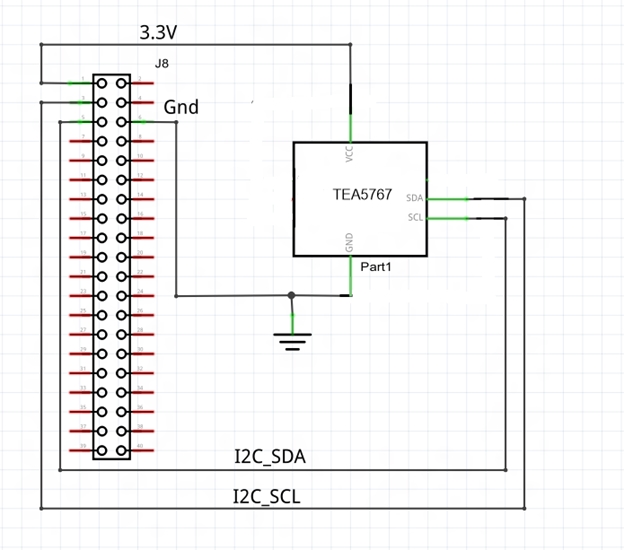
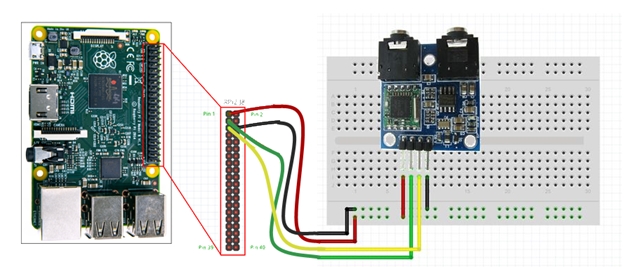
GND: Connect to ground on the
RPi2 (Pin 6)
-
VCC: Connect to 3.3V on the
RPi2 (Pin 1)
-
SDA: Connect to SDA on the RPi2
(Pin 3). This is the data line for the I2C bus.
-
SCL: Connect to SCL on the RPi2
(Pin 5). This is the clock line for the I2C bus.
Here are the connections shown on a breadboard:
Here are the schematics:
Deploy and run the app
When everything is set up, power your device back on, and open up the sample app in Visual Studio. Configure the TEA5767_I2C_ADDR String with the address of the device. In this case, we use 0x60 [hexadecimal], just like explain the TEA5767 datasheet. This project use the MainPage for manage all the function and it divide by MainPage.xaml and MainPage.cs.
MainPage.xaml
The MainPage.xaml contains the FM Radio Display and the user interface of the FM Radio app.
<Page
    x:Class="FM_Radio_Station.MainPage"
    xmlns="http://schemas.microsoft.com/winfx/2006/xaml/presentation"
    xmlns:x="http://schemas.microsoft.com/winfx/2006/xaml"
    xmlns:local="using:FM_Radio_Station"
    xmlns:d="http://schemas.microsoft.com/expression/blend/2008"
    xmlns:mc="http://schemas.openxmlformats.org/markup-compatibility/2006"
    mc:Ignorable="d">

    <Grid Background="{ThemeResource ApplicationPageBackgroundThemeBrush}">
        <Canvas HorizontalAlignment="Left" Height="768" VerticalAlignment="Top" Width="1024" Margin="0,2,0,-2">
            <Canvas.Background>
                <LinearGradientBrush EndPoint="0.5,1" StartPoint="0.5,0">
                    <GradientStop Color="Black" Offset="0.518"/>
                    <GradientStop Color="#FF060832" Offset="0.818"/>
                    <GradientStop Color="#FF05073C" Offset="0.201"/>
                    <GradientStop Color="#FF010108" Offset="0.694"/>
                    <GradientStop Color="#FF05060C" Offset="0.328"/>
                </LinearGradientBrush>
            </Canvas.Background>
            <Button x:Name="button" Content="1 FM"  Height="105" Canvas.Left="65" Canvas.Top="603" Width="250" BorderBrush="#FF1B302F" HorizontalAlignment="Center" FontWeight="Medium" FontSize="64" Foreground="White" Click="button_Click">
                <Button.Background>
                    <LinearGradientBrush EndPoint="0.5,1" StartPoint="0.5,0">
                        <GradientStop Color="Black" Offset="0"/>
                        <GradientStop Color="#FF1C1C21" Offset="0.573"/>
                        <GradientStop Color="#FF01020F" Offset="0.956"/>
                    </LinearGradientBrush>
                </Button.Background>
            </Button>
            <Button x:Name="button2" Content="2 FM"  Height="105" Foreground="White" Canvas.Left="380" Canvas.Top="603" Width="250" BorderBrush="#FF1B302F" HorizontalAlignment="Center" FontWeight="Medium" FontSize="64" Click="button2_Click">
                <Button.Background>
                    <LinearGradientBrush EndPoint="0.5,1" StartPoint="0.5,0">
                        <GradientStop Color="Black" Offset="0"/>
                        <GradientStop Color="#FF1C1C21" Offset="0.573"/>
                        <GradientStop Color="#FF01020F" Offset="0.956"/>
                    </LinearGradientBrush>
                </Button.Background>
            </Button>
            <Button x:Name="button3" Content="3 FM" Foreground="White" Height="105" Canvas.Left="690" Canvas.Top="603" Width="250" BorderBrush="#FF1B302F" HorizontalAlignment="Center" FontWeight="Medium"  FontSize="64" Click="button3_Click">
                <Button.Background>
                    <LinearGradientBrush EndPoint="0.5,1" StartPoint="0.5,0">
                        <GradientStop Color="Black" Offset="0"/>
                        <GradientStop Color="#FF1C1C21" Offset="0.573"/>
                        <GradientStop Color="#FF01020F" Offset="0.956"/>
                    </LinearGradientBrush>
                </Button.Background>
            </Button>
            <TextBox x:Name="Title" Height="145" Foreground="WhiteSmoke" TextWrapping="Wrap" Text="FM STATION" Canvas.Top="68" Width="1024" TextAlignment="Center" HorizontalAlignment="Center" VerticalAlignment="Center" FontSize="96" BorderBrush="{ThemeResource AppBarItemPointerOverBackgroundThemeBrush}" SelectionHighlightColor="{x:Null}" Background="{ThemeResource ApplicationForegroundThemeBrush}"/>
            <Button x:Name="button1" Canvas.Left="85" Canvas.Top="263" Height="250" Width="275" Click="button1_Click">
                <Button.Background>
                    <ImageBrush Stretch="Fill" ImageSource="Assets/Actions-media-seek-backward-icon.png"/>
                </Button.Background>
            </Button>
            <Button x:Name="button1_Copy" Canvas.Left="645" Canvas.Top="263" Height="250" Width="275" Click="button1_Copy_Click">
                <Button.Background>
                    <ImageBrush Stretch="Fill" ImageSource="Assets/Actions-media-seek-forward-icon.png"/>
                </Button.Background>
            </Button>
            <TextBox x:Name="Text_Status" Foreground="WhiteSmoke" Height="55" Canvas.Left="10" TextWrapping="Wrap" Text="TextBox" Canvas.Top="543" Width="1004" TextAlignment="Center"  HorizontalAlignment="Center" VerticalAlignment="Center" BorderBrush="{ThemeResource AppBarItemPointerOverBackgroundThemeBrush}" SelectionHighlightColor="{x:Null}" Background="{ThemeResource ApplicationForegroundThemeBrush}" FontSize="32"/>
        </Canvas>

    </Grid>
</Page>
MainPage.cs
public sealed partial class MainPage : Page
{
  private const byte TEA5756_I2C_ADDR = 0x60; /* 7-bit I2C address of the TEA5756 */
  private I2cDevice TEA5767;
  double frequency = 106.9; /* Puerto Rico Local Station */
  double frequency1 = 104.7; /* Puerto Rico Local Station */
  double frequency2 = 100.7; /* Puerto Rico Local Station */
  double frequencyCurrent;
  int cof = 32768; //crystal constant
}
You should be able to press F5 (Run) from Visual Studio. The FM Radio app will deploy and run, and you should see the current frequency showing up on screen. In this example you can use the seek button. This button will stop when the TEA5756 signal is strong. That is, that the station is found it. The other buttons, are preset stations [FM #1][FM #2][FM #3]
Congratulations! The I2C TEA5767 is connected.
Let’s look at the code
The code in this sample performs two main tasks:
1. The code initializes the I2C bus and the TEA5756
2. Read from the TEA5756 the defined frequencies and update the display.
Let’s start by digging into the initializations.
Initialize the I2C bus
To use the TEA5756, we need to initialize the I2C bus first. Here is the C# code:
Here’s an overview of what’s happening:
- First, we create an I2CConnectionSettings object with the TEA5767 address “TEA5756_I2C_ADDR” (0x60).
- Next, we get the class selection string for our I2C controller. This controller controls the I2C lines on the exposed pin header.
- If the device does not have a connected controller, this function will throw an exception. This may happen if you run the app on a desktop machine.
- Finally, we create a new I2C device with the settings and bus controllers obtained previously.
Initialize the TEA5767
using Windows.Devices.Enumeration;
using Windows.Devices.I2c;

public async void InitI2CTEA5756()
{
  try
  {
    var settings = new I2cConnectionSettings(TEA5756_I2C_ADDR);// 0x60 is the I2C device address
    settings.BusSpeed = I2cBusSpeed.FastMode; /* 400KHz bus speed */
    string aqs = I2cDevice.GetDeviceSelector("I2C1"); // Get a selector string for bus "I2C1"
    var dis = await DeviceInformation.FindAllAsync(aqs); // Find the I2C bus controller with our selector string
    TEA5767 = await I2cDevice.FromIdAsync(dis[0].Id, settings); /* Create an I2cDevice with our selected bus controller and I2C settings */
    mute();
    if (TEA5767 == null)
    {
      Text_Status.Text = string.Format(
      "Slave address {0} on I2C Controller {1} is currently in use by " +
      "another application. Please ensure that no other applications are using I2C.");
      return;
    }
    else
    {
      Title.Text = string.Format(" FM 1 " + frequency + " MHz ");
      Text_Status.Text = string.Format("La Mega station");
      setFrequency(frequency);
    }
  }

  catch (Exception ex)
  {
    Text_Status.Text = "I2C Initialization failed. Exception: " + ex.Message;
    return;
  }
}
Now that the I2C Device TEA5767 instance is set the I2C bus initialization is done. It’s now possible to write and read data over I2C to start up the FM Radio Station. This is done with the Write() and Read() functions. To set the frequency, some internal registers need to be configured before the device can be used. The data format register has 5 data bytes [byte#1][byte#2][ byte#3][ byte#4][ byte#5]. So a byte object is needed to read and write on the buffer.
Write the Data
The Write() function is needed to set a frequency. Configure the byte object calling the writeBuf function. If you need information about the register click here.
void setFrequency(double frequency)
{
  int frequencyB = (int)(4 * (frequency * 1000000 + 225000) / 32768);
  byte frequencyH = (byte)(frequencyB >> 8);
  byte frequencyL = (byte)(frequencyB & 0xFF);
  byte[] writeBuf = {frequencyH, frequencyL, (byte)0xB0, (byte)0x10, (byte)0x00 };
  TEA5767.Write(writeBuf);
}
Read data from the TEA5767
The Read() function is used to read a Frequency. Configure the byte object calling the readBuf function. If you need information about the register click here.
double getFrequency()
{
  double frequency = 0.0;
  TEA5767.Read(readBuf);
  frequency = ((readBuf[0] & 0x3F) << 8) + readBuf[1];
  // Determine the current frequency using the same high side formula as above
  return Math.Round(Math.Round(frequency * 32768 / 4 - 225000) / 1000000,1);
}
Demo
I made a little demo to demonstrate how it works. (FM Radio.git). In this demo you can write, read and search local radio stations available using a graphical user interface.


Comments
Please log in or sign up to comment.