

Hardware components | ||||||
| × | 1 | ||||
_ztBMuBhMHo.jpg?auto=compress%2Cformat&w=48&h=48&fit=fill&bg=ffffff) |
| × | 1 | |||
| × | 1 | ||||
 |
| × | 1 | |||
| × | 1 | ||||
Software apps and online services | ||||||
 |
| |||||
Hand tools and fabrication machines | ||||||
 |
| |||||
 |
| |||||
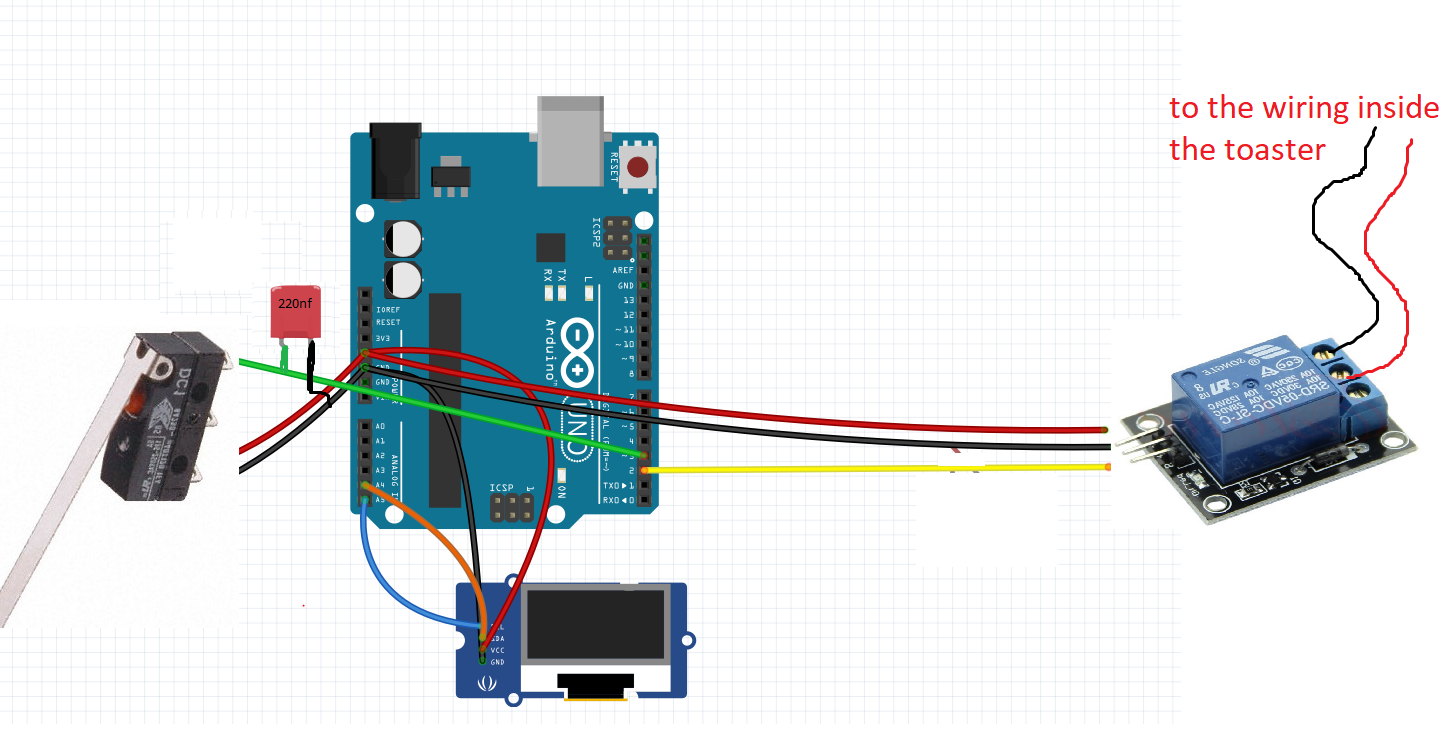
I setup my toaster with a precision of ±10ms the perdiod of time i want the toast to be cooked.
For making this i just need three things:
- Sensor for taking the time we start the toaster.(LIMIT SWITCH).
- Actuator for stopping the toaster exactly when we want to.(RELAY and wires)
- A robotic brain microcontoller such an arduino.(i use UNO)
- relay interruptions eeprom and timmer use
- OLED screen and distance sensor
- OLED screen and potenciometer
CODE:
At first we declare all of those libraries that help us for controlling the OLED screen.
Then we declare our pins and variables. After that we create the class named display. For controlling our OLED:
#include <SPI.h>//liraries for manage the OLED display
#include <Wire.h>
#include <Adafruit_GFX.h>
#include <Adafruit_SSD1306.h>
#define OLED_RESET A6
#define interruptPin 2
#define relePin      3
float toastingtime=3000;//time in milisenconds
float starttime=0;
bool flag=0;
Adafruit_SSD1306 display(OLED_RESET);
In the setup everything as usual, OUTPUT declaring. I attach the interrupt to pin 2 to be handled by the function TOASTaction() when the pulse in pin 2 RISES.(_____-HERE-----------____).
After that we "begin"(initialise) the display on I2C address 0x3C, set some formating for our text such as size colour or position, and display a short message with my name in it. (yes, you can put yours instead)
void setup() {
 pinMode(relePin,OUTPUT);
 pinMode(A4,OUTPUT);//I2C OLED CONTROL
 pinMode(A5,OUTPUT);
 digitalWrite(relePin,LOW);
 attachInterrupt(digitalPinToInterrupt(interruptPin), TOASTaction, RISING);//activates the function when the logic level of interruptPin rises so: (__-HERE------------------_____)
 display.begin(SSD1306_SWITCHCAPVCC, 0x3C); //initialize with the I2C addr 0x3C (128x64)
 display.clearDisplay();//initial flush to black of the screen
 display.setCursor(0,0);  //initial message
 display.setTextSize(2);
 display.setTextColor(WHITE);
 display.println("TOSTADORA");
 display.setTextSize(1);
 display.setCursor(0,55);display.println("Javier Munoz Saez");
 display.display();
 delay(3000); //for 3 seconds
 display.clearDisplay();
 display.display();
}We check every loop if the flag is ==1, if so things are happening!
void loop() {
 if(flag==1){//check just when we need to
   OLEDcountdown();
   whentostop();
 }else{
OLEDtext();
 }
}
TOASTaction: Executes every time the pin 2 is activated (toast is introduced):
void TOASTaction(){//interruption from pin 2
 flag=1;//the toasting just started!
 starttime=millis();//get start time
}
Whentostop: checks if time is already up and activates the relay.
void whentostop(){//checks time and activates relay
 if(toastingtime<=millis()-starttime){//when toasting time is smaller than the time since the toaster started
   digitalWrite(relePin,HIGH);//relay! ____---__________
   delay(50);
   digitalWrite(relePin,LOW);
   flag=0;//get back to idle mode.
   OLEDTOAST();
 }
}
OLED functions: each one is a different screen mode.
OLEDcountdown()shows time untill stop in msOLEDtext()shows text for the setup initial partOLEDTOAST()when toast gets finally done fires a TADAAAA text
void OLEDcountdown(){
 int tiempo=toastingtime-(millis()-starttime);
 display.clearDisplay();
 display.setTextSize(3);
 display.setCursor(0,30);display.println(tiempo);  display.setCursor(80,30);display.println("ms");
 display.display();
}
void OLEDtext(){
   display.clearDisplay();
   display.setCursor(0,0);
 display.setTextSize(2);
 display.setTextColor(WHITE);
 display.println("HIGH      PRECISION TOASTER");
 display.display();
}
void OLEDTOAST(){
   display.clearDisplay();
   display.setCursor(0,0);
 display.setTextSize(2);
 display.setTextColor(WHITE);
 display.println("TADAAAA :)");
 display.display();
 delay(3000);
}BE CAREFUL OPENING YOUR TOASTER, UNPLUG IT FIRST, check everything twice with a voltimeter and do whatever you find fit in the name of safety like praying or wearing gloves.
- First step, lets see whats inside: 730-870W AC, cheap ass Bluesky toaster.
After some simple circuit analysis i discovered a small transformer, some filters and capacitors, a variable resistor, the timming and everything is made with analog components such as capacitor charging/discharging times.
No sign of any digital brain and lots of mechanical components are present. Its ugly enough to scare me, I was thinking about replacing everything but now I'm not that sure.
- The time of toasting is not constant at all and depends on the previous temperature of the heating resistances. I need a predictable accurate toasting time for my project.
- Controlling when to stop, I found the stop-toasting button inside the case and I attached some wires to it so it can be controlled by a rele and Arduino.
The button has a DC voltage of 0,77V and I didn't research deeply into it but it seems like a clamping mechanism. My theory is: When the lever is pulled down we close the small transformer core and current starts flowing trough it, the lever has part of the magnetic ferrite core attached so now is magnetically glued to the rest of the core. If I push the button it bypasses ground switching off the transformer circuit and releasing the magnetic force that was keeping the string mechanism to jumping back and it goes OFF.
If we dont use that button the time naturally is controlled by a capacitor charging trough the variable resistance (more resistance more time of charging more time of toasting).
I could use a classy n channel MOSFET, but I decided out of my own lazyness to overkill it with a relay. (And because I didn't have one).
Also connect a pararel capacitor (i use 220nF) to prevent bouncing on the switch signal.
Happy hacking!


Comments
Please log in or sign up to comment.