About Smart Lock:
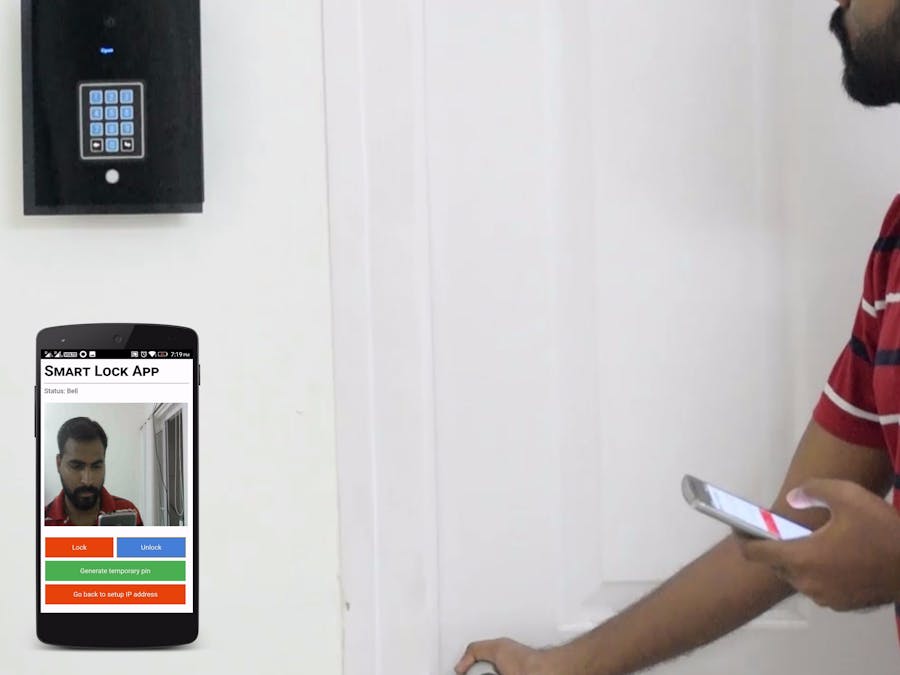
Smart Door Lock with Door Bell is a IoT device built using MediaTek Linkit smart 7688 duo which is interfaced with a Oled Display, A keypad, A Magnetic Door Lock with Read Switch and a USB Camera. The prototype connects to internet via Wi-Fi to send video stream and notifications to android app through internet. Whenever someone presses the door bell button connected to the LinkIt, it pops up a alert on the android app on which the video stream from the camera connected to LinkIt can be seen live. Using the app, the user can remotely lock and unlock the door as well. A keypad and display is also available on the device to set temporary authentication codes and permanent authentication codes to unlock the door lock.
Demo video of working prototype:
Architecture:
Steps to build the prototype are as follows:
Step 1:
Follow the steps given in link below to sign in into Web UI of the 7688 Duo Board:
Step 2:
Follow the steps given in link below to setup WiFi SSID and password of the router to which LinkIt should connect via WiFi:
Step 3:
Once you have setup the Wi-Fi SSID and password of your router on the LinkIt, the device will get switched from Access Point Mode to Station Mode and connect to your router. You can check this by opening your router's UI and check the LinkIt device in the connected devices list as shown in the screen shot below:
Note down IP address of the LinkIt Smart 7688 duo that you see in your router page, in my case its 192.168.4.3 as highlighted in above screenshot
Step 4:
Open any terminal software like Putty and login into the console of LinkIt using the IP address of the LinkIt via SSH
click on "Yes" when the Security Alert pops up
It will prompt for the username
Enter user name as "root" and default password or the password you set in Step 1.
Once you have logged in, you will be able to see the console as shown in the screenshot above
Step 5:
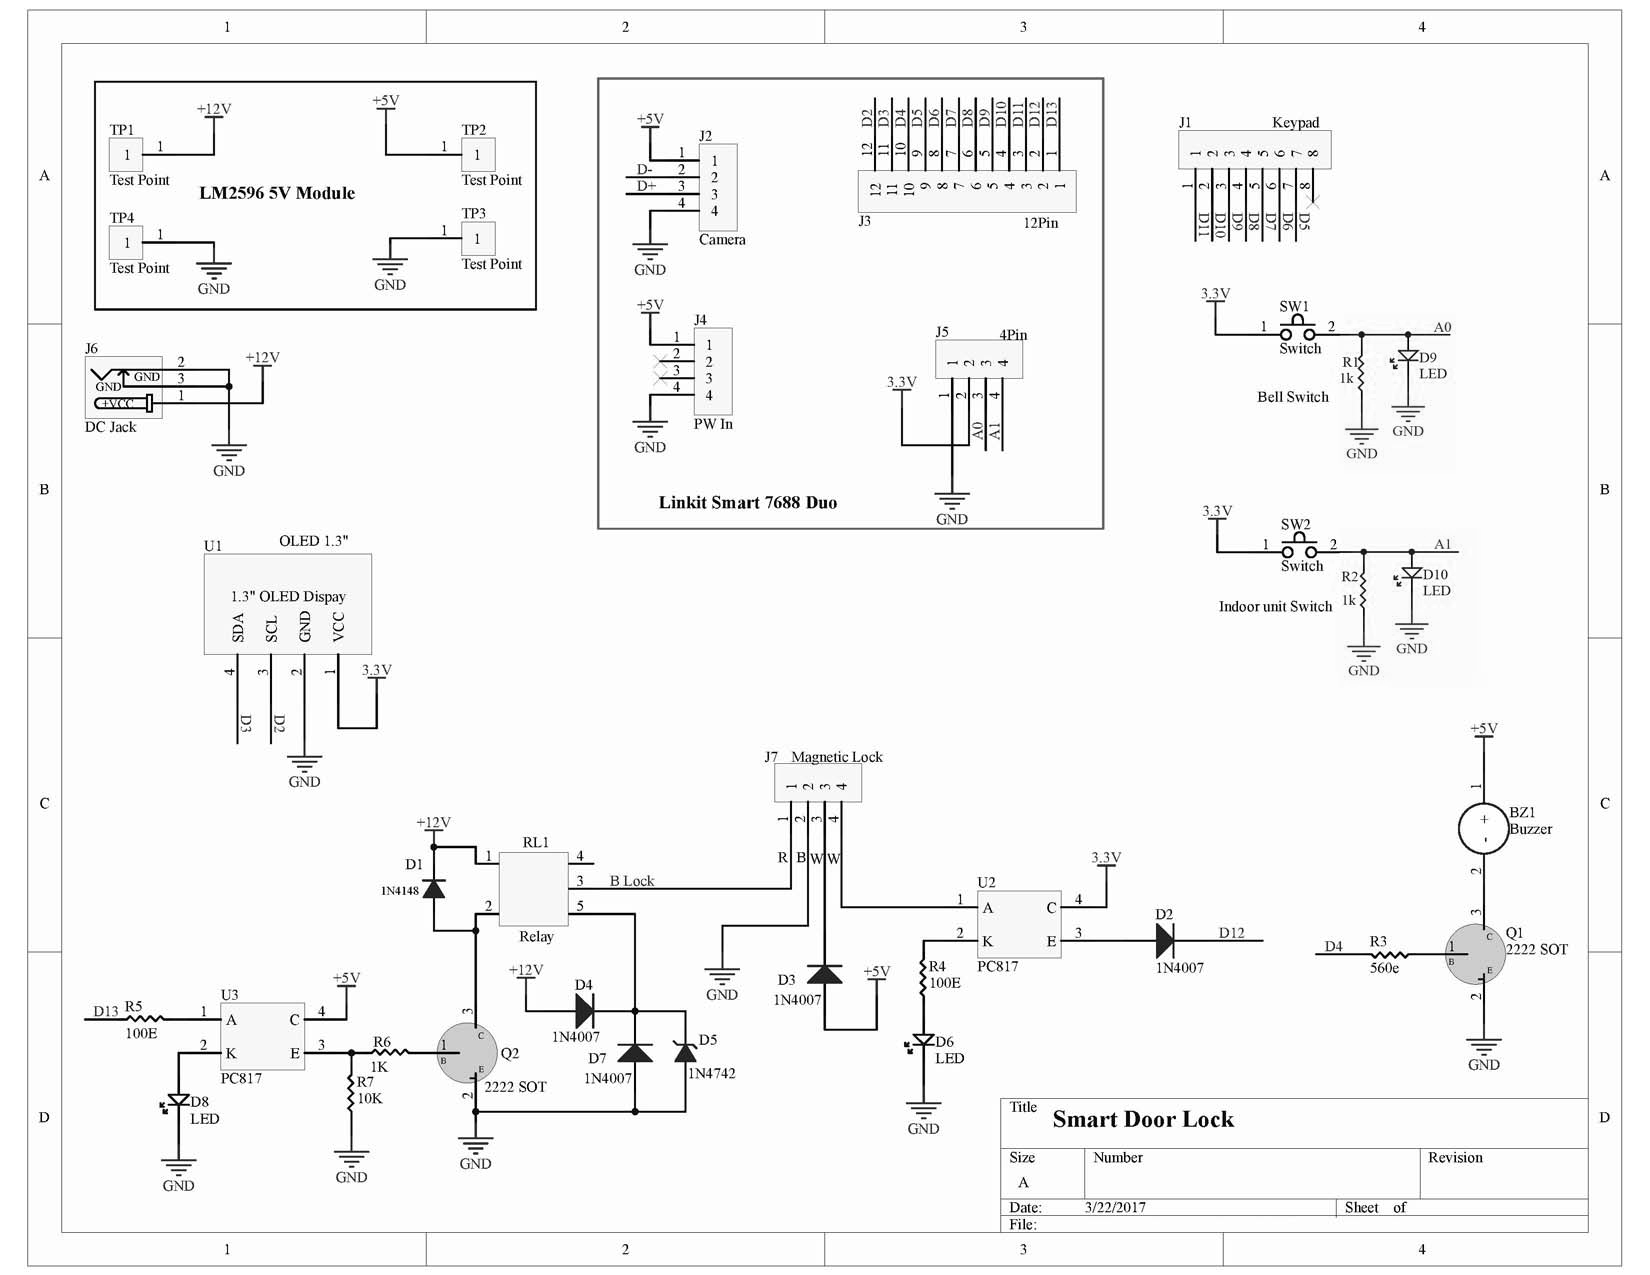
Connect the components as per circuit diagram given below:
As shown in the video, I have divided the above schematic to fit on two boxes called the outdoor unit and the indoor unit
The outdoor unit with the Camera, Display, Keypad and the Push button which is used as door bell button
then the indoor unit which contains everything else from the schematic which includes the Voltage regulator, LinkIt board, relay circuit, another push button, buzzer
and the magnetic lock which connects to the indoor unit
The step files of the laser cut acrylic parts are available in the CAD files section of the project if you want to use it, but after laser cutting I drilled holes and cutouts manually using the the hand drill and cutters
Step 6:
Follow the steps given in link below to add LinkIt smart board to your Arduino IDE:
Step 7:
Follow the steps given in links below
to upload the ArduinoMain.ino code available in Code section of this project into the ATmega 32U4 on LinkIt using Arduino IDE
You will need the following two libraries installed in the Arduino Libraries directory to compile the code successfully
Step 8:
Now we will go ahead to interface the camera with the LinkIt.
Connect the USB Camera to USB Host port on LinkIt using a OTG cable.
Once you have connected the camera, you can go ahead and power the development board on, and login into the console and check whether the camera has been detected or not by checking the list of items on the /dev directory as shown in the screenshot below
if you see the video0 on the list as highligted in the above image, it means your camera is connected properly, you can go ahead to stream the camera on the local server
The mjpg_streamer package comes pre-installed in the LinkIt firmware, so we can use the following command to test the camera streaming using it
mjpg_streamer -i "input_uvc.so -d /dev/video0 -r 640x480 -f 25" -o "output_http.so -p 8080 -w /www/webcam"
You can see in the above screenshot that the TCP port is 8080 on which the streaming is happening, so if you point your browser to your LinkIt's IP address followed by port 8080 i.e. http://192.168.4.3:8080 in my case you will see the video streaming from the camera as shown in screenshot below
Now that we are able to stream the cam feed, we can make this command run the camera streaming automatically when LinkIt boots up, to do this edit the /etc/rc.local file on the LinkIt using vim editor
vim /etc/rc.local
the modified /etc/rc.local file looks as shown in the picture below
once you have save the rc.local file as shown in screenshot above, it will automatically start streaming the video from USB camera connected to the LinkIt whenever its turned on.
Step 9:
Now we will create a directory on the home folder named app and create the app.js and index.html files inside it
mkdir app
once you have created the directory you will be able to see it when you use the ls command
ls
now move into the app directory by using cd command
cd app
now install socket.io using npm inside the app directory
npm install --save socket.io
Once you have installed socket.io successfully without any errors you can see the socket.io directory inside the nodemodules directory that will be automatically created inside the app directory after successful installation of socket.io in previous step which you can see as shown in the screenshot below:
Now we can go ahead and create the app.js file and index.html files inside the app directory using vim text editor
vim app.js
app.js code is made available in the Code section of the project
once you insert the code into the app.js file, you can save it using the :wq command and quit from the vim editor
similarly create the index.html file also which available in the Code section inside the app directory using vim text editor
Note: Change the IP address highlighted in the below screenshot of the code to your LinkIt's IP address, as mentioned previously in my case the IP address of my LinkIt is 192.168.4.3 which you can see in the screenshot below
once you have created it, your app directory will look as shown in the screen shot below:
once you have these files ready inside the app directory we can move ahead and test the device by running the NodeJs application
node app.js
If you get the output as shown in screen shot above, your code is running without error, you can point your browser to your LinkIt IP address at port 4000, in my case http://192.168.4.3:4000 where you will will see the web app as shown in screenshot below
As you can see, the web app has the status as Begun, and you can Lock, Unlock and Generate temporary pin by clicking the buttons on the web app and you can also see the outputs in the console when the Lock is locked, Unlocked, and other status updates as shown in snapshot below
Like we did in Step 8 to run the camera streaming at bootup, we need make the NodeJS server also to run at bootup, to do this we will similarly edit the rc.local file to as shown shown in picture below
node /root/app/app.js
once you save the rc.local file as shown in screen shot above, you will be able to see that the NodeJS server runs automatically after boot up.
Note: The index.html code has css class named rotate180 which is used in the line of code as shown in the below snippet
<img src="http://192.168.4.3:8080/?action=stream" height="300" width="340" class="rotate180" />
this is used because I have mounted my camera upside down on the outdoor unit, if you are mounting your camera straightly, you can remove that class attribute from the line of code, then the modified line will be as shown below
<img src="http://192.168.4.3:8080/?action=stream" height="300" width="340" />
Step 10:
To connect the device to the internet and make it accessable via your public IP address provided by your internet service provider (ISP), you should port forward the port 4000 which is used by the NodeJS server and the port 8080 which is used by the video streamer
Every router has a different way to do it, the screen shot shown below is my router's port forward screen
You can see the above screen shot that I have port forwarded port 8080 and 4000. Once you have done it, any request coming to particular port 4000 and 8080 on your public IP provided by your ISP will be redirected by the router to the LinkIT device.
If you don't know what is your public ip, you can type in google "what is my ip" and you will get it as shown in screen shot below
Now, if point at this public IP address followed by port number 8080 you will be able to see the video feed from any computer or mobile device that is connected to the internet around the world, similarly you can point at the port 4000 to use the web app
Note: Make sure you change the IP from local IP of your LinkIt to public IP of your router on the index.html to use the web app running on LinkIt from a different location i.e. outiside your LAN
Step 11: Using the Android App to control the device from anywhere around the world via Internet
If you want to use an Android App instead of the Web App to control the device both when you are in the local network as well as on the public network when you are connected to some other router in some other part of the world, I have built a small android app which might come in handy in that case which I also showed in the video. You can download the apk by clicking on the Download Apk button given below or download the source code of the phonegap project file i.e. the source code of Apk and build it on your own:
You can install this Apk on your android phone and set it up either to use the public IP or to use the local IP without worrying about changing the IP address on the index.html page on the device to control the Smart Lock device remotely
Screen Shots of Apk:
Screen Recording Video of App:
I guess I have shared all the information needed to replicate this project. Just in case if you face any issues, you can type in on the comments section below, I will be ready to help.


_3u05Tpwasz.png?auto=compress%2Cformat&w=40&h=40&fit=fillmax&bg=fff&dpr=2)
Comments
Please log in or sign up to comment.