I tried to develop a sound based system that detects water flow in a pipe by monitoring the sound level intensity within a specific frequency range on a water inlet pipe.
Existing solutions require a sensor at every location where a leak may occur. Others require installing an inline sensor which necessitates cutting the pipe to install the sensor. The only existing noninvasive method that I am aware of utilizes ultrasonic sensors that are more expensive than a microphone based system.
This system will detect water flow and disable water flow by operating a motorized ball valve. It could also be modified to disconnect power on the water pump for systems with wells.
The solution places a microphone in close proximity to the pipe and monitors the sound level intensity in the pipe. The sound intensity changes with the flow rate and can be detected above a predetermined threshold. If the threshold is exceeded and the system is armed, the ball valve can be actuated to prevent additional water flow. The flow can also be ignored for normal use if the system is disarmed.
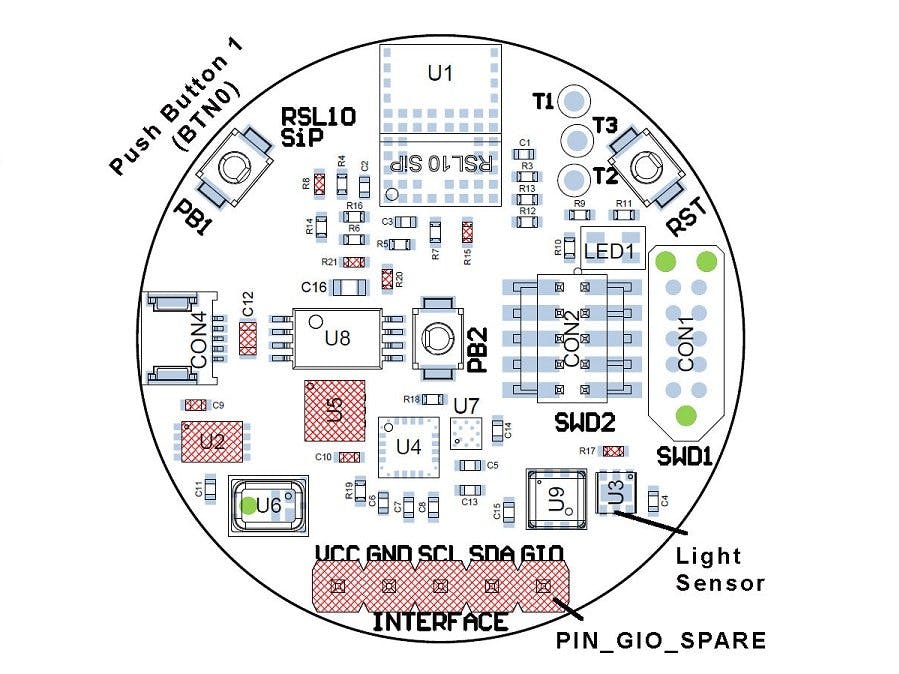
I attempted to use the INMP522 microphone on the RSL-10 board to monitor the sound level in the pipe. The microphone has a digital output that is read over an I2C bus by the microprocessor. When attempting to view the output using J-Scope however the microphone output would not change from "0". I don't know if the software changed, the microphone is damaged or if I was doing something wrong.
The following video shows the J-Scope output that my RSL-10 displayed.I also loaded the IDE on 2 computers to see if they reacted the same way and they both read "0" for the audio output.
After several weeks of frustration and contacting On Semiconductor Technical Support, I decided to use the lux meter for an example of how it would work.
LUX THRESHOLD TEST (Pipe_Break2)I started with the sense_noa1305_example project and copied it to my workspace. Now rename the project to Pipe_Break2.
The threshold level is defined on the main.h program in the include folder. The value can be set to a proper value that will trigger an action in the main.c program.
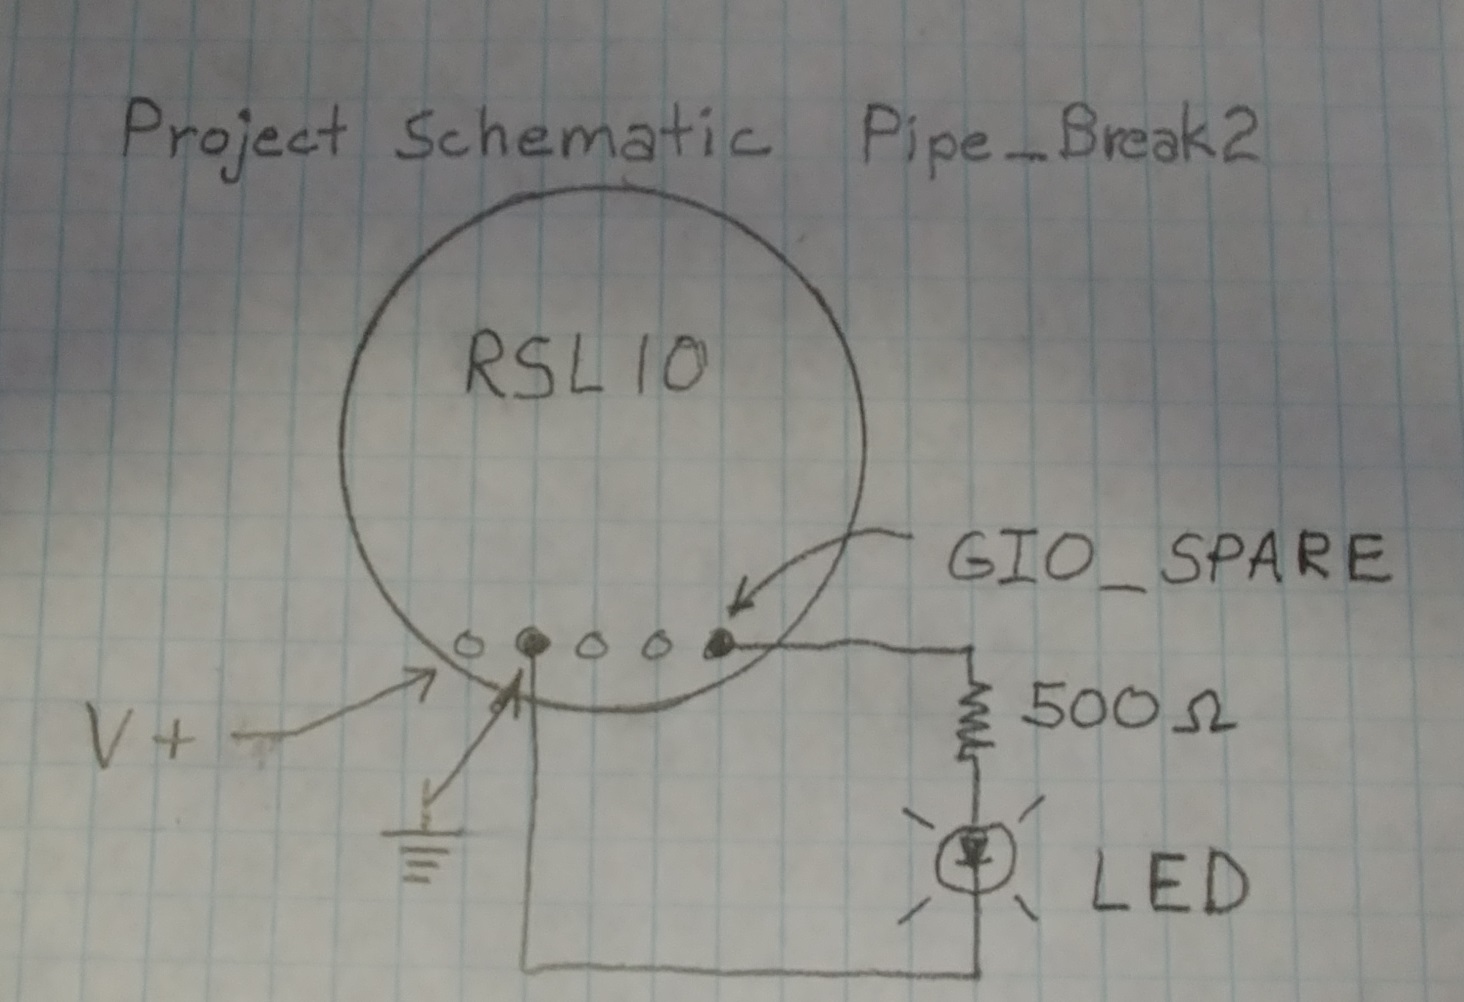
The code was modified in the main.c program to turn on the RED LED when the threshold is exceeded if the system is armed. The system is considered armed when pushbutton 1 (PBN0) is pressed. The LED simulates turning on a valve to shut off the main water supply. The Spare GPIO is used to drive the LED. Note that the maximum drive current is 12 ma. Do not overload the output or you will damage the device. I used a 500 ohm resistor in series with the external LED.
R = 3.3V/ 0.012 amps =275 minimum, I selected 500 ohms.
The following video demonstrates the function using the light sensor with a set threshold of 600 lux.
You should only need to modify the main.c file to replicate the project. See the attached code to replace the existing main.c starting with a copy of the sense_noa1305_example. You can also replace the readme file for instructions on using the program. I have also included a flow chart for the project to reference.
Now that I had a working program I decided to see if I could read the LUX values on my phone. I soldered a wire to the gpio side of the outside button to use it as an arm/disarm switch. The common pole of the switch is connected to ground.
The GPIO SPARE output is connected to an LED through a 500 ohm resister.
The following instructions are also listed in the main.c file for seting up the project.
- 1) Copy "sense_ics_firmware" to the Project Explorer View from CMSIS Pack Manager View.
- It is called "Custom Service Firmware (RSL10-SENSE-GEVK)" in the CMSIS View.
- Using this project ensures that all of the required BDK components are included.
- 2) In the Project Explorer View, rename the project.
- 3) Rename "xxxxxxx.rteconfig" file to the new project name if required.
- 4) De-select the BLE - peripheral server - BASS component to remove battery status
- 5) Replace the code in the "main.c" file with new "main.c" code (copy / paste).
- 6) Replace the code in the "main.h" file with the new "main.h" code
- 7) Delete the file CNS_PB.h in the include folder.
- 8) Delete the file CNS_PB.c in the src folder.
- 9) Build the project, Debug and Flash the RSL10.


Comments
Please log in or sign up to comment.