


Hardware components | ||||||
| × | 1 | ||||
 |
| × | 1 | |||
_ztBMuBhMHo.jpg?auto=compress%2Cformat&w=48&h=48&fit=fill&bg=ffffff) |
| × | 1 | |||
Hand tools and fabrication machines | ||||||
| ||||||
I’m working on ways to make my Arduino UNO communicate with my Raspberry Pi 3 over a serial connection, and I’ve used a USB cable to connect the two devices together.
But because the Type-B USB connector on the Arduino is being used, I don’t have a convenient way to upload sketches to the Arduino UNO from my development machine. I can obviously disconnect the USB connector from the Arduino UNO and connect it to my development machine, but this gets kind of old after a while, and I’d like an easier way to upload sketches.
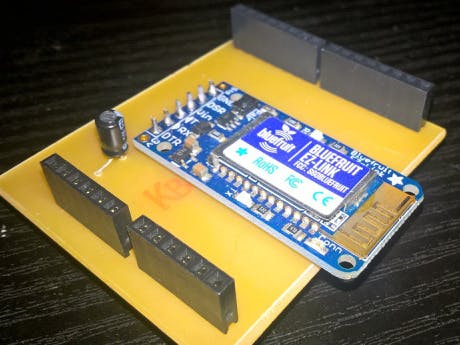
So I dug deep into my box of electronic bits and pieces, and fortunately found I’ve got another way to do this – I can add Bluetooth capability to my Arduino UNO with the Adafruit Bluefruit EZ-link breakout board.
First connect the board to the Arduino UNOI could have done this with wires and a breadboard, but I decided to make a custom shields with some copper clad PCB board and my Shapeoko.
Fortunately there was very little soldering to be done on my custom PCB as my soldering could be better!
I designed the PCB according the pinout recommended by Adafruit, which is:
- EZ-Link GND -> Arduino GND
- EZ-Link DSR -> Not connected
- EZ-Link V-IN -> Arduino 5V
- EZ-Link Tx -> Arduino Digital Pin 0 (Rx)
- EZ-Link Rx -> Arduino Digital Pin 1 (Tx)
- EZ-Link DTR -> 1uF capacitor in series with Arduino Reset
Attaching the breakout board to a custom made PCB makes the whole device more self contained and I can also add other Arduino shields on top. I found out afterwards that Adafruit actually sells something similar to this already – a Bluefruit EZ-Link Shield.
Now pair the Bluefruit board with a development machineAdafruit provide some really good documentation for pairing the Bluefruit module with a Windows 7 machine – but I’ve written my own notes before for the Windows 10 operating system.
My Arduino is powered by the USB connection to my Raspberry Pi, so once I attached the shield to the Arduino the blue power light came on immediately. The next step was to pair the Bluefruit device with my development machine.
My machine has bluetooth v4.0 on board, but I could have used an after-market bluetooth dongle like this one – it’s important to get one that supports Bluetooth v4.0, some of the cheaper dongles do not support v4.0.
From Windows 10, I typed “Bluetooth” into the search box on the taskbar, and the results gave me the option to select “Bluetooth and other devices settings”.
I clicked on the “+” button beside the text “Add Bluetooth or other device”, which opened the screen below.
I clicked on the Bluetooth option, which opened the screen below, and this shows the Adafruit EZ-Link device.
I selected the Adafruit device for pairing, and received the success message below.
So at this point, it’s possible to upload sketches to the Arduino through the Bluetooth COM port – and in the image below, you can see that even though my Arduino isn’t connected by USB cable to my development machine, the serial port COM6 is available to me.
I talked about how to use VSCode to develop and deploy to the Arduino on my blog previously, and it works exactly the same way in VSCode.
And as far as the Arduino is concerned, this is just another COM port, as if the Arduino was directly connected to the PC using a USB cable. I don’t need to do any further set up, and I can verify and upload my sketch to the Arduino UNO wirelessly through COM6 (it’ll probably be different on another machine). It’s a little bit slower to transfer a sketch over the air, but at least it’s wireless.
Wrapping upThis was a short post about how to wirelessly deploy sketches to the Arduino using the Adafruit Bluefruit EZ-Link breakout. When I can’t use the Arduino’s on board USB port, this device makes my Arduino development much more convenient. If you have this device in your toolkit, hopefully you find this post useful!


Comments
Please log in or sign up to comment.