

_63j47y9OVS.jpg?auto=compress%2Cformat&w=40&h=40&fit=min&dpr=2)
I've had a ham radio license for 40 years, but have not been active for a long time. Searching the web for a ham oriented Arduino project, I found Richard Chapman's (KC4IFB) code for an Iambic keyer. Originally published in QST magazine in September 2009, his sketch is available on the ARRL web site unfortunately you need to be an ARRL member to access the QST downloads. But I am, and I did, and I breadboarded it with a Nano. It worked very well. About the same time I had a class in programming the ATTiny85 Atmel chip at our local makerspace, so took a shot a porting KC4IFB's code to one of those. This is the result - Generation 1 of my keyer odyssey:
This first generation device happily beeps out code from my home made paddles but I only used it for practice, never added a transmitter interface circuit. More information and a code link is in this Wordpress page.
https://wb8nbs.files.wordpress.com/2014/02/dscf0312.jpg?w=768&h=577
Second GenerationSo the next winter I feel the need for another Arduino project. I decide to enhance KC4IFB's code to include memorys, keyboard support, and better sounding side tone. More Google searching turned up Raron's blog on Wordpress (anyone know what's happened to Raron?) with his experiments in Arduino morse. I had several conversations with him but ultimately did not use his library, I built my own morse decode algorithm. The device can program it's memories from the keyboard or directly from paddle sent morse. I also added random code practice in five letter groups and improved the audio with a Direct Digital Synthesized sine wave.
This is the second generation device. It uses a pro mini board
More information and code links are in the second half of this wordpress page: https://wb8nbs.files.wordpress.com/2014/02/dscf0312.jpg?w=768&h=577
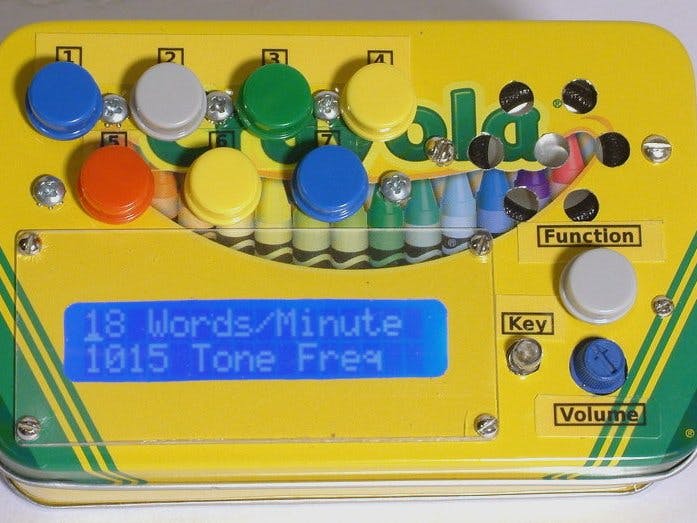
Third GenerationIn the winter of 2015-2016 I again improved the keyer design. This time a Liquid Crystal Display, internal batteries, more memories, and a clock were added. The processer selected was a PJRC Teensy 3.2. This board has a Coretex M4 ARM processor with a lot more horsepower than an original Arduino. It has built in Real Time Clock capability and a real DAC. Porting the second generation code went fairly well but implementing menus on the 16x2 LCD was messy.
This is generation three:
More details and code download links are in this Wordpress page
https://wb8nbs.wordpress.com/2016/02/11/arduino-iambic-keyer-2016-part-1-hardware/
Fourth GenerationIn the winter when I can't ride my bicycle, I sometimes go for long walks. It's a perfect time to listen to the keyer's morse practice mode in headphones. I used the generation two and generation three versions for this but for my winter 2016/2017 Arduino project, I decided to build a version that is solely intended for code practice and would fit in a shirt pocket. The board selected was an Adafruit Feather 32u4 mainly because of it's built in battery charger circuit. Porting the code I found out that removing code from a sketch is almost as difficult as putting it in. The completed project uses a rotary encoder, another first for me and four memory buttons. It can function as a complete iambic keyer but I have not added a transmitter interface circuit as it is intended for practice. It's cute though and the little 150 Mah battery holds up for about six hours.
This is generation four:
Details and a code link are here: https://wb8nbs.wordpress.com/2017/12/03/arduino-iambic-keyer-2017/
I think I'm done building iambic keyers. I have learned the following:
The time to complete a project is inversely proportional to the size of the box you're putting it in.
_63j47y9OVS.jpg?auto=compress%2Cformat&w=60&h=60&fit=min&dpr=2)


Comments
Please log in or sign up to comment.