


Hardware components | ||||||
 |
| × | 1 | |||
_ztBMuBhMHo.jpg?auto=compress%2Cformat&w=48&h=48&fit=fill&bg=ffffff) |
| × | 1 | |||
| × | 1 | ||||
| × | 1 | ||||
| × | 1 | ||||
| × | 1 | ||||
Software apps and online services | ||||||
 |
| |||||
 |
| |||||
This article is to demonstrate how you could create an Arduino-connected lightbulb and remotely controlled the on-off of the lightbulb with an app written in App Inventor 2. For educational purposes, we will use 9V lightbulb instead of a 220V one, but the concepts are identical.
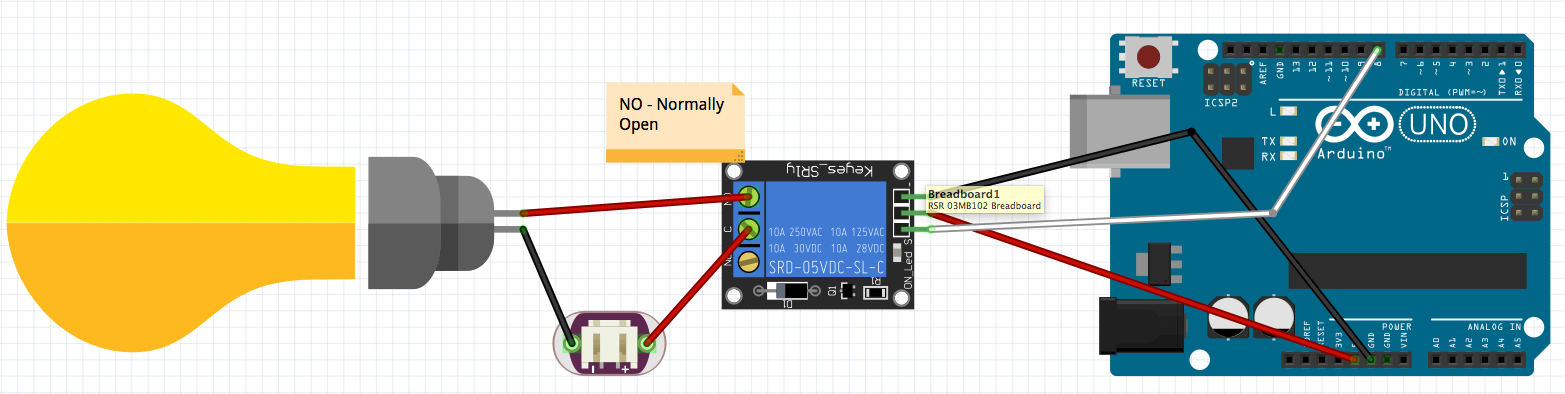
HardwareYou can't control a high voltage device directly from Arduino; instead, you will need a 5V relay in between to switch the 120-220V current and use Arduino to control.
A relay has lower power terminal that connects to Arduino and high power terminal that connects to the high-voltage device.
You may refer to this article here for more details on relay.
Connect the lightbulb, relay and Arduino/ObjectBlocks as per schematic. Note that we use a 9V lightbulb and a 5V-9V converter for illustration purposes (and we taught it in classroom as well).
ObjectBlocksObjectBlocks is an Arduino shield plus a web platform for Arduino and IOT development. (You may want to look at previous article here for more details on ObjectBlocks)
Let's test out if the lightbulb works and can be controlled by Arduino.
Log into ObjectBlocks (here) and start a new Arduino program, and enter the followings.
Upload the program (and you need ObjectBlocks Shield Prime for that) and the lightbulb should be on for 2 seconds before it switches off again.
As said in previous article, ObjectBlocks consists of a Channel that serves as a remote storage so as to facilitate the "inter-communication" among Arduino's, Raspberry Pi's and other WiFi connected devices.
Before we can send any message to ObjectBlocks, we setup a channel at Channel panel.
Create a new channel called "bulb", change the type to "Message" and set "Generate Webhook" to Yes.
Then update and upload the program as below:
For those curious, the generated Arduino C code will look like below:
Now you can test if the remote Webhook works. Open Channel again, and click at "Webhook" for "bulb" channel. You should see a dialog box like this:
Using the Webhook you can actually send information to listening Arduino and control it with a particular message. In this case, if we send message "on" to bulb channel, the lightbulb should be on, and if we send anything else, it will be off. Test it in the browser.
Now we are ready for app development.
App Inventor 2Open App Inventor 2 (here) and create a new Project. Create an interface with 2 buttons (On / Off), and also drag a Web component to the interface. We will use Web component to send the web requests to Arduino / ObjectBlocks to control the lightbulb.
In blocks, create the following block program. Use the same web requests you just tested in browser. (i.e. when you press "On" button, it will send the web request with message "on" to Arduino / ObjectBlocks).
Upload the program to your Android mobile with App Companion installed, or install the apk program directly to your Android mobile.
Pressing the buttons, and your lightbulb should be on/off accordingly.
All of these should be done within 30-45 minutes. Please note that this works even if the app and the lightbulb are not in the same network.


Comments
Please log in or sign up to comment.