When I saw the Horbert radio I knew in instant I want to build something similar for my 2yo daughter. But yet I wanted to make it smaller and handier. Maybe put some lights there. So here we are. Radio for your little ones. It features 7 color buttons, small yet powerful speaker and MP3 player capable of playing songs or fairytales from SD card. Last but not least, it includes rainbow LEDs around the case to create nice ambient light which can be used as a night lamp while the bedtime fairytale is being played.
I wanted to make the case wooden. It looks nice and I love working with wood. Luckily by the same time, my friend got himself a laser cutter to cut plywood. And it is awesome! Various shapes cut within a few seconds and with awesome accuracy! The graphics file is attached at the bottom of this article.
Dimensions: 90x140x35mm
The case is made out of 4mm plywood cut into 8 parts. Front and back plate. Four side plates. Battery and speaker cover. First I glued the four side plates together to form a frame. I've also used some extra wood to reinforce the corners because I want them to be round at the end so I need to have some extra material there to be able to sand the corners down a little bit.
Before I glued in the front piece I inserted a thin layer of plexiglass between the front plate and the frame. This will allow me to later attach the LEDs to create a nice shiny ring around the radio. Some extra design touch. I've used 4mm plexiglass which I cut into rough shape to fit on the frame. Plexiglass is glued to the frame and front plate with the use of super glue. Don't worry about the overlapping plexiglass, it will be sanded out with final shaping.
To add an extra coolness and effect in the dark I've added 4 RGB LEDs around the case. Plexiglass inserted earlier will allow the emitted light to spread around the case. I've used standard addressable WS2818 RGB LEDs daisy-chained together. One in each corner of the case.
First, glue these tiny LEDs into the corners on top of the plexiglass with super glue. Don't forget to mark the pin 1 otherwise you won't be able to properly interconnect them - see my tiny black mark made by permanent marker. Second, interconnect them together. I've used 0.3mm copper wire with transparent insulation.
- VCC to VCC
- GND to GND
- OUT to IN of the next LED
Prior to gluing the back plate in place cut small holes on one side of the frame to fit Arduino Nano USB port, MP3 player SD card slot and power switch. I've decided to put them on the left side of the radio. Using a small knife and a square file I've cut precise holes. As small as possible to hide as much as possible.
Now it is time to glue the back plate in place and form the final shape of the radio. After the glue set, I've used a bench sander to shape the round corners and clean up all the surfaces. To protect the edges I've also sanded them a little bit. Protect the wires coming out of the RGB LEDs to prevent any damage to the insulation while sanding.
The last step is to glue a speaker cover ring over the speaker hole. It will hold the speaker in place. As a final protection, I've applied clear lacquer in 4 layers.
To protect the speaker from being damaged by the curious fingers I wanted to put a mesh of some kind over the speaker hole. But since I don't own a 3D printer and I didn't have anything else suitable, I've created it by soldering 1mm brass rods into a mesh.
It's perfect. It's incredibly solid. Nothing can penetrate it and also looks pretty nice. To hide the solder joints I've sprayed it with white color. Speaker cover is glued into the radio with use of super glue.
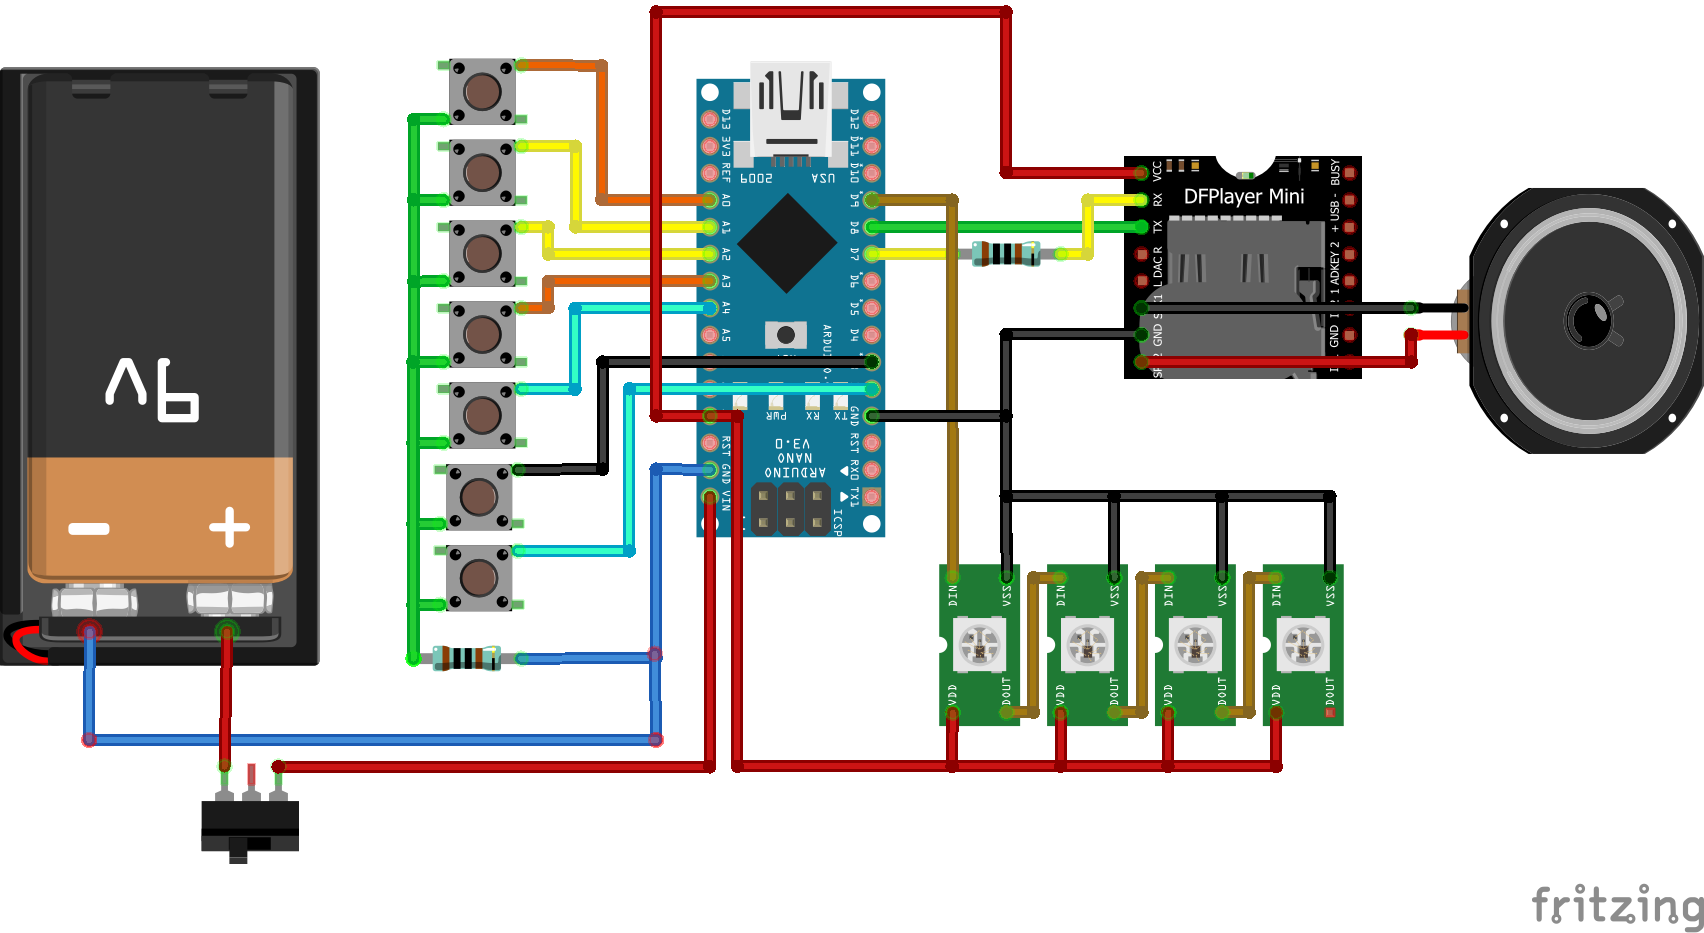
Inside the radioThe heart of the radio is my favorite Arduino Nano board. It reads the states of 7 buttons, controls DFPlayer mini MP3 player and controls the addressable RGB LEDs. DFPlayer is a tiny MP3 player with built-in SD card slot and sound amplifier which can handle up to 3W speaker. I've used a 0.5W 8ohm speaker.
First of all, create the buttons platform. Radio contains 7 programmable buttons in total soldered to small piece of a perf board. Originally I wanted each button to have a different color to play 7 different songs. But it didn't look nice so I decided to have one black button to change the volume level and yellow, blue and red pairs to select previous or next song out of 3 groups of songs. Each button is connected to one digital pin of Arduino and they are all grounded via 1Kohm resistor.
The buttons don't have standard perf board friendly spacing so I had to place them into the holes in the case and solder them together with a piece of a brass rod using free form technique. Now when the layout of buttons was fixed it was time to solder it to the perf board upside down and add 7 wires to each button. Finally, I soldered the 8th wire for the common ground.
Now when you have all the parts needed, let's finish the job. I first soldered all the wires between the Arduino Nano, DFPlayer, buttons, speaker, RGB LEDs, battery and on/off switch outside the radio because there is not enough room inside the case once they will be inserted. It also allowed me to test the electronics outside the case before all the components are irreversibly glued inside.
First I inserted and glued Arduino Nano, DFPlayer and on/off switch into the case with use of Mamut Glue. The Mamut Glue gave me more time to precisely and nicely place the boards inside and will hold them better in the future because it is flexible. Next was a speaker mounted on the bottom of the speaker cover mesh again with Mamut Glue. And the last parts were the buttons and the battery pack. The battery pack sits in the hole on the back to allow easily replace the batteries. Later I replaced the 4xAA batteries with a single 9V battery. It's much lighter.
It is finished! Let's program it!
I've simply used examples from DFPlayer site and added some code to read the buttons and control the LEDs from my Ever Blooming Mechanical Tulip project. The code is quite simple. Definitely not the cleanest I ever made but it works.
It requires the SD card to contains 3 folders named 01, 02, 03 for each color pair. Within each folder can be up to 255 songs named 001.mp3 to 255.mp3. I'd rather name the folders red, blue and yellow but DFPlayer does not support that.
DFPlayer is pretty easy to use. It communicates via serial line and has a pretty nice library with various functions to read and control the state of the player. I would only add support for human readable folder and file names.


Comments
Please log in or sign up to comment.