


Hardware components | ||||||
 |
| × | 1 | |||
 |
| × | 1 | |||
 |
| × | 1 | |||
 |
| × | 1 | |||
| × | 1 | ||||
| × | 1 | ||||
| × | 1 | ||||
Hand tools and fabrication machines | ||||||
 |
| |||||
 |
| |||||
 |
| |||||
 |
| |||||
Ever since I've been in college, I've wanted to have a secure place to store my valuable belongings to ensure that other people don't steal them. Since safes are pretty expensive, and storage rooms inconvenient to use, I've had to store my valuables in my drawer. Although convenient to get to, items stored in a drawer are susceptible to theft, which makes me slightly concerned as I have heard stories of valuables getting stolen from some of my friends.
Therefore, for my project I decided to build a fingerprint safe to protect my valuables at all times. Built out of the strongest material on earth (wood), the FingerSafe Fortress 3000 is the latest and most innovative solution that guarantees 24/7 protection of my valuables! Using fingerprint recognition, I don't have to worry about remembering a code to access the safe, rather I can simply enroll my fingerprint and access my valuables knowing only enrolled users can access my valuables.
I used an RGB LCD screen to guide the user when unlocking/locking the safe, and included a button and potentiometer as user controls. I also used a fingerprint sensor to store and read the user's fingerprint, and used a servo as the mechanism to help unlock and lock the safe. Finally, I used a portable battery as a power source to the safe, automatically running as soon as it turns on without the need of a computer.
Building the FingerSafe Fortress 3000Hardware
MechanicalComponents
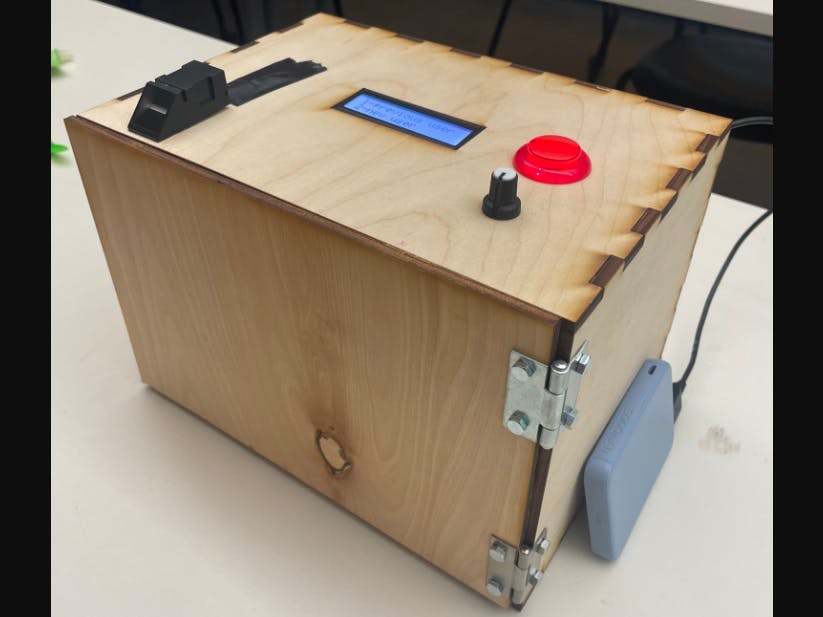
In order to create the safe, I first created the wooden box using a laser cutter. I used the MakerCase website to generate the svg file for my box, setting my outside dimensions to 7inx7inx10in. I chose to make an open box with finger edge joints (finger size: 0.826) and a kerf of 0.007in. After downloading the svg file, I made some extra edits on Illustrator to cut out the extra windows I needed on the top view, including the RGB LCD window, fingerprint window, button window, and the potentiometer window. Then, I assembled the box together using a mallet hammer to help fit the finger edges together. After assembling the box, I laser cut out one more wooden piece to act as the door, setting the dimension as 7x10in. In order to have the door swing open, I used two hinges and drilled the corresponding holes on the door and side to properly attach the hinges. Finally, I created a slot for the servo to lock into using Solidworks, and used hot glue to attach it to the inside of the door. Pictures of this process can be seen below (note: picture includes a camera which was removed for final project):
ElectricalComponents
In order to properly operate the safe, I used an RGB LCD screen, fingerprint sensor, button, servo, potentiometer, and a rechargeable battery. We learned how to wire the button, servo, and potentiometer in class, so I used my previous knowledge to wire these components. Then, I used the Adafruit Character LCDs and Adafruit Optical Fingerprint Sensor websites to properly wire the RGB LCD and fingerprint sensor.
Software
My software diagram illustrating the flow of my code can be seen below:
For the software, I included my code in my Github library. For the RGB LCD and fingerprint, I downloaded the following libraries (make sure you are connected to the internet before attempting to install these libraries):
pip3 install adafruit-blinka
pip3 install adafruit-circuitpython-charlcd
pip3 install adafruit-circuitpython-fingerprint
I tested each component individually before integrating the components together. For the button, servo, and potentiometer, I used the files developed in class which can be seen in my Github. For the RGB LCD and the fingerprint sensor, I used the "Full Example Code" at the bottom of each corresponding page (RGB LCD and fingerprint sensor).
Video Demonstration of the State-of-the-Art SafeSteps:
1. Safe automatically locks at the beginning of the process.
2. Device asks the user if they are a previous or new user.
3. User uses the knob to select either new user or previous user.
4. If new user, the device asks the main user for their fingerprint before enrolling the new user to the system (no limit on main user attempts to recognize fingerprint). After new user is enrolled the device asks for fingerprint to unlock safe.
5. If previous user, the device asks for fingerprint to unlock safe.
6. User has 5 attempts to open safe. If fingerprint is not recognized in 5 attempts the device has a 5 minute timeout before reattempting to open the safe. After the timeout the user gets 5 more attempts to open the safe, but the timeout period increases by 5 minutes if fingerprint is not recognized after the new 5 attempts.
7. Device recognizes the user fingerprint and displays "Match Found!", and the servo turns to unlock the safe.
8. User stores/retrieves items from safe and push the red button whenever they want to lock the safe.
9. Device asks to scan fingerprint to lock safe.
10. User places fingerprint and locks the safe if fingerprint is recognized. If not recognized, the device asks to scan fingerprint again (no limit on attempts here).
11. Device asks if the user wants to unlock safe again or keep it locked.
12. User uses knob to select unlock safe again or keep it locked.
13. If the user selects unlock safe again, device repeats steps 5-12.
14. If the user selects keep it locked, then the safe displays "Cya later!" completes the run function.
Future GoalsAs alluded to in the beginning, future iterations of this program should include a camera and add a facial recognition feature to the safe. This feature would allow for a dual authentication method of unlocking the safe.


Comments
Please log in or sign up to comment.