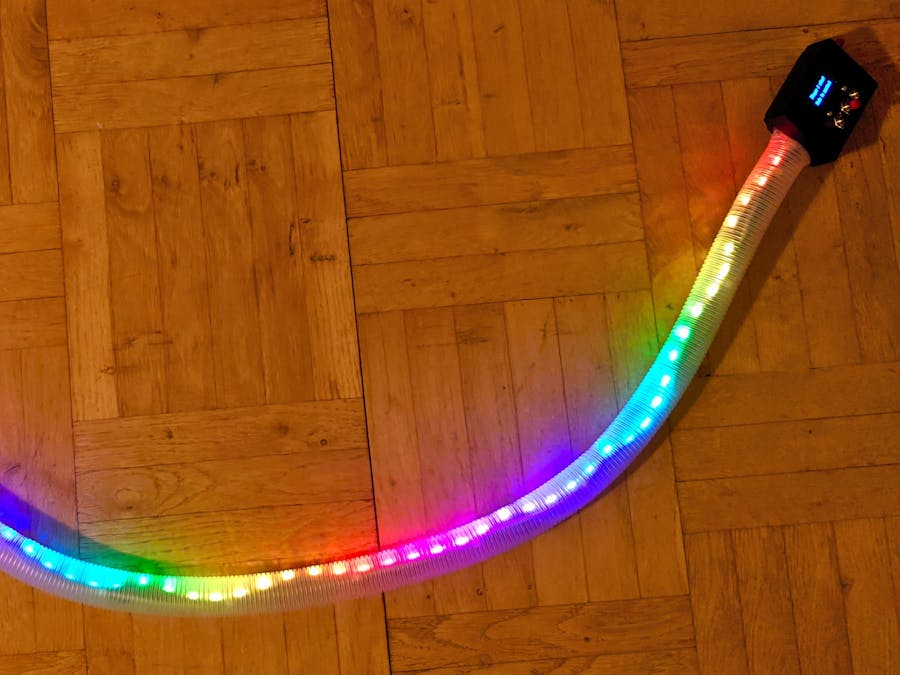
A while back I saw a photo of a fun gadget/toy that looked like you would play tennis with a “ball” of light travelling along a LED-strip. It was a marketing photo showing a person holding this toy with cool background lighting and edgy angles. Thought to myself that it looked like a fun toy and that probably would be something I could make with some of the stuff I have laying around. Anyway… I forgot about it for a while until Christmas (2021) started closing in. I knew I was going to meet my sister and her daughters, and I had this idea that it would be fun to build something together with them. Now this toy jumped into my mind again and I decided to try making one with my nieces.
We had a fun week of me teaching them to solder (they soldered all the buttons), putting everything together and writing some code, troubleshooting and testing (although I wrote the majority of the code before we started building since it’s quite time-consuming and maybe not how an 8- and a 10-year old want to spend their Christmas). After about a week of spending a couple of hours each night we eventually were rewarded with a fun toy that the whole family enjoyed (ages 3 to 64).
Later, after we had finished building everything I eventually found the original photo again and it turns out to be from a Kickstarter that will (hopefully) end with their product reaching the backers/market at the end of 2022. So if you want something more polished and feature packed, and don’t mind waiting (if you’re reading this before their release), check out Light Pong: https://www.playlightpong.com
FutureThe current iteration of LED Tennis is what I intended to build together with my nieces. It was fun to make and it’s really fun to play, both by yourself and with others.
There are probably a bunch of optimisations I could do to the code, but It's running well enough and fits nicely on the Nano with it's quite limited storage and memory.
Future improvements might include more game modes, but I also have ideas for how to make it a game for more than 2 people. That’d take some major redesigning, thinking and testing though but should be a viable project within a not too distant future.
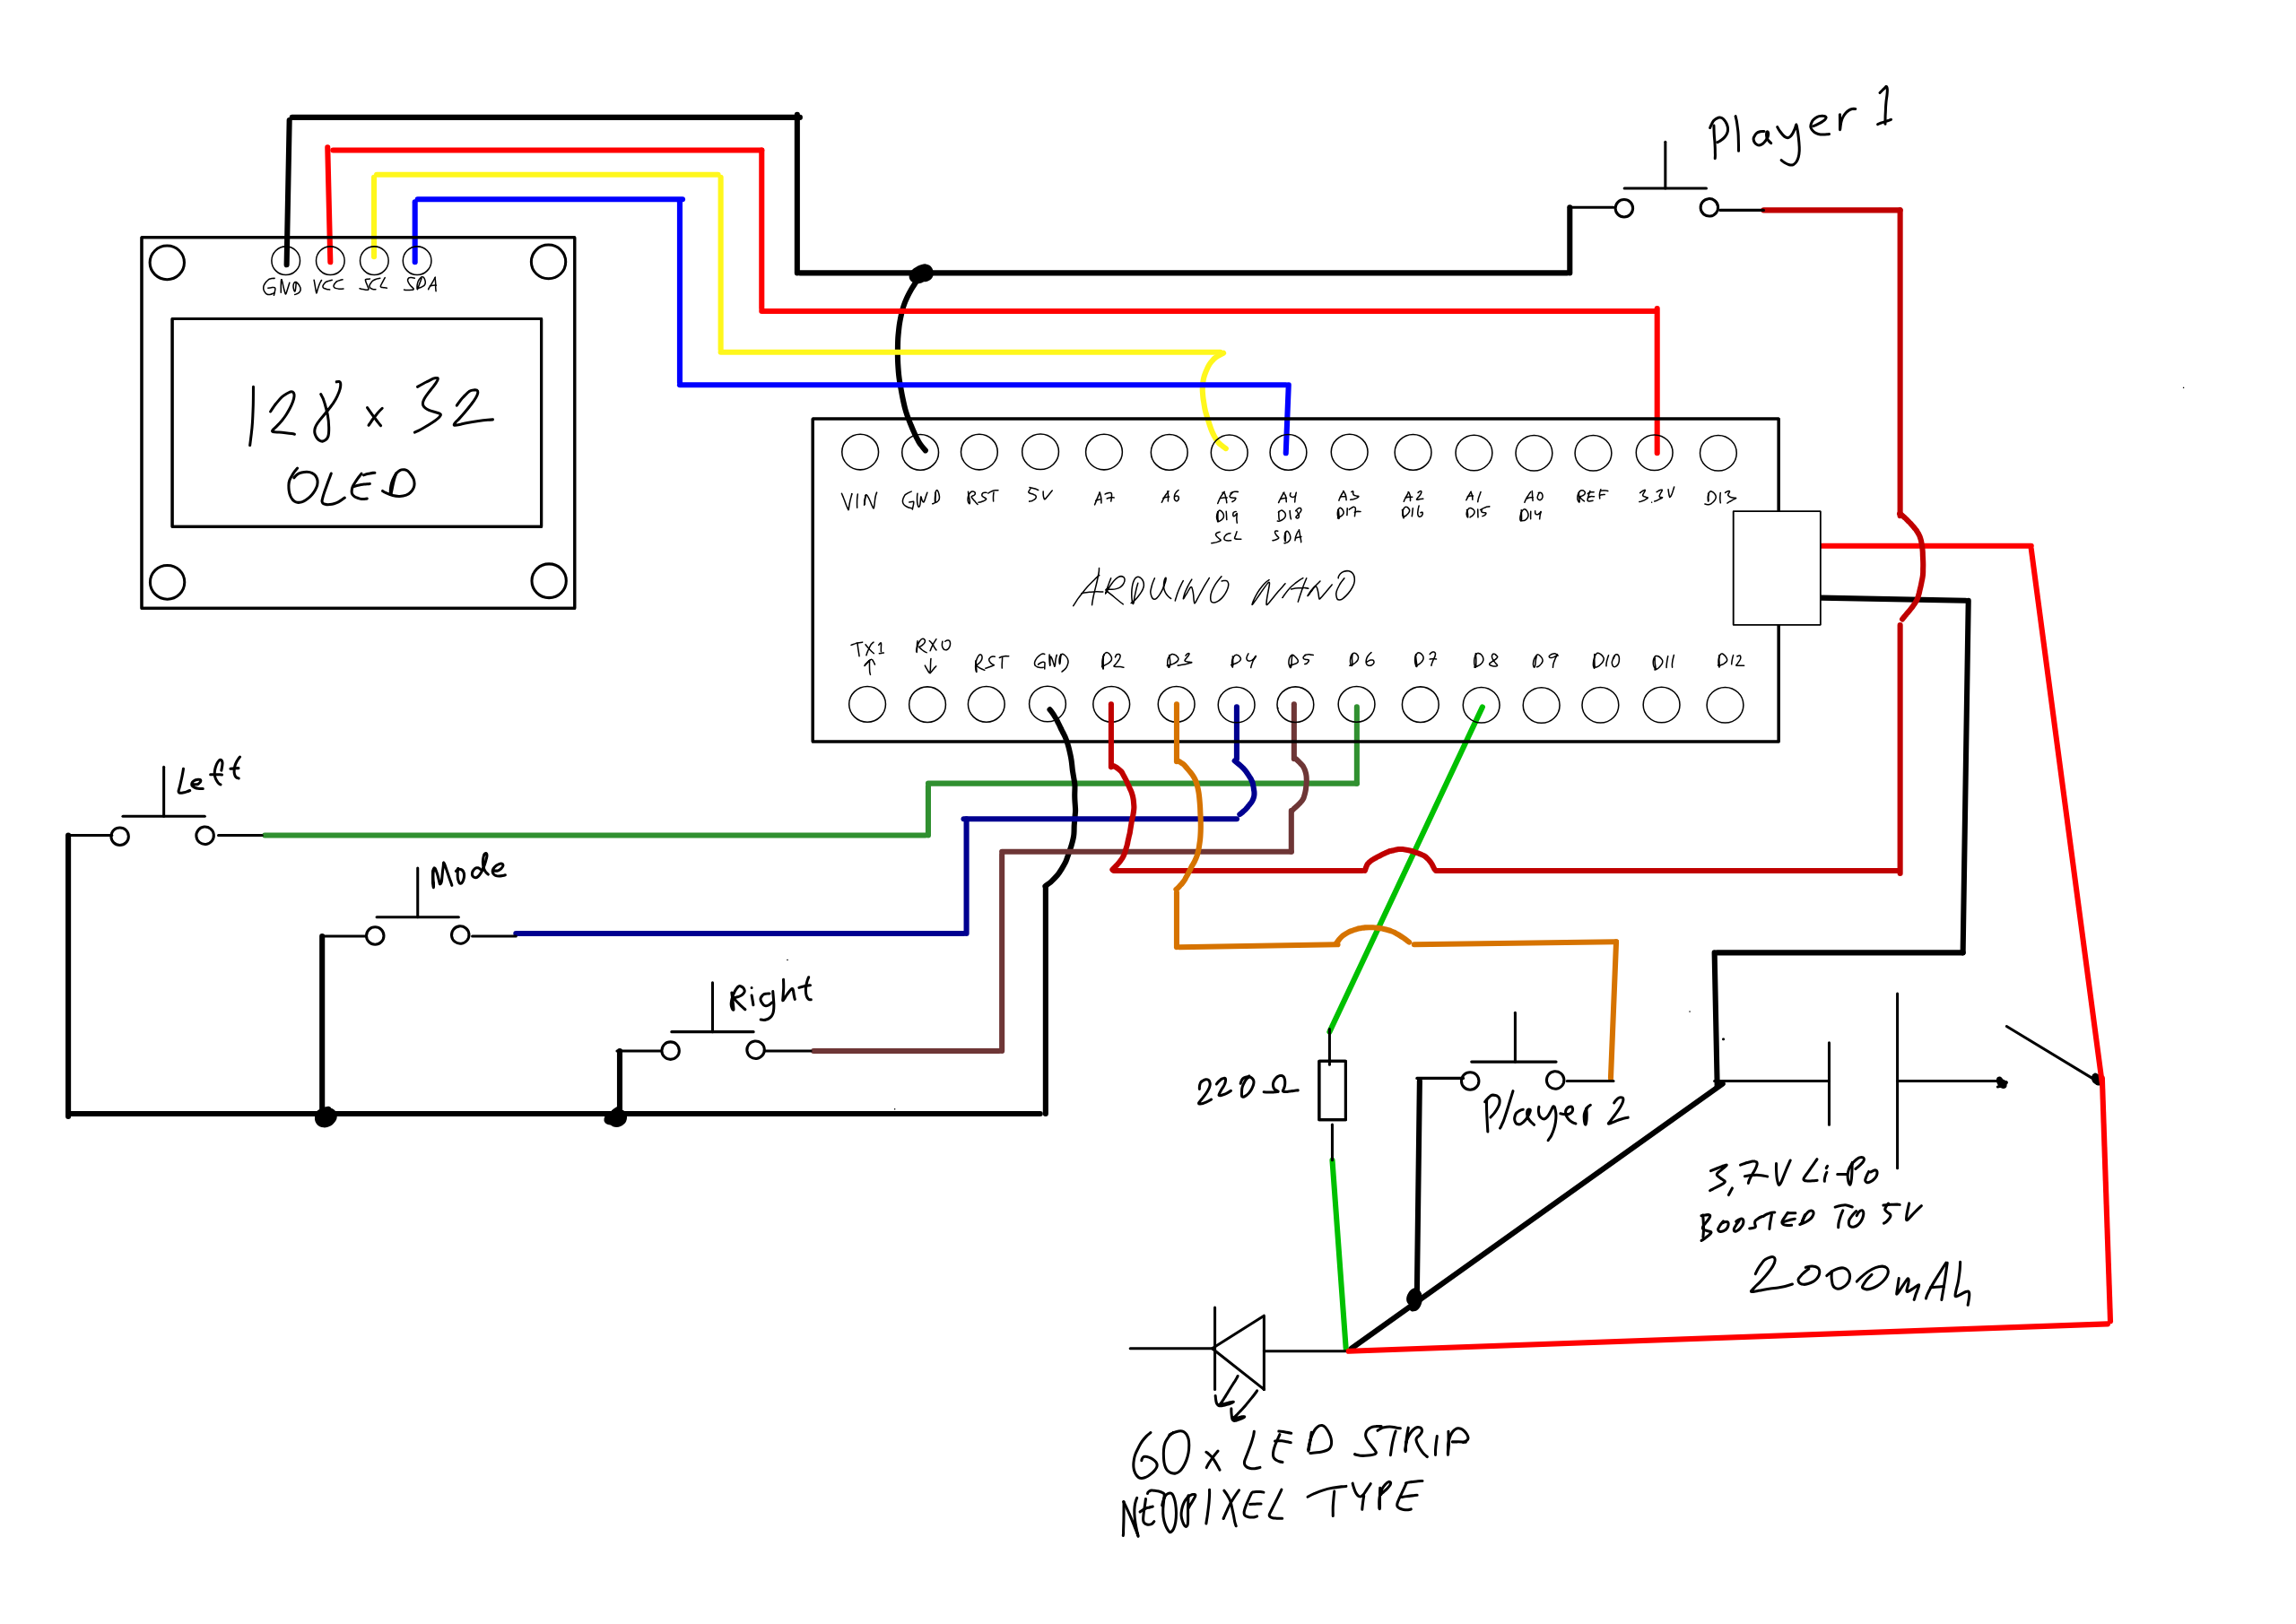
DesignAt the beginning of the design phase for this project I started by looking at what components and parts I already had available. Luckily, most of the toy could be put together with stuff I had laying around. The two plastic housings were unused from an earlier project, the plastic tube came from an old dishwasher, as mentioned above the power supply comes from a small power bank, I already had the Nano, etc. The only part I needed to buy separately was the OLED screen.
To start with I thought I would need two Li-Po cells, since the LED strip potentially can draw quite a lot of power, but this presented another challenge. It would leave no room in player 2’s box for the buttons. After having wired everything together and started testing it was quite clear that LED brightness could be kept pretty low (default is set to 74 out of max 255) and since the LEDs rarely are on for any length of time one single cell is more than enough to power the toy. So far I have no idea how long the battery lasts…
Another challenge that I initially did not know how I would solve was connecting the plastic tube to the hand controllers. But, after having gotten all the parts together it was clear that it would be pretty straightforward to simply clamp the ends of the tube between the two halves of the plastic housings. With the tube being corrugated it is held quite firmly in place this way. The only accommodation I made for this setup was small grooves in the plastic housing case to make space for cables and wires.
Putting everything together was fairly easy. All components fit nicely in the plastic housings and the LED strip and cables all sit (zip-tied together) in the plastic tubing. I did not cut either the USB cable or the plastic tube until I had everything setup properly, just to make sure that they would be the correct length (not too long or short). Even though I made sure to attach all the cables to the LED strip in such a way that the strip would be pointing upwards, it can move quite freely inside the tube. This doesn’t matter too much though since the cables hold it somewhat in place and the light from the LEDs is scattered when reaching the tube making it very easy to see from all angles. If the LED strip moving and twisting inside the tube becomes a problem I can easily attach it to the plastic tube with one or two small zip ties.
There are currently four game modes:
- Tennis
- React
- Tug-O-War
- Minigolf
Players send a single LED light back and forth between them, by pushing their respective button when the LED reaches their end of the light strip. Good timing and quick presses are necessary for a successful hit.
The initial speed that the LED travels across the strip is determined by the receiving player’s difficulty level and each successful hit increases this speed. The player difficulty level also determines how large the field is for detecting a button press as a successful hit. Higher difficulty level means there’s a smaller window of opportunity to send the LED back to the opponent.
On difficulty level 2-5 button inputs will be blocked for 1 second after pressing, so make sure not to press too early… On difficulty level 1 it is possible to press as many times as the player wants.
At the end of a round the number of successful hits that were made (including the “serve”) are displayed on the screen.
ReactAt the beginning of this game all LEDs will pulse in a rainbow pattern for 2-8 seconds. When this pulse ends the light strip will turn white and the players then need to press their buttons as quickly as possible. The player that presses first scores the point and their half of the LED strip turns green. If neither of the players press their button within a set time the LED strip turns red and points are deducted. If both players manage to press their buttons at exactly the same time the LED strip turns yellow and no points are awarded or deducted. If any player presses their button too early the round will end and the player will lose a point.
Player difficulty levels and the amount of points a player has accumulated determine how long (or short) the window of opportunity for pressing the button is. Each player can have a different time frame.
Tug-O-WarWhen the game is kicked off the whole light strip pulses in red - yellow - green before two white lights turn on in the middle of the strip. The players need to press their buttons as quickly and as many times as they can to “pull” these two lights towards their end of the strip. The two LEDs change colour to green the closer they get to either end.
Player difficulty will affect how many LEDs the two lights will jump every time the player manages to “pull” them towards themselves. Lower difficulty means larger jumps and vice versa.
At the end of a round the number of clicks each player made is displayed on the screen.
MinigolfThis is a single player game where the player needs to charge up a light spot to make it travel different distances along the light strip. Pressing and holding the player 1 button will start a charging indicator that represents the length of the light strip (the end of the charging indicator is shown with a red light). Releasing the button will send the light the corresponding distance along the light strip. If the button is not released before the light is fully charged the light will automatically be released and travel along and all the way to the end of the strip, resulting in a failed attempt.
The goal of this game mode is to hit a randomly selected part (the “golf hole”) of the light strip, represented by one or several green lights. A higher player difficulty level means that there is a smaller number of lights to hit, and vice versa. A high difficulty level also makes it possible for the “golf hole” to be placed at the extreme ends of the light strip.
Note that time for charging the light is also counted between the lights turning on in the charging indicator, making it possible to finely tune how much you want to charge the light before releasing.
Pause/End gameBefore each game there is a state of waiting that either needs to be ended by one of the players or ends automatically. This is shown by either pulsing blue lights at the end of the light strip of the player that kicks off the game, or all of the LEDs pulse if it’s automatic. During this state the “Mode” button can be pressed to pause the game and on the screen that is then displayed it is also possible to end the game and return to the main screen.
SettingsPushing the “Mode” button while on the main screen will enter the settings menu. Repeatedly pushing the “Mode” button will cycle through the different available menu windows. Pushing the player 1 button will exit the menus and go back to the main screen.
Use the left and right buttons to cycle through the different play modes.
DifficultyUse the right button to change player 1’s difficulty level and the left button to change player 2’s difficulty level. 1 is easiest and 5 is hardest. The difficulty level will affect LED speed across the strip, how big the window to react is, etc (see each game mode for more details). Defaults to difficulty level 3.
Setting a low difficulty for one player and a higher difficulty for the other can even out the playing field for different skill levels. This makes the game playable from ages 3 and up.
Winning goalSet a goal to reach for a player to win. Use the left and right buttons to change the goal to reach. Defaults to infinity (no goal). This menu will not show for single player game modes.
When a player reaches the winning goal the game will end and rainbow colours will travel across the light strip towards that player. The screen will also show who won.
LED BrightnessSet the LED brightness. Use the left and right buttons to cycle from 1 (dimmest) to 10 (brightest). Defaults to brightness level 3.
Charging the batteryOn the bottom of the tube, at player 2’s end of the strip, I’ve cut out a hole to access the charging port. When using the game this is covered by a small piece of tubing that has been cut to be able to mount it over the regular tube.


Comments
Please log in or sign up to comment.