Just over a year ago I built a PCB Etching Agitator using a 100rpm geared motor. As I make my own printed circuit boards, it became an invaluable addition to my workshop. However it wasn't without some issues. At full speed any liquid that it was agitating would get thrown around the container and if that was an open container, it would get thrown out of it. So the system used PWM to slow the motor down to a more suitable speed. However the side-effect of this was a reduction in torque. This meant the weight of the container and liquid that could be agitated at slow speed was severely limited.
Recently I came across another agitator made by Hobbyman19. It used a 5-6rpm cheap microwave motor. It seemed like it might address the problem I had above.
One of the changes I made to the original design was to replace the case with a clam shell design. I just think it has better aesthetics by not having screws on the front panel.
rock_arm.STL - 0.2mm, no supports
rock_plate.STL - 0.2mm, rotate 90 degrees, no supports
Rotating_arm.STL - 0.2mm, rotate 90 degrees, no supports.
hinge.STL - 0.2mm, rotate 90 degrees, supports, 2 required
Back.stl and Front.stl - 0.2mm, rotate 90 degrees, no supports
Bottom.stl - 0.2mm, no supports
Top.stl - 0.2mm, rotate 180 degrees, no supports
The lugs that hold the shells together are a bit fragile. I glued on washers before I drilled the holes with a 2.5mm drill and created a thread with a 3mm tap. Drill out the holes that the screws go through with a 3mm drill.
The motor I got from AliExpress had a 3mm hole through the motor shaft. After printing Rotating_Arm.stl, drill one side hole with a 3mm drill, drill the other side hole with a 2.5mm drill and create a thread with a 3mm tap. Fix it onto the motor shaft with a 20mm M3 screw. My shaft was too long and would of interfered with the Rocker arm if it wasn't cut. Start my marking where the cut should go. Remove the Rotating arm and cut the motor shaft with a hack saw or Dremel with a cutting wheel attachment. Remove any sharp edges with a file.
Connect the Rocker arm to the Rotary arm using a 20mm M3 screw with a couple of washers and a lock nut. It needs to be loose enough to allow the Rotary arm to move freely.
Press in a 624ZZ (4x13x5mm) bearing into each hinge piece. Also press in two M3 nuts into each hinge block. The hinge blocks go through the top of the case and are held on using four 8mm M3 screws.
On the rocker plate, create a thread using a 4mm tap so that you can screw in two 20mm M4 screws to act as the axles for the rocker plate to pivot on.
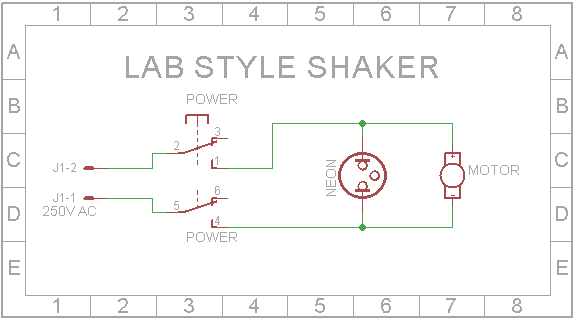
The wiring couldn't be much simpler. However be aware that you are dealing with mains voltages so be very careful.
Place the top assembly onto the bottom and secure the two clam shells together with four 6mm M3 screws. Connect the Rotary arm to the bottom of the plate using a 20mm M3 screw. The hole in the Rotary arm should allow it to freely rotate around the screw.
To secure the tray that holds the liquid, I decided to use fridge magnets. Trade people tend to leave a lot of these in letterboxes here in Sydney so now I finally have a use for them. Glue some to the top plate of the agitator and to the bottom of your etching trays.


Comments
Please log in or sign up to comment.