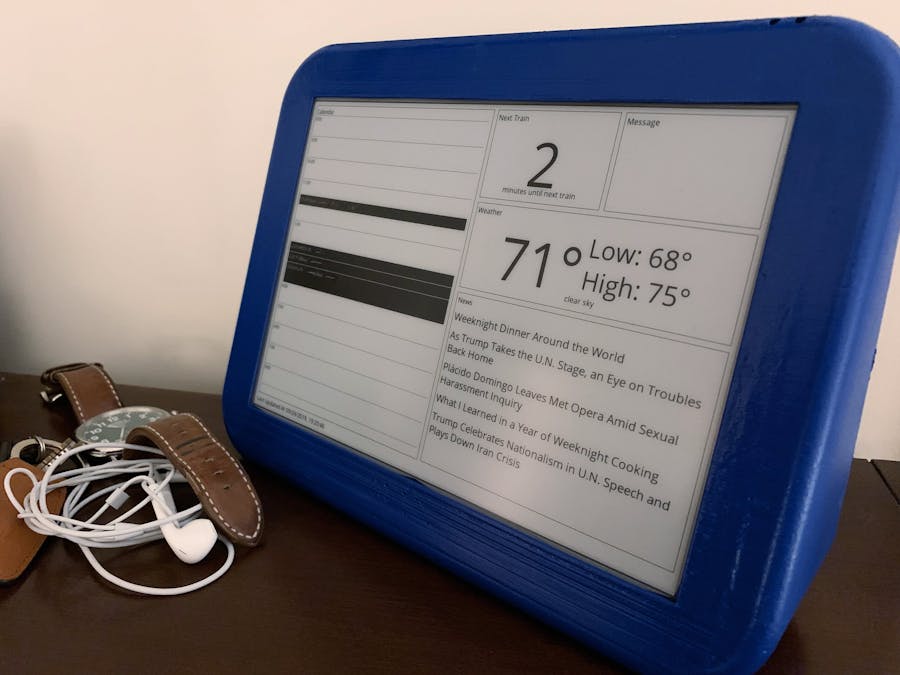
Morning routines are sacred. The time you get up, how you get ready, how you head off to work, and more all make up everyone's first ritual of the day. And there's a part of my routine that I'm sure others will relate to: checking the weather, schedule, top news, and transit info. All of this, of course, is available on a phone or a voice assistant like Alexa, but I wanted something that presented this information more readily and in a condensed format. So I decided to build something.
What I NeededHere are a few requirements I set for this project:
- Access my Outlook and Google calendars to show my schedule for the current day
- Access weather via any free, reliable weather API. (RIP Weather Underground's API)
- Display the latest headlines from a collection of RSS feeds
- Show the next estimated arrival time for my metro route via the WMATA API
- Show reminder messages
- Use an E-Ink display so that the project would consume minimal power and could be "on" without emitting noticeable light
- Use a familiar hardware platform like a Raspberry Pi Zero
For the display, I chose the largest E-Ink display available on Waveshare. Besides liking the large size of the screen, it also supported grayscale images -- as opposed to some other E-Ink displays on the site that are just 1-bit black/white -- and the display updates very quickly. With the display comes a driver board and documentation for connecting to a Raspberry Pi's GPIO pins along with sample code.
The SoftwareBefore digging in on assembling the hardware I wanted to make sure I could get the software working the way I wanted it. Some of the sample code for other sized E-Ink displays on Waveshare is written in Python, but unfortunately not for this specific display I chose. The sample code is only available in C, and with my average understanding of C, building the entire project in C or porting the sample code to Python seemed like a big task. Luckily, the sample C code compiles to a program that simply takes an 8-bit grayscale file as a parameter and updates the display with that image.
With that plan in place, I put together a Python project that is capable of rendering a set of widgets to a BMP file using the Pillow library. (Users of the open source code can configure a YAML file with a few different parameters to suit their needs.) The YAML file controls the width and height of the final dashboard and the total number of rows and columns for widget locations. And the YAML file controls the parameters for each widget they'd like to use. There are currently five types of widgets available, but the code could be expanded upon to support more. The current ones are:
- Calendar: Specify any number of Google and/or Exchange calendars. The dashboard will query for today's events and merge the lists.
- WMATA: Set an origin station, an end-of-the-line station on the same line, and an API key, and the dashboard will query the WMATA API for the next train arrival prediction for the origin station.
- Message: It checks a specified URL and displays the text response, which allows me to send reminders to myself. I built another service that I can text messages to, which this code will then query.
- Weather: It seems like there are limited free weather APIs these days. Therefore I had to turn to OpenWeatherMap for this project. Set an API key and location ZIP here and the dashboard will render the current temp, high and low temps, and the current weather.
- News: Set any number of RSS feeds, and the dashboard will display a merged list of the most recent posts from those feeds.
This is where I am less qualified. I've designed a small amount of 3D printed objects, but by no way did I feel this would be a slam dunk for me. However, the two pieces shown below, when printed, turned out great and ended up being perfect for this project. The front is a sloped case with an opening size based on the dimensions provide by Waveshare, and a back set to snap into the front. The original print was basic white, so to give it some life I spray-painted it gloss blue.
With the code tested and functional and with the case painted and prepped, I began assembly. Most pieces fit properly, with the exception of the HAT connector on the bottom of the display driver -- my screw holes where about three millimeters too short so the PCB sits at an odd angle. Also, I intended to secure the back of the build with screws, but the back snapped in fairly tightly so that was not necessary.
Recreating ThisThe code powering this is available as an open source project and you can download the STL files, all linked with this project. All the steps needed to get the code up and running on your machine and on a new Pi installation are all in the Readme file for the project. Feel free to expand the code as you see fit!


Comments
Please log in or sign up to comment.