This is my prank for circuit.io's Arduino Day Prank Contest
Here is a link to the circuit.io reply page that I used: https://storage.circuito.io/index.html?solutionId=58e452ccf72c4f00124dc4d3
I'm fairly new to Arduino projects, so the wiring diagrams and sample source code from circuit.io were a real life-saver.
My idea is to make a trick candy bowl with a trap bottom that will automatically move away when it senses proximity. For icing on the prank cake, it then plays the "Nanny nanny boo boo!" song mockingly. Once the victim recovers from the surprise/disappointment at the retreating candy and subsequent mocking, the push of a button lets you reset the system for your next friend/mark.
So, getting started, here's my BoM from circuit.io (the most interesting parts of it anyway):
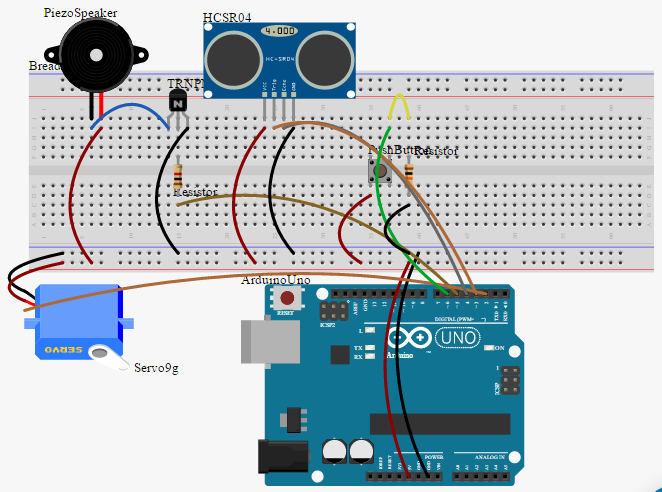
And here is my wiring diagram:
Following the instructions from circuit.io I ended up with this:
Moved on to the sample code from circuit.io to test everything out. It saved me a lot of time to have ready-made code for testing all my components and my wiring job! Also notice that all my supporting .h and .cpp files that I will need are already included:
At this point I used the serial monitor in the Arduino IDE tools and was able to experiment with each component. I noticed that the servo motor was a little jumpy at the beginning and my distance meter was giving odd values, so I decided to make a better ground plane by adding a jumper from the other Arduino Uno ground pin to the other side of the ground rail on the breadboard. This seemed to help but don't accidentally connect the breadboard ground rail to the VIN pin on the Arduino like I did (it was late). Didn't let any magic smoke out but needed a board reset and another round of testing to make sure I didn't cook anything (thankfully I didn't).
Example code was great for testing components, but it wasn't going to make my prank work. In my attached code you can see how I modified the sample code from circuit.io to achieve the behavior I needed. There's also a link to my github repository that includes all the support files that I got from circuit.io.
Now with my basic circuit prototyped and code pretty much done it was time to move on to fabbing my candy bowl, trap door, and enclosure. As cool as it would have been to 3D print this thing, I did most of my construction with cardboard, tape, and hot glue.
So with assembly all done it was time to test. Here is how the trap worked:
And here's how the reset works:
ConclusionsSo all in all, it's pretty obvious that something is up when you spy candy in a paper bowl recessed in an old shipping box with a sensor on top. Even if the trap is kinda obvious I liked the speed of the servo trap door. BTW, in the videos you can see a USB cable coming out the the box to power it, but it does work with a 9V battery. The one I was using wasn't up to the task when I was taking videos but I tested it later with a fresh battery and everything worked just fine.
It was a fun project and I liked the help of circuit.io to get quickly into prototyping. I'll definitely be going there in the future. Thanks for looking at my project!


_ztBMuBhMHo.jpg?auto=compress%2Cformat&w=48&h=48&fit=fill&bg=ffffff)


_3u05Tpwasz.png?auto=compress%2Cformat&w=40&h=40&fit=fillmax&bg=fff&dpr=2)
Comments
Please log in or sign up to comment.