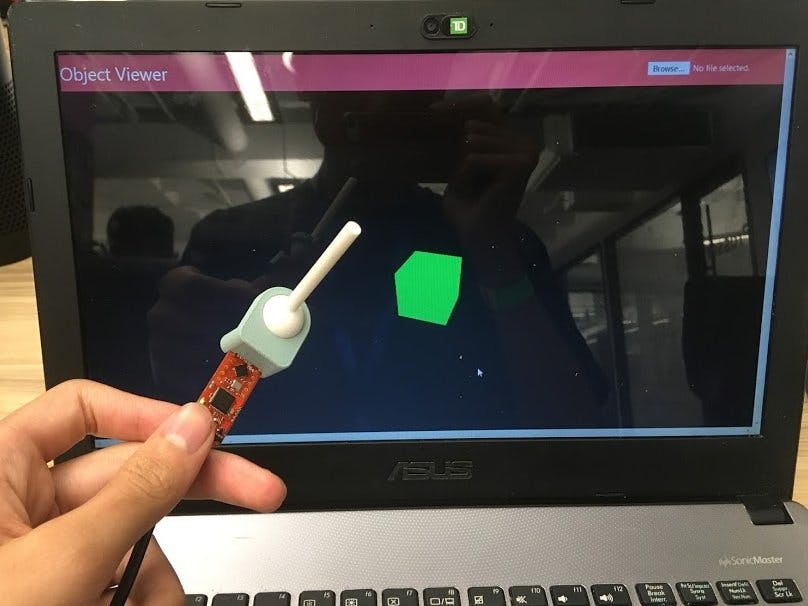
After checking out the Infineon's 3D2Go hall effect sensor, I was absolutely amazed by the resolution and levels of sensing offered by the sensor. This got me thinking; what better way to use the real time tracking of magnet position and orientation than to use it to emulate a virtual STL file? So that's what we'll be making with the TLE493D controller!
DemonstrationIt's better to show it in action than to describe it, so here goes!
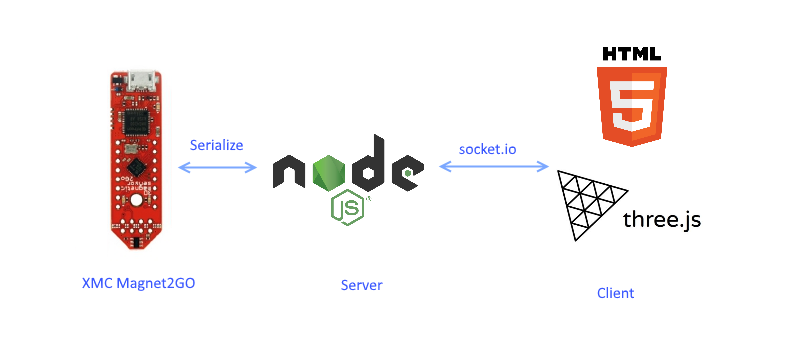
How It WorksThe setup currently works by taking the magnetic readings from the magnet installed on the custom joystick module. Then, it reads the x and y positions specifically and sends the data to the host computer via serial. The host machine creates a localhost server using Node.Js and sends the serial data through Socket.io to the server. After, the data is read and used by the ThreeJs to render a 3D object with the controllable rotation.
This way, you'll be able to control a joystick and intuitively control the orientation of a 3D object on the web.
Setting Up the InfineonTo properly get the sensor readings, we have to set up the Infineon microcontroller. What's really nice about the board is that it has GPIO and analog pins, much like an Arduino, as well as an Arduino boards library, allowing for the average Joe to read the TLE493D on a simple Arduino IDE interface.
First, install the XMC microcontroller boards in the Arduino broads manager. Open the Arduino IDE, and under File > Preferences add Infineon's boards to the Arduino IDE. Copy the link below and paste it in the Additional Boards Manager URLs field:
https://github.com/Infineon/Assets/releases/download/current/package_infineon_index.json
Then navigate to Tools > Board > Board Manager and type "XMC" in the field. You should see the XMC Microcontroller board package. Install it.
Now, navigate to Tools > Board. You should see XMC1100 XMC2GO as an option. Select it.
Now that the board is selected, we need to install the necessary library for reading the sensor. To do this, go to the library's github repository here, and download it as a zip file. Back in Arduino IDE, navigate to Sketch > Include Library > Add.ZIP Library, and select the.zip file you just downloaded. In my scenario, I used the TLV493D library because my XMC2GO module returned constant values for the readings when using the TLE493D library. However if it works on your board, I'd recommend following examples like this for the readings, as it's much more intuitive to understand.
For the hardware setup, screw in the joystick module to the hole in the PCB and plug in the board to the computer.
Now download the project repo here and unzip it. It is also linked in the resources section. Navigate to sensor > sensor.ino and open the arduino file. Now in the Tools tab, make sure that Serial Output Selection is set to "PC", and under Port make sure that you selected the port that the XMC is connected to. In my situation, it's COM3, but it varies based on the situation.
Click the "upload" button in the Arduino IDE, and once it's done, open the serial monitor by selecting Tools > Serial Monitor. Set the baudrate to 115200 in the monitor. You should be able to see the x and y magnet readings posted in the monitor. If you wish to use other data recorded by the module, you can uncomment the respective code in the.ino file.
Now, we should have the XM2GO board all set up, connected to the computer and sending magnet readings to the computer via serial.
NodeJS ServerFor the server end, we'll be using node.js to create a localhost server to receive and process the incoming serial. Download and setup Node.js here, and open the command prompt. Navigate to the directory where you installed my source code repo and install the required modules. For example, I did:
cd C:\Users\Jonathan\Documents\Coding\Contests\magnetbois
npm install
That should install the required modules; express, serialport and socket.io. Express is a module that helps with creating a web server, serialport processes incoming serial to the host machine and socket.io communciates with the javascript on the client side.
If you have the XMC module connected to the PC via a serial port other than COM3, make sure to change it to the respective port (the port you selected in the Arduino IDE) on line 30 on index.js.
To start the node server and begin listening for serial data, go back to cmd and type:
npm node index.js
Now you have set up the server end of the project! If you wish to hot your webpage online, I'd highly recommend using Heroku, it's very versatile, has a very extensive tutorial, and is completely free! That will allow you to visit the webpage at urls other than localhost:8080.
HTML and Three.JsI've already set up the code for the landing page, where all the 3D object visualization happens, but I'll explain the stuff in detail so you can add your own nifty features. Here's the process that the client's script.js goes through:
- It first sets up the socket client, and creates a function to process data when it comes in
- It logs the data in the console, which can be viewed by hitting F12
- If the data is a valid sensor reading, it parses the string values as floats (to deltax and deltay)
- The script then tries to load a custom stl file which the user uploads. If nothing is uploaded, a standard cube will be used.
- After, it sets up a Three.js scene by setting the camera perspective and render window
- Finally it animates the 3d object, by rotating the object by an interval defined by the deltax and deltay values
Overall, I found the creation of this project quite enjoyable. It's my first time working with node.js and a bunch of frameworks, so I definitely enjoyed the learning experience. Moreover, after I overcame the initial hurdles of setting up the TLE493D controller, I found it smooth sailing when getting responsive, accurate readings. I believe there's great possibilities in the utilities offered by a low profile, non intrusive 3D sensor.
For the project itself, an integration with VR could allow for more organic interaction with virtual objects, or an integration with video calling can allow for more tactile online tech support for hardware products. Hopefully I'll be able to recreate the interface but in a VR headset, allowing for a more immersive experience.
Thanks for reading and have a great day!


_apSpU4IuPr.jpeg?auto=compress%2Cformat&w=40&h=40&fit=min&dpr=2)


_apSpU4IuPr.jpeg?auto=compress%2Cformat&w=60&h=60&fit=min&dpr=2)

Comments
Please log in or sign up to comment.