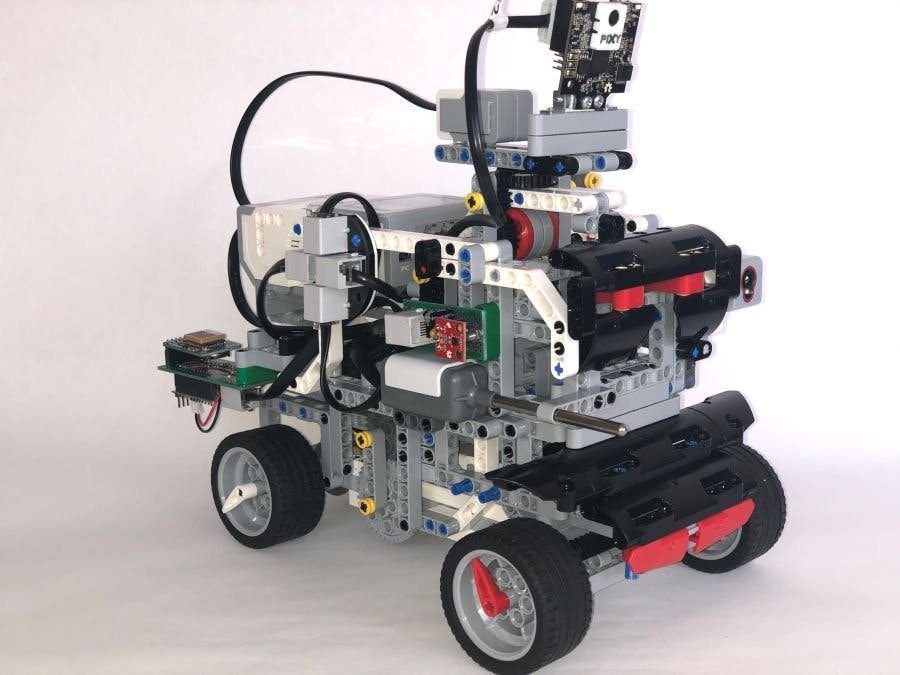
Autonomous EV3 Color Tower Explorer (AEV3CTE) is a Lego robot that scan a field searching two color towers, red and blue and go to each tower based in Alexa directives.
At arrive each tower it check the right color, temperature, humidity and GPS position at his location.
AEV3CTE has two modes of operation depending on the directives that Alexa receives, processes and sends to the gadget.
The first mode of operation is exploration of an individual tower of an indicated color, goes to the explored tower and returns to the base.
The other way is autonomous, it indicates the color of the two towers to explore, for example, red and blue and it going to explorer in that order to the red tower, explores it, returns to the base and from there will depart to explore the blue tower to explore it and finally return to the base again and finish the journey.
To locate the color of the respective tower, a Pixy2 Lego camera was configured and trained in this type of search.
Block diagramAEV3CTE is composed of four main modules see the a_ev3_cte Block Diagram.
The engine (car_engine) uses a single long motor supported by a differential to move the two rear wheels.
A scanning tower (scan_tower) which supports the Pixy2 camera and gyro sensor using a long motor.
A steering-wheel (steering_wheel) to drive the two front wheels and cross right and left using a medium motor.
An arm that extends and contracts (color_arm) supporting a color sensor that will validate the color of each tower when it reaches it.
The same diagram shows that it presents some sensors and connection modules.
- Lego color sensor.
- A GPS module (not Lego, is an homemade)
- An Arduino Pro Mini for UART to i2c conversion (not Lego, is an homemade)
- Lego temperature sensor.
- Humidity Sensor (HTU21D not Lego, is an homemade)
- A port splitter to connect the I2C sensors to the Input 4 port of EV3 brick.
All building Lego Instructions for AEV3CTE and Color Red and Blue towers can be find at Schematics section (Lego parts and instructions and Color Tower Red and Blue build instructions).
In addition to the Lego pieces, two rectangles were used, one blue and one red using foamy and attached to each tower.
Inputs and Outputs and keyboard leds at EV3 BrickOutput_A = Color Arm Medium Motor - Yellow Leds
Output_B = Scan Tower Large Motor - Red Leds
Output_C = Car Engine Large Motor - Orange Leds
Output_D = Steering Wheel Medium Motor - Green Leds
Input_1 = Color
Input_2 = Temperature
Input_3 = Gyroscope
Input_4 = Port Splitter (Pixy2, GPS, Humidity)The leds on the EV3 brick are used to indicate the operation of each of the modules.
- Yellow leds: when it expands and contracts the arm color.
- Red leds: when the tower moves to the left and to the right, the led of the respective position lights up.
- Orange leds: when moving forward or backward.
- Green leds: when it crosses to the right or to the left the led of the respective position turns on.
Upon reaching one of the color towers, the sensors will obtain the following data:
- Latitude and longitude,
- Fahrenheit temperature,
- Percentage of relative humidity.
- Validate the color of the tower.
Port Splitter from Mindsensors
This Port Splitter allows you to split a EV3 port and connect up to three i2c compliant sensors to single EV3 Port. At this time it uses for connect the Pixy2 cam, the GPS sensor and the Humidity sensor, all i2c compliant.
GPS Sensor
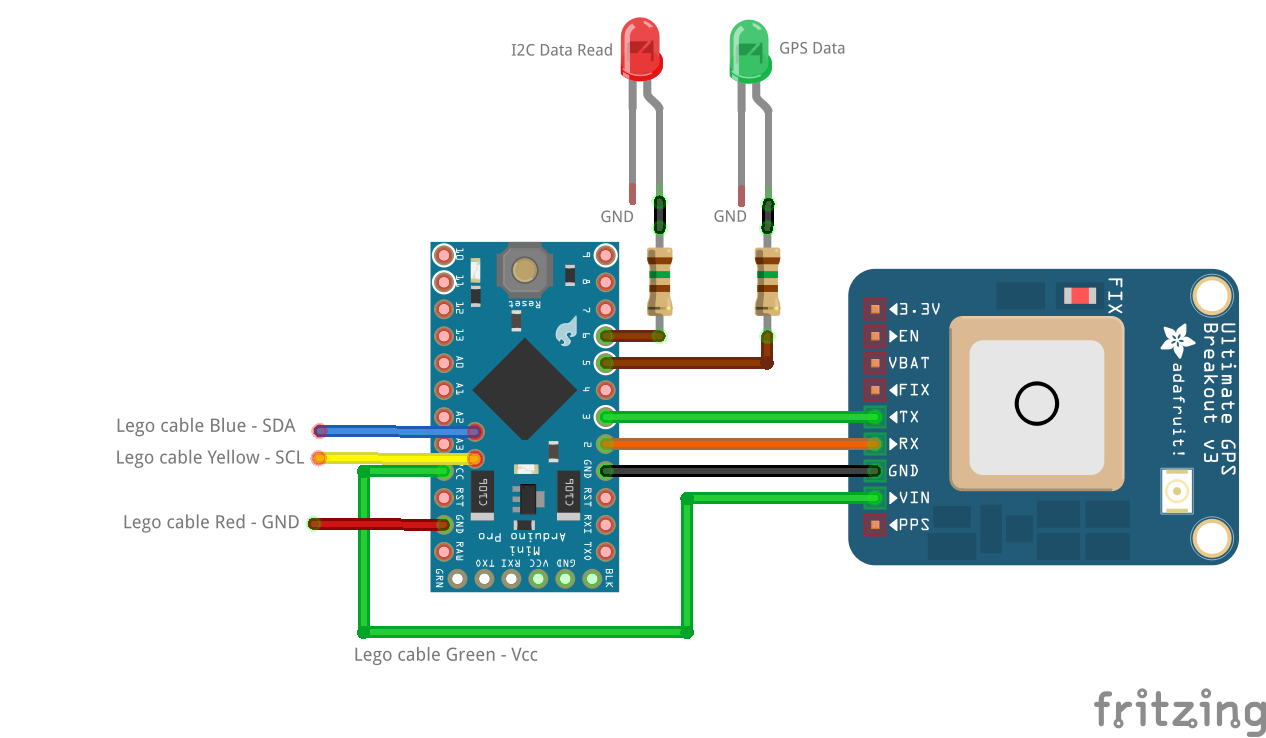
It is an home made sensor build using :
- Adafruit Ultimate Breakout GPS.
- Arduino Pro Mini to convert uart gps data to i2c data at 0x70 address.
The electronic schematic is at Schematic section (GPS with UART to I2C interface) and the arduino firmware is at code section arduinoI2C.ino file.
Humidity Sensor
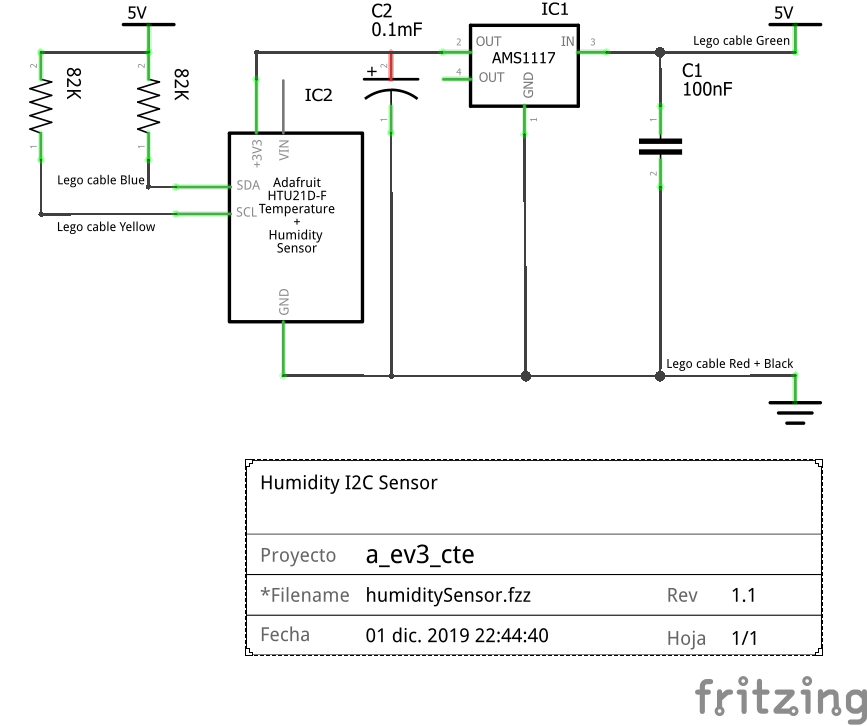
It is another home made sensor using the SparkFun humidity sensor module HTU21D at i2c address 0x40. The two pull-ups resistor of 82K is only used when module is alone at splitter connection, when is used with Pixy2 cam i2c module for example they are not used.
The electronic schematic is at Schematic section (Humidity i2c Sensor).
Pixy2 Lego Camera
Pixy2 for Lego is a fast vision sensor for robotics and similar applications.
The camera must be configured by connecting it to the PC and activating its i2c protocol and teaching how to detect objects in the color that is required.
Once configured, it is used as an object detector and its color through vision. It is used to mark the navigation map for the AEV3CTE.
Female Lego Sockets
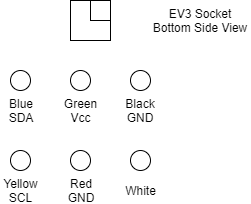
GPS and Humidity sensors uses female Lego socket to let use the Lego cable rj-12 connectors. The signal pins for this connector is at Schematic section (EV3 female socket)
Install all software neededAEV3CTE brick
EV3 brick uses linux EV3DEV operation system and let us use Python to control the explorer. All code is edited using Visual Studio Code.
For instruction to install EV3DEV and config Visual Studio Code please see this link at contest.
The AEV3CTE firmware are build using Python 3.7 and could be find at code section. It is a link to my GitHub repository.
The name above each rectangle in block diagram is the python class name used.
All python class are at libs directory. The main class program is a_ev3_cte, py and the config ini file for Amazon ID product is a_ev3_cte.ini. At mission 1 of contest it is the explain how create this id and config Amazon product id for gadgets, please use it.
Additional are there test_xxxx files for test all class using at project.
To run firmware connect to EV3 brick with ssh, Go a_ev3_cte directory and execute sudo phyton3 a_eve3_cte.py. The password for sudo is maker
Arduino Pro Mini
The firmware for arduino pro mini is developed using Arduino IDE. They requires install at libraries section, the lib Wire, Adafruit_GPS, SoftwareSerial and SparkFunHTU21D. The main file is arduinoI2C.ino file
Pixy2 Camera Config
The Pixy2 camera must be config to uses i2c protocol. To do that connect the cam to PC using USB cable and install Pixy2mon v2 software and go Configure section.
If this options don't show I2C please install general firmware at this address, and upgrade camera with this procedure.
To teach Pixy2 camera to scan each color tower, you must assign a signature to each one and uses it at python class program. To do that please use this procedure and create two signatures one for red=1 and another to blue=2 tower.
Pixy2 cam is used to calculate tower distance to explorer. Calculate object distance in inches based on camera focal length.
W know width of objectD know distance from camera before take a pictureP know width in pixels of object at distance D
F = (P x D) / WDnew = (W x F) / P(new pixels width)
Alexa Skill
Remember at Alexa Voice Service you create your Gadgets (Alexa Gadget) and it assign you an Amazon ID and an Alexa Gadget Secret need by a_ev3_cte.ini file.
At Alexa Skills create a skill (Autonomous EV3 Color Tower Explorer) and import json file skill.json in JSON Editor section.
All Intents and slots will be created.
Create Invocation word in lower case for Alexa at Invocation section.
Now go to Code Section and import all files from skill-nodejs directory except skill.json file. They must be in directory Skill Code/lambda, save and deploy code.
Go to Build and select Intents, Save Model and Build Model.
Now skill is ready to be invocation by Alexa device echo show or echo dot.
Invocation,Directives, Events and Session values
InvocationName: autonomous color tower explorer is the invocation word that activate the skill at Alexa device.
Declaratives
Explorer declarative (ExplorerIntent) used at skill are grouped autonomous and individual type.
Autonomous:
"Go tower color {TowerColorA} and {TowerColorB}",
"Explore tower {TowerColorA} and {TowerColorB}",
"Go and explore tower color {TowerColorA} and {TowerColorB}",
"Explore tower color {TowerColorA}",
Establish order to go, for example "Go tower color blue and red", the explorer will go to color tower blue first, return to base and go tower red and finish travel returning to base.
Individual:
"Go tower color {TowerColorA}",
"Go and explore tower color {TowerColorA}"
Conditions declaratives (ConditionIntent) is used to read all or particular condition at arrived tower.
"How is {ReadConditions}",
"Read {ReadConditions}"
Return Base declarative (ReturnBaseIntent) is used to indicate explorer to return base.
"Return base and go to next tower",
"Return base"
Events
Events are used by Alexa device to communicate gadget (AEV3CTE) that some actions are init or finished.
GOING_TOWER = "going_tower" the explorer will go to tower color indicated
RETURN_BASE = "return_base" the explorer will return to base
ARRIVE_TOWER = "at_tower" the explorer arrived at tower indicated
ARRIVE_TOWER_AUTO = "at_tower_auto" the explorer arrived at tower in autonomous mode.
ARRIVE_BASE = "at_base" explorer arrive base
TEMPERATURE = "temperature" temperature has been read
HUMIDITY = "humidity" humidity has been read
COLOR = "color" color was read
GPS = "gps" GPS latitude and longitude has been read
ALLCONDITIONS = "all_conditions" all conditions at tower has been read
Session Values
Additional session values are used to control where is explorer position
"botPosition"= base, red tower, blue towerMy work at Intelix Synergy C.A. helped me develop this project using C, Python and Node.js languages.
This project is dedicated to the memory of my Father 1941 - 2017


_dyynx0bnuf_8u4Xi07d4z.png?auto=compress%2Cformat&w=48&h=48&fit=fill&bg=ffffff)


_3u05Tpwasz.png?auto=compress%2Cformat&w=40&h=40&fit=fillmax&bg=fff&dpr=2)
Comments
Please log in or sign up to comment.