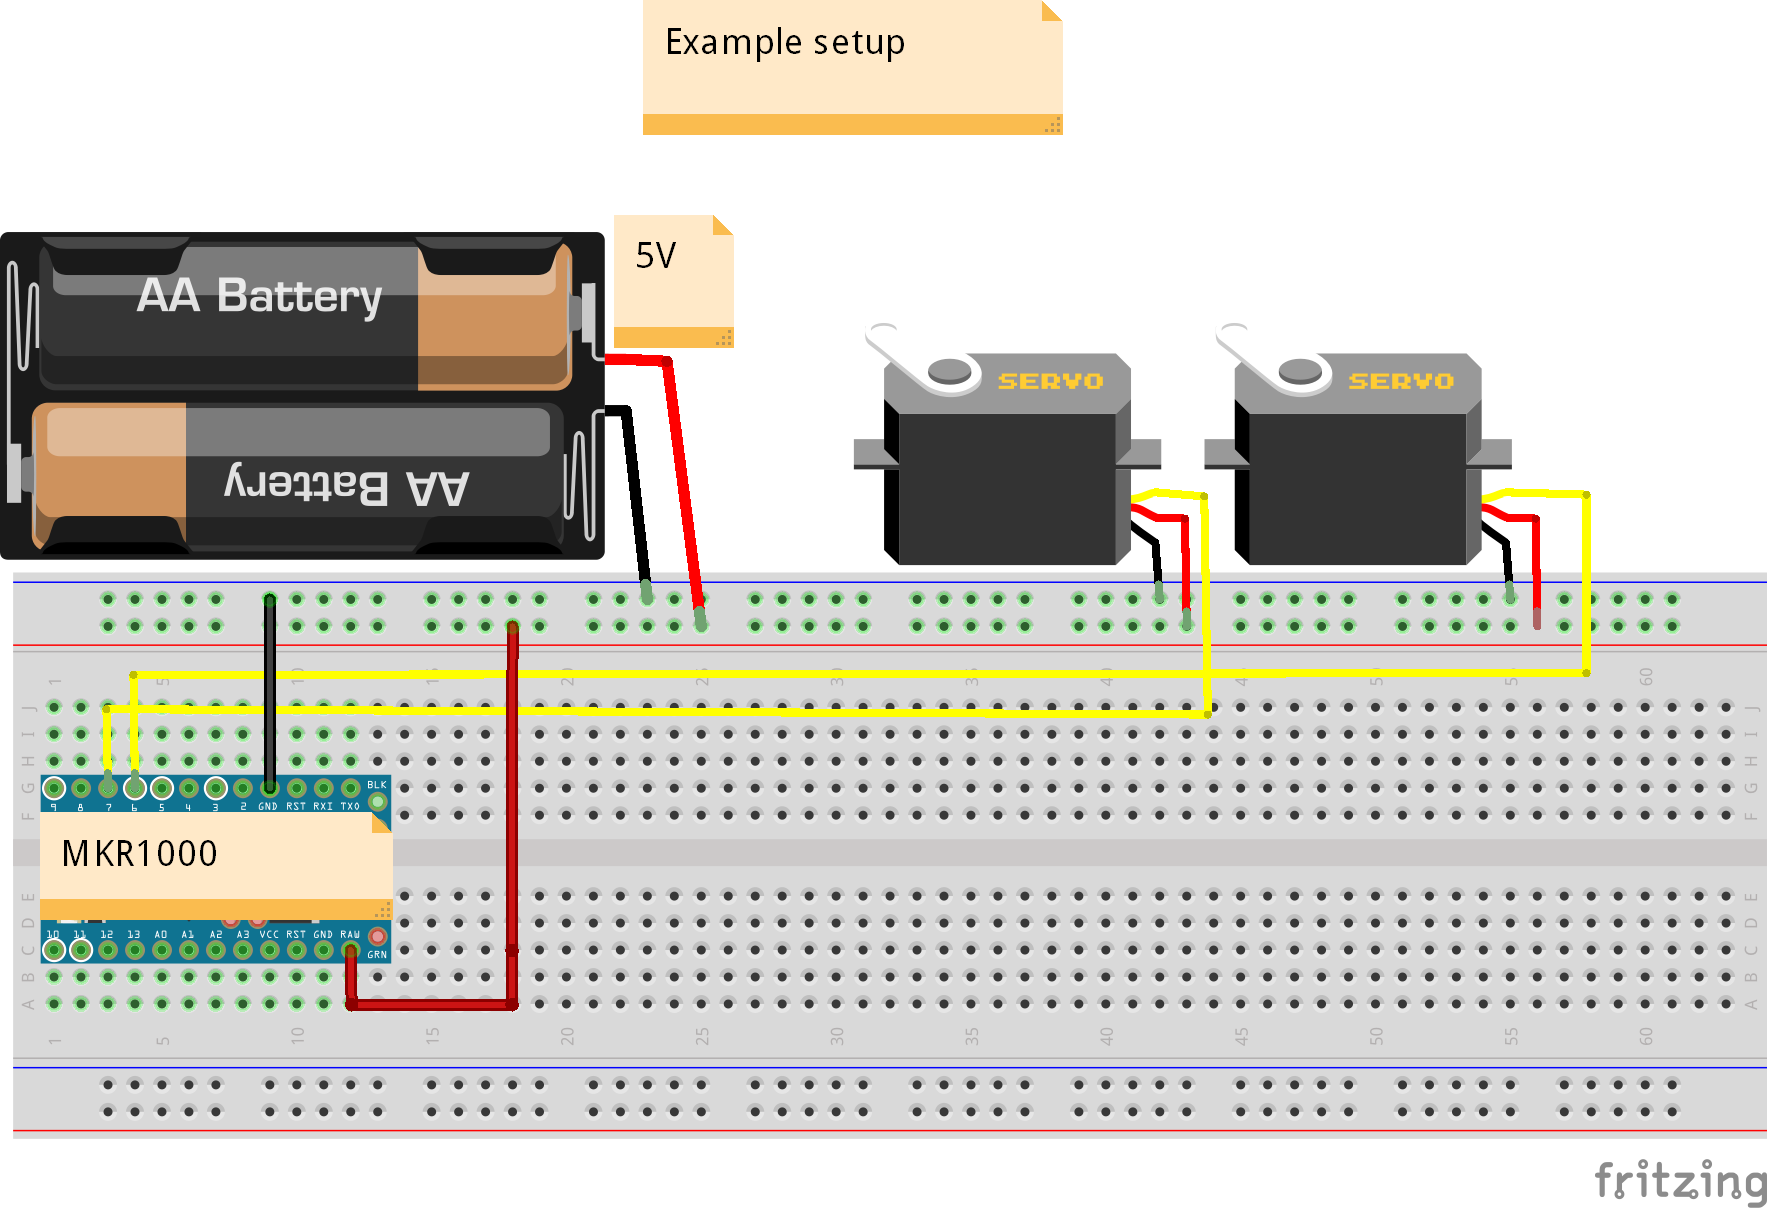
Arduino and servos have pretty much gone together from the inception of the legendary Arduino hardware project. If you look on the web, you see many examples, questions and uses of Arduinos boards and servos together. In this article, I will introduce a set of code to allow the Arduino MKR1000 and some Javascript/Ajax to function as a simple but interactive servo control panel. Studying this code will help you interface with an Arduino with Wifi abilities to put together control or data collection tools that are both interactive and easy to use.
What you will Learn from this Article and its Code- Basic Arduino web server coding
- Simple Javascript/Ajax user interfaces
- http get requests from Javascript/JQuery
- json data strings
The "application" as we will call it here, is in two parts. The first component is on the Arduino MKR1k itself. The microcontroller code is a web responder running on port 80. This web responder listens for requests from a web browser, parses the request sent, executes it and then returns the results of the request back to the browser. On the browser side (Javascript/Ajax) requests are sent via HTTP get requests as the user interacts with the panels controls.
Code Highlights of the Web ResponderThe web server for this project is very simple. The code starts out setting up the Wifi connection. Once connected, it opens up a listening socket on port 80. After the setup is complete we get into the main loop of the code. In the loop code we check for new client connections and parses the request data sent. For this application, we really are only interested in the first line any request sent, so once that is read and processed and the rest of the request data is read, but ignored.
Here is a simple example of a GET request sent from a web browser:
GET /servoOpen?7 HTTP/1.1
User-Agent: Browser-X (compatible; Webkit.X1; Linix X64)
Host: www.ipland.com
Accept-Language: en-usAccept-Encoding: gzip, deflate
Connection: Keep-Alive
We are only needing the actual GET request part - "GET /servoOpen?7 HTTP/1.1"
This line will contain all the information we need to process the command sent in the request. After the first line ending ('\r\n') is found, the request info is parsed out. The parameters are pulled out from the file path info. This is anything past the '?', and up to the ' ' (space) before the 'HTTP/1.1' at the end on the line. Once the code gets the parameters (if any), the command sent in is matched by a series if/if elses using the 'request_is' function. If there is a match, the function is called sending any parameters sent in. If there is no match found, the line is ignore (no function is called)
void loop ( ) {
   bool endofline = false;
   json_ret = "";

   WiFiClient client = server.available ( );

   if (client) {
      #ifdef DEBUG
        Serial.println ("Client connected");
      #endif
      String currentLine = "";
      while (client.connected ( )) {
         if (client.available ( )) {
            char c = client.read ( );
            if (c == '\n') {
               endofline = true;
            } else if (c != '\r') {
               currentLine += c;
            }

            // - End of the line, so parse and execute if a url match is found - \\

            if (endofline) {
               endofline = false;
               String parms = "";

               #ifdef DEBUG
                 Serial.println ("<" + currentLine + ">");
               #endif

               // Copy the parms sent in the request.
               int ndx1 = currentLine.indexOf ('?'); // location of the '?'
               // location of the ' ' before "HTTP" and the line end
               int ndx2 = currentLine.indexOf (' ', ndx1);

               #ifdef DEBUG
                 Serial.println ("<" + String (ndx1) + ">");
                 Serial.println ("<" + String (ndx2) + ">");
               #endif

               if (ndx1 >= 0) {
                  parms = currentLine.substring (ndx1 + 1, ndx2);
               }

               #ifdef DEBUG
                 if (parms.length ( ) > 0)
                    Serial.println ("<" + parms + ">");
               #endif

               if (request_is (currentLine, "/servoOpen")){
                  ServoOpen (parms);
               } else if (request_is (currentLine, "/servoClose")) {
                  ServoClose (parms);
               } else if (request_is (currentLine, "/servoSet")) {
                  ServoSet (parms);
               } else if (request_is (currentLine, "/servoRead")) {
                  ServoRead (parms);
               } else if (request_is (currentLine, "/servoCtrlReset")) {
                  ServoCtrlReset ( );
                  json_ret = "{\n\t\"return_code\": 0\n}";
               } else {
                  break;
               }

               #ifdef DEBUG
                 Serial.println ("<=" + json_ret + "=>");
               #endif

               sendReturnResp (client, json_ret);
               currentLine = "";
               break;
            }
         }
      }

      // Close the connection when done
      client.stop ( );
      #ifdef DEBUG
         Serial.println ("Client disconnected normally");
      #endif
   }
}
After each matching command is executed, the 'json_ret' global variable is set to the data that will be sent back to the calling program (the browser in this case). This data is formatted in a JSON format for easy processing by Javascript or other calling languages. The json data is sent back by a call to the 'sendReturnResp' function listed in the code and the connection is closed and then waits for another connection.
Code Highlights from the Control PanelThe browser code may look complex at first, but it's really not. The GUI and it's processing is done with a combination of css style sheets, HTML5 for the gui elements, jquery/javascript for the html and form manipulation, and then javascript for the data processing and command sending to the server. Noteworthy code from the browser code itself is the 'connServo' function. In it you can see good examples for jquery/javascript interaction as well as get requests and json processing.
function connServo (servo) {
      var conn_state = $('#conn_state' + servo).val ( );
      var pin = $('#gpio' + servo).val ( );
      if (conn_state == "0") {
      if (seeIfOpen (pin) == 1) {
         return;
      }

      // Send the /servoOpen command as a GET request to the arduino web responder
      var requestURL = "http://" + DEVICE_IP + "/servoOpen?" + pin;
      $.get (requestURL, function (data) {
                 // The value from the the json field 'data_value' is save off in a
                 // hidden form field for use later to control that servo.
   		 $('#servo_id' + servo).val (data.data_value);

                 // Enables the servo control buttons and sets the
                 // Connect button text to 'Disconnect'
   		 $('#range' + servo).prop("disabled", false);
   		 $('#servo' + servo).prop("disabled", false);
   		 $('#setmin_but' + servo).prop("disabled", false);
   		 $('#inc_but' + servo).prop("disabled", false);
   		 $('#dec_but' + servo).prop("disabled", false);
   		 $('#setmin_but' + servo).prop("disabled", false);
   		 $('#setmax_but' + servo).prop("disabled", false);
   		 $('#set_val' + servo).prop("disabled", false);
   		 $('#set_but' + servo).prop("disabled", false);
   		 $('#home_but' + servo).prop("disabled", false);
   		 $('#conn_state' + servo).val ("1");
   		 $('#gpio' + servo).prop("disabled", true);
   		 $('#conn_but' + servo).text ('Disconnect');
      });
   } else {
      // Send the servoClose command as a GET request.
      var servo_id = $('#servo_id' + servo).val ( );
      var requestURL = "http://" + DEVICE_IP + "/servoClose?" + servo_id;
      $.get (requestURL, function (data) {});

      //
      // Reverse all the button settings that the connect code did.
      //
      // Try and turn the servo off first.
      // After the servo turn off, send the close request.
      $('#range' + servo).val ('90');
      $('#servo' + servo).val ('90');
      setServoVal (servo);
      $('#servo_id' + servo).val ('-1');
      $('#range' + servo).prop("disabled", true);
      $('#servo' + servo).prop("disabled", true);
      $('#setmin_but' + servo).prop("disabled", true);
      $('#inc_but' + servo).prop("disabled", true);
      $('#dec_but' + servo).prop("disabled", true);
      $('#setmin_but' + servo).prop("disabled", true);
      $('#setmax_but' + servo).prop("disabled", true);
      $('#set_val' + servo).prop("disabled", true);
      $('#set_but' + servo).prop("disabled", true);
      $('#home_but' + servo).prop("disabled", true);
      $('#conn_state' + servo).val ("0");
      $('#gpio' + servo).prop("disabled", false);
      $('#conn_but' + servo).text ('Connect');
   }
}
To use the Application, you must first download it from the link below (MkrServo Code). After doing so, unzip the file and navigate to the directory that contains the file 'MkrServo.ino'. Load this into the Arduino IDE and hook the MKR1k board up to your computer for programming. See Arduino IDE setup for info on getting the IDE. You may also need to load the board definition for the MKR1000, see here for more info on that. After you have the IDE ready and the board connected, select your board and com-port and load the code.
You may see the following pop up:
If so just click 'OK'.
Once the web server code is loaded into the IDE, find the following lines:
// Define your Wifi info here
#define SSID "YOUR ROUTER SSID"
#define PASSWD "YOUR ROUTER PASSWORD"
Here you will set the SSID (your Wifi router name) and the password use to log on to it. This would be the same you use for your phone, tablet or PC. After that change is made, save the file and send it to your MKR1k by clicking the 'upload' button on the IDE.
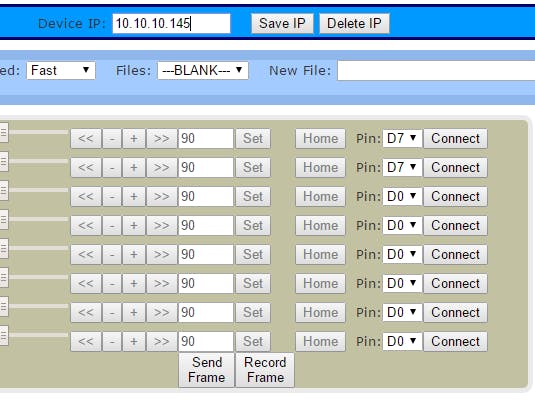
The Servo Control Panel InterfaceThis is the screen for the control panel itself. It consists five boxes of different colors or shades (CSS styles). *For this article we will only use and focus on the Device IP fields and buttons (darker blue area) and the Grey box with the actual servo controls and connection buttons.
* -- To keep the code limited to the basics, the other buttons are only there for future use and ideas.
To start controlling a servo connected to a MKR1k that is configured with the servo web responder, you must first give the IP address of the controller. To find this, you will need to open up a serial monitor or terminal with the controller connected via USB. You could optionally look at your WiFi router's admin pages to find the IP as well.
Navigate to the folder with the file 'Mkr1000servolocal.html' is it and double click it to run. Once it loads into the browser, copy this IP (Just the ip - i.e. 192.168.34.2) to the 'Device IP:' field of the control panel. Connect a servo the the arduino and select the pin from the drop-down you have it connected to and click the 'Connect' button. If the control panel code was able to connect to the MKR1k web server, the 'Connect' will change to 'Disconnect'. You can now use the sliders, or buttons to move the servo (The grey box). If it did not connect, open up the javascript console in the browser (Shift + Ctrl + I on Chrome), if there are any errors, correct them and try again. If you get a good connection to the controller, and do not want to type the IP each time, you can do the following... The IP can be saved by clicking the 'Save IP' button. Then the next time the control panel used it will load the saved IP automatically. You can remove the save IP with the 'Delete IP' button.
NOTE: You will need an HTML5 based browser such as Chrome to use the Servo Control panel.
Going Forward...I hope you have learned some about Javascript and talking to an Arduino via Wifi from a browser. There are lots more you can do with the browser code as well as the web responder on the MKR1000. You could add the record and playback functions or other functionality. You are only limited by your imagination. Please continue to learn and have fun!


Comments
Please log in or sign up to comment.