I will be detailing here on how I made my regular ceiling fan a smart one by integrating Amazon Alexa for speed control of the same. We will be using amazon alexa skill set to initiate the speed change, and will be ngrok tunneling service to route the request to our locally housed RPi server, which will tell our Arduino uno to turn on the related relay.
we need the following services to make use for our server.
- Python PIP : to install python packages, if you are using python 2.7 or 3 pip will be intalled by default, hence you can avoid this step
sudo apt-get install python-pip
- Flask : Flask is a sever package for python which will help you to implement python servers easily.
pip install flask
- flask ask : a flask extention used to create alexa frendly programs easily.
pip install flask-ask
- pyserial : serial communication module for python
sudo apt-get install pyserial
- libpython2.7-dev
sudo apt-get intall libpython2.7-dev
all necessary modules are installed its time to set the server running. we need to enter the python script for the same
from flask import Flask
from flask_ask import Ask, statement
import requests
import json
import serial ser = serial.Serial("/dev/ttyAMA0",9600)
app = Flask(__name__)
ask = Ask(app, '/')
@ask.launch
@ask.intent("FanOn")
def on():
    ser.write(b'1')
    return statement("Ceiling Fan turned on.")
@ask.intent("FanOff")
def off():
    ser.write(b'0')
    return statement("Ceiling Fan turned off.")
@ask.intent("FanLevelUp")
def up():
    ser.write(b'+')
    return statement("Ceiling Fan speed up.")
@ask.intent("FanLevelDown")
def down():
    ser.write(b'-')
    return statement("Ceiling Fan speed down.")
if __name__ == "__main__":
    app.run(debug=True)
Run this python script, and enlist this script to the auto start list of your RPi.
3. Download Ngrok
Ngrok is secure tunneling platform to make your device online. With this platform you can make your web application or any application goes online with a very simple way. For download go to official site and download for ARM.
Unzip it and go to directory where you extract it. Run it using command
./ngrok http 5000
Go to amazon developer page and sign up for your developer account
Enter the developer console after sign in and now enter select "Alexa skill kit"
now select "Add new skill"
Enter the name for your skill, and enter an invocation name,. ensure your invocation name meet the necessary conditions
save and proceed to next step
here enter the intents for invocation of the skill, and utternce examples, ie the word combinations to be initiate each intent.
intents are as follows
{
"intents": [
  {
    "intent": "FanOn"
  },
  {
    "intent": "FanOff"
  },
  {
    "intent": "FanLevelUp"
  },
  {
    "intent": "FanLevelDown"
  }
]
}
sample utterances
FanOn say fan on
FanOn say on
FanOff say off
FanOff say fan off
FanLevelUp say fan level up
FanLevelUp say increase fan speed
FanLevelDown say fan level down
FanLevelDown say decrease fan speed
Save and proceed to the next stage. here you will have to enter the location to which you are expected to send the data once an intend is invoked.
since we are using ngrok, select HTTPS, and enter the secure link is generated in ngrok serve, save it and proceed to next step
choose second option for SSL Certificate, and proceed
To check whether our setup is working or not . Make sure your ngrok server is working and Python script also running otherwise it will not work.
we can see that servers are getting request and updating it.
Arduino Code
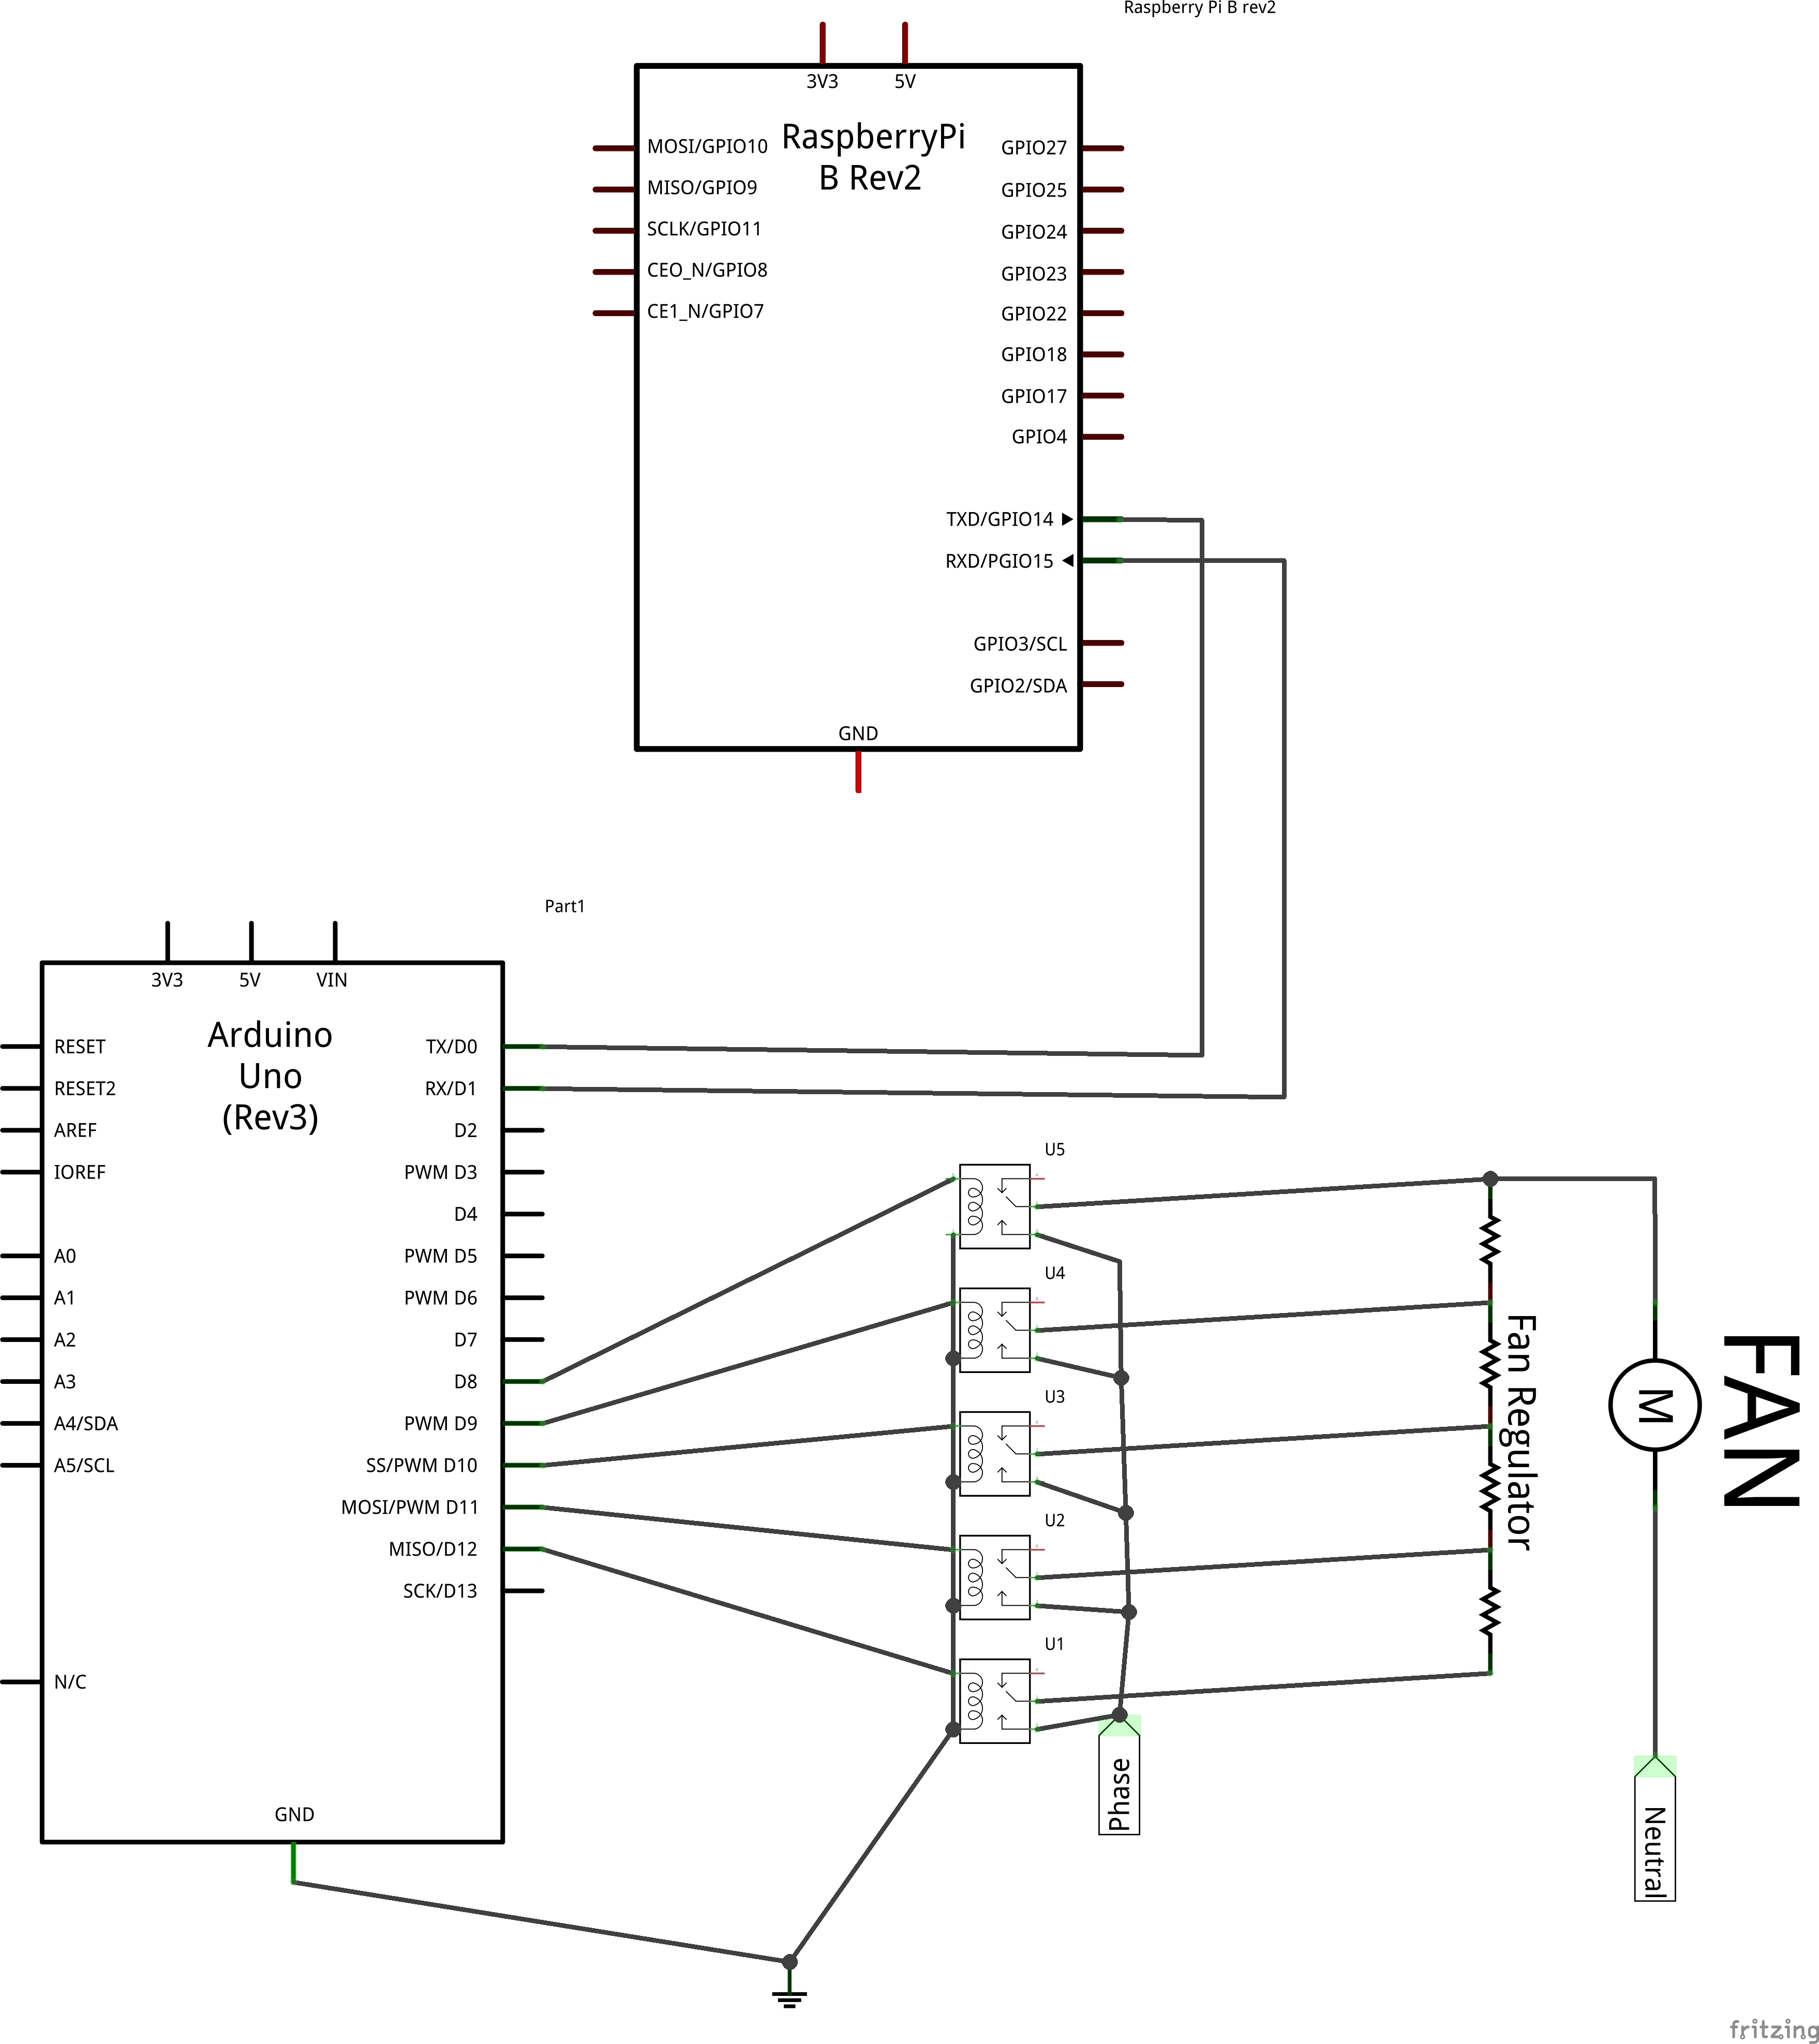
upload the attached sketch your arduino and connect it to raspberry pi as explained in the schematic.
int Fan[] = {13,12,11,10,9,8};
int n=0;
void reset();
void set(char);
void setup() {
// put your setup code here, to run once:
for(int i=0;i<6;i++)
{
 pinMode(Fan[i], OUTPUT);
}
 Serial.begin(9600);
}
void loop() {
 char x;
if (Serial.available())
{
 x=Serial.read();
 reset();
 set(x);
}
}
void reset()
{
 for(int i=0;i<6;i++)
 {
 digitalWrite(Fan[i], LOW);
}
}
void set(char x)
{
 switch (x)
 {
   case '1':
     n=1;
     break;
   case '+':
     n++;
     break;
   case '-':
     n--;
     break;
   case '0':
     n=0;
     break;
 }
 digitalWrite(Fan[n],HIGH);
}
connect the hardware as shown in the schematic
Happy making. make any other appliance voice activated in similar way :)


_ztBMuBhMHo.jpg?auto=compress%2Cformat&w=48&h=48&fit=fill&bg=ffffff)


Comments
Please log in or sign up to comment.