I decided to make this project because I wanted to use of AI and Sony's Spresense board to improve's people's lives and help solve a big problem faced all over the world.
Problem StatementLandslides occur on any terrain or weather conditions and cause significant loss of life, damage and monetary losses. Equipment to help detect potential for flood damage and landslides is expensive and not readily available to most countries.
Following the research of the Harte Institute of Technology, the work by LM Highland and Google labs, I decided to use the Spresense board as an affordable and attainable alternative to detect potential for flood damage and landslides using machine learning and image recognition.
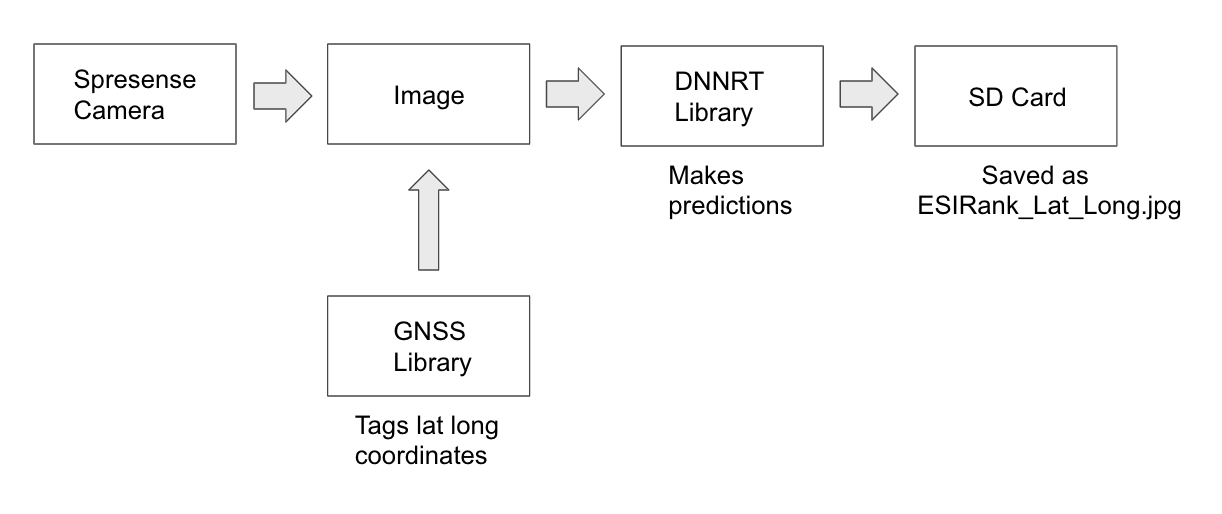
IntroIn this project I will mount a Spresense board and camera to a drone. The drone will fly around coastal areas and take low altitude areal images. Each image will be saved to an SD card and tagged with a GPS position. I will also train an image recognition model and make predictions on potential for flood damage using Spresense board's neural network libraries. This is called machine learning at the IoT edge.
The image recognition model makes predictions on the potential for flooding based on the following table.
For this step you will need a google cloud platform account in order to make predictions.
Because preprocessing the data and training the model is very time consuming (about 6 hours) and costs about $20 dollars in gcp compute costs, I provide the preprocessed images and trained model in the next step.
If you want to do everything from scratch, you can follow this notebook https://github.com/GoogleCloudPlatform/training-data-analyst/blob/master/quests/scientific/coastline.ipynb
Step 1 : Open Datalab
Login to the gcp console and open the cloud shell
Then run the command:
This step takes about 5 minutes. If you are prompted with a message in the console, write 'Y' then press enter. When asked for a passphrase just press enter, then followed by another enter.
Once the datalab instance is created, click on web preview and change port to 8081 and preview.
Step 2: Predict
The Harte Research Institute collected and labeled 8000 coastal images. I preprocessed all the images and built a model to make predictions on new images. In whole it took 6 hours using dataflow and about 25 minutes training on GPUs for 15000 steps in batches of 100. All the preprocessed images and model can be found here https://console.cloud.google.com/storage/browser/coastline-txf
After running for 15000 steps, this was my final result:
70% accuracy.
Looking at tensorboard I believe I could have ran it for less steps because it looks like the model was overfitting the train data after around 10500 steps. This is due to the training accuracy (in blue) going up but the eval accuracy (in red) stagnating.
Ok to continue, download the notebook https://console.cloud.google.com/storage/browser/coastline-txf/coastlinetrain.ipynb and then upload it to the datalab project you just created and open it from there
Run the first cell to set the model directory.
Skip the training cells since the model has already been trained and look for the following cell and run it.
When this is done running, you can see your model has been deployed by going to the ML Engine option in the gcp console.
To make predictions now run the last cell.
Results are promising. All three images were recognized correctly.
Setting up the hardware
For setting up the Spresense board, the extension board and camera you can follow the directions here https://developer.sony.com/develop/spresense/developer-tools/get-started-using-nuttx/hardware-overview#_how_to_attach_the_spresense_extension_board_and_the_spresense_main_board.
For setting up the arduino IDE, you can follow the directions here https://developer.sony.com/develop/spresense/developer-tools/get-started-using-arduino-ide/set-up-the-arduino-ide.
After that I tried the camera example to get some images.
Now we are ready to use the Spresense board.
Geotagging and Image Capture Algorithm
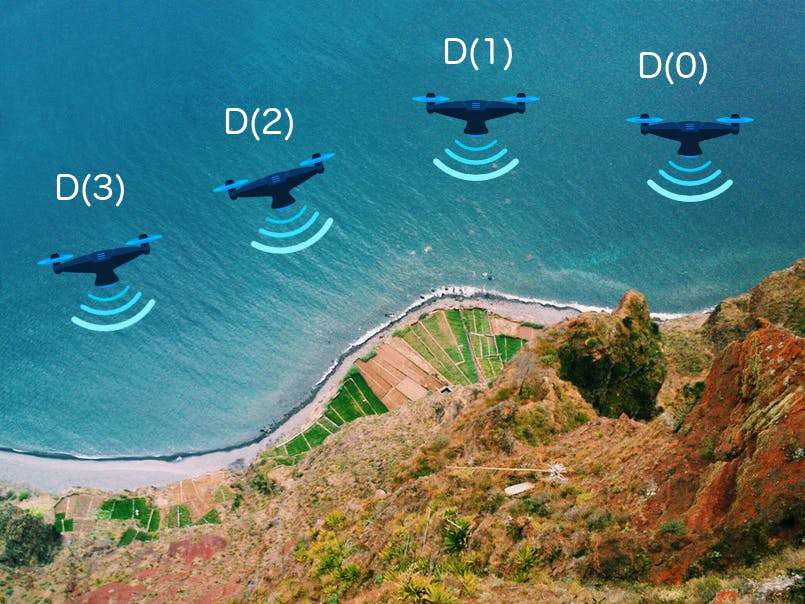
The drone will be flying over a coastal area as follows:
D(0), D(1), ..., D(n) represent points (Lat,Long) along the coast. To calculate a good distance between them to take images I used the haversine formula (https://en.wikipedia.org/wiki/Haversine_formula) and took images 50 meters apart.
static double haversineDistance(double lat1, double lon1, double lat2, double lon2){  // generally used geo measurement function
   double dLat = lat2 * M_PI / 180 - lat1 * M_PI / 180;
   double dLon = lon2 * M_PI / 180 - lon1 * M_PI / 180;
   double a = sin(dLat/2) * sin(dLat/2) +
   cos(lat1 * M_PI / 180) * cos(lat2 * M_PI / 180) *
   sin(dLon/2) * sin(dLon/2);
   double c = 2 * atan2(sqrt(a), sqrt(1-a));
   double d = R * c;
   return d * 1000; // meters
}
Testing the equation and walking around my house:
2018/12/21 04:28:22.000591, numSat: 4, Fix, Dist=2.499298
2018/12/21 04:28:23.000586, numSat: 4, Fix, Dist=2.016485
2018/12/21 04:28:24.000579, numSat: 4, Fix, Dist=3.282987
2018/12/21 04:28:25.000570, numSat: 4, Fix, Dist=2.258576
2018/12/21 04:28:26.000587, numSat: 4, Fix, Dist=1.172982
2018/12/21 04:28:27.000577, numSat: 4, Fix, Dist=0.155176
2018/12/21 04:28:28.000569, numSat: 4, Fix, Dist=0.428858
2018/12/21 04:28:29.000571, numSat: 4, Fix, Dist=0.964820
2018/12/21 04:28:30.000568, numSat: 4, Fix, Dist=1.158680
**More experimentation is needed about what a good distance is when mounted on a drone.
The code for taking images depending on the distance measurement is as follows:
   if (prevLat != -1 && prevLon != -1) {
         double dist = haversineDistance(prevLat,prevLon,lat,lon);
         Serial.print("Dist=");
         Serial.print(dist,6);
         if (dist >= 50) {
           takeImage(lat,lon);
           prevLat = lat;
           prevLon = lon;
         }
   }
So far we have our code for taking images and geotagging them using the Spresense board and camera. We also have an image recognition model that we trained using GCP services.
Unfortunately, we cannot load the trained model into the Spresense board. That's ok though, because the Spresense board comes with its own neural network library https://developer.sony.com/develop/spresense/developer-tools/api-reference/api-references-arduino/classDNNRT.html and https://nnabla.org/.
We are going to use nnabla to, again, train an image recognition model on a smaller subset of the 8000 coastal images we used in the first part of this tutorial. NNabla gives us a model in a format in which the DNNRT Spresense library can use to make on the edge image recognition.
Preprocessing Images
For this task, I decided to use 100 images from each category and split it 80/20 for train and eval. The original coastal images are very large, about 10 MB each on average and over 10GB for all images so I decided to do 2 things:
- Remove the text label at the bottom of each image.
- Make image grayscale.
- Size each image to 224 x 224 pixels.
I will be training a resnet model which uses 224 x 224 image size.
Final images look like this:
You can get the python notebook I created to do all the preprocessing here https://storage.googleapis.com/coastline-txf/pre_process_img_nnabla.ipynb
And the preprocessed images from https://storage.googleapis.com/coastline-txf/processed_images.zip
Training with NNabla
NNabla has a good started jupyter notebook to learn how to build convolutional neural networks found here https://github.com/sony/nnabla/blob/master/tutorial/by_examples.ipynb
I used one the mnist example as a baseline and modified it to take my images instead and used the resnet architecture to train the model. You can find all the files here https://storage.googleapis.com/coastline-txf/mnist-collection.zip
After unzipping you need to install nnabla via pip:
pip install nnabla
Then run
python3 classification_coastal.py
Originally I tried training using a GPU inside a compute engine deep learning instance. I tried running multiple docker containers from https://github.com/sony/nnabla-ext-cuda/tree/master/docker. I was not successful in doing so.
I then decided to use a google cloud compute instance VM running 32 GB of ram with 2 Cores to train a Res-net model. The training loads all images to RAM and runs 10000 training steps.
I adjusted the parameters multiple times such as the learning rate and batch size. Finally I settled on a learning rate of 0.01 and batch size of 64. After running the training for 48 hours and completing about 1200 training steps, it became apparent the training was not going very successfully. The training loss was pretty close to when it started. Training losses by 10 steps separated by spaces:
(9th step) 0.837519 0.74062529 0.70781239 0.7687549 0.71093859 0.72343769 0.71562579 0.75937589 0.762599 0.75109 0.771875119 0.754687129 0.776563139 0.779687149 0.796875159 0.753125169 0.734375179 0.782813189 0.760938199 0.765625209 0.696875219 0.709375229 0.740625239 0.796875249 0.707812259 0.698438269 0.689063279 0.732812 0.75299 0.696875309 0.709375319 0.734375329 0.740625339 0.785937349 0.8359 0.782813369 0.804688379 0.795312389 0.721875399 0.7409 0.715625419 0.726562429 0.779687439 0.751563449 0.726562459 0.757812469 0.785937479 0.779687489 0.76875499 0.74375509 0.740625519 0.721875529 0.701562539 0.725549 0.735938559 0.771875569 0.754687579 0.728125589 0.714063 (599 step) 0.732812609 0.796875619 0.795312629 0.796875639 0.829688649 0.80625659 0.703125669 0.773438679 0.754687689 0.798438699 0.740625709 0.79375719 0.746875729 0.75625739 0.757812749 0.745313759 0.74375769 0.74375779 0.7625789 0.745313799 0.804688809 0.76875819 0.796875829 0.746875 (839th step) 0.754687849 0.689063859 0.75869 0.735938879 0.790625889 0.7125899 0.69375909 0.6875919 0.676562929 0.723437939 0.701562949 0.745313959 0.814063969 0.785937979 0.820312989 0.773438999 0.756251009 0.7140631019 0.7093751029 0.7515631039 0.7796871049 0.7515631059 0.7234371069 0.7265621079 0.7421881089 0.8203121099 0.7421881109 0.7156251119 0.7140631129 0.7281251139 0.71251149 0.7203131159 0.7359381169 0.768751179 0.7765631189 0.7671881199 (1999 step)0.7625
I decided to create a model out of 1000 steps and use it in the Spresense board.
I understand this model is not very accurate, so in the future to get a more accurate model I like to use all 8000 coastal images to train and use GPUs to accelerate training time. This should give me an accuracy close to my tensorflow model. Sony has cloud services for this type of task https://dl.sony.com/.
Loading NNabla model in Spresense BoardThe model format that comes from the training in the above step is not compatible with the Spresense board, we need an nbb file format, so it needs to be converted with the following command:
nnabla_cli convert resnet_result.nnp resnet_result.nnb
The *.nbb file then is moved to the SD card's main directory and the model is loaded as follows:
bool setupDNNRT() {
 Serial.println("loading nn");
 File nnbfile("resnet_result.nnb");
 if (!nnbfile) {
   Serial.print("nnb not found");
   return false;
 }
 Serial.print("dnnrt.begin, ret: ");
 int ret = dnnrt.begin(nnbfile);
 Serial.print(ret);
 if (ret < 0) {
   Serial.println("Runtime initialization failure.");
   return false;
 }
 return true;
}
Finally we set up the logic to make predictions and save the filename with the prediction, lat and long coordinates.
void takeImage(double lat, double lon) {
 Serial.println("call takePicture()");
 CamImage img = theCamera.takePicture();
 if (img.isAvailable()) {
   //char filename[25] = {0};
   String filename = String("");
   char latStr[15];
   dtostrf(lat,8, 3, latStr);
   char lonStr[15];
   dtostrf(lon,8, 3, lonStr);
   if (isDnnrtSetup) {
     DNNVariable input(img.getImgSize());
     float *buf = input.data();
     /*
     * Normalize pixel data into between 0.0 and 1.0.
     * Gray scale image, so divide by 255.
     * This normalization due to how the network was trained.
     */
     unsigned char *imgBuf = img.getImgBuff();
     Serial.print("load image to buffer");
     for (int x = 0; x < img.getImgSize(); x++) {
       buf[x] = float(imgBuf[x]) / 255.0;
     }
     dnnrt.inputVariable(input,0);
     dnnrt.forward();
     DNNVariable output = dnnrt.outputVariable(0);
     int label = output.maxIndex();
     filename = filename
       + label + String("_");
   }
   filename = filename
     + latStr + String("_")
     + lonStr + String(".JPG");
   Serial.print("Save taken picture as ");
   Serial.print(filename);
   Serial.println("");
   /* Save to SD card as the finename */
   File myFile = theSD.open(filename, FILE_WRITE);
   myFile.write(img.getImgBuff(), img.getImgSize());
   myFile.close();
   ++pictureCount;
 }
}
And there it is, this will save a JPEG inside the SD card in the format "prediction_lat_lon.jpg".
Also note that there is a check to see if DDNRT is setup. If it is not set up, then the image will be saved as "lat_lon.jpg". These images can then be uploaded to a computer or the cloud to make predictions with our tensorflow model we created in part one.
For example, we can upload them to Google storage and make predictions like this:
Using Sony's Cloud Services
Sony offers cloud GPUs services with a very intuitive UI to train your own models. This service is called the neural network console (https://dl.sony.com/). They have 10 hours free to use on CPU and about $2 USD/hr for GPUs. That's very affordable. The console also has pre-set graphs for us to use. In my case, I decided to use one of the ResNet models.
After creating an account and logging in I downloaded the nnc uploader app into my Mac. With the uploader I can create my own datasets and upload them to the neural network console.
Uploading Datasets
Right now the images I used for training are saved with 2 channels, one channel holds the grayscale pixels from 0 to 255 and the other holds the transparency. I decided to remove the transparent channel before uploading my datasets. The python script to do so:
def convertImageSingleChannel(imgPath):
   im = Image.open(imgPath)
   im = numpy.asarray(im)
   print(im.shape)
   im = im[:,:,0]
   print(im.shape)
   im = Image.fromarray(im.astype('uint8'))
   #im.show()
   im.save(imgPath,"PNG")
def convertImages(csvPath, imagePath):
   dataset = pd.read_csv(csvPath)
   print(dataset.columns)
   print(len(dataset))
   for index, row in dataset.iterrows():
       filename = row.filename
       print(imagePath + filename)
       convertImageSingleChannel(imagePath + filename)
convertImages('local_labeled_images_train.csv','processed_images/')
convertImages('local_labeled_images_eval.csv','processed_images/')
I also had to create two csv files, one for training and another with eval datasets. The first row representing the data and the label. Ex:
x:image,y:label
IMG_1993_SecDE_Spr12.png,9
IMG_1999_SecDE_Spr12.png,9
IMG_2007_SecDE_Spr12.png,9
...
All of this can be found here https://console.cloud.google.com/storage/browser/coastline-txf/sony_nnc/processed_images
Now that the data is ready for upload, go to Sony's neural network console and click on datasets and Upload dataset
A console opens with a key
Copy the key and now on your computer open the nnc uploader. Paste the key from above and then look for the csv file with all your data. Again, it should be two csv files, one for training and one for eval. You have to upload one at a time.
Once the upload is finished, you can check the neural network console to see the files being uploaded
Once this process is done, you can see your datasets inside the Datasets menu with a preview window that shows the images.
Modifying the ResNet Model
Now click on the Project menu and look for the project
tutorial.basics.12_residual_learning and clone it with your own name. After the project opens, click on Edit and you can see the ResNet graph. First change the input to take a (1,224,224) image instead of the (1,28,28). This is because our images are 224 width x 224 height.
The nice thing about this console is that you can just create cnns without touching code.
And set the output to be 14 labels instead of 10.
Now click on Datasets on the top right and link the datasets we just uploaded.
Train
Click Edit once again and click Run from the top right area to start the training
The training will start. Once complete, you will get the training graph.
Now that your model is ready, go to Evaluation and download your nnb model to be used with the Sony Spresense board.
Mounting Spresense To Drone
The Spresense board and camera each have 4 mounting slots making it easy to install into a drone. I had an old drone laying around so I gave it a try.
The mounting points fit exactly into place where the old drone circuit board used to be in place.
Well that's it, hope this project is helpful for getting started with the Sony Spresense board with image recognition.


Comments
Please log in or sign up to comment.