Sometimes we need a countdown clock that repeat the same countdown a lot of times.
By example, if we are making our workouts in the gym and we want to dedicate 1 minute to each one. Every time the countdown finishes must sound an alarm and the timer should be again at the same time we set. Pressing a single button the countdown shall start.
We want too that the clock be very easily configurable.
Clock operation for fitness.The goal is to make each of the workouts for a certain time, for which the clock has a unique function, COUNTDOWN.
As secondary objectives include the following:
- It should be very easy to configure so that allows us to concentrate on the workouts.
- It should be very easy to stop and restart.
- It must allow time us for prepare the initial position of the workout before the account.
1 - When you turn on the clock, it will be set at 00:00
2 - Whenever you press Reset, returns to this situation.
3 - Pressing the +1 button, the clock will add one minute to the present countdown on the display.
4 - Pressing the button +5 will add 5 minutes to countdown.
5 - Pressing the button +10 will add 10 minutes.
6 - It should be considered in programming, the maximum time is 99 minutes.
7 - Pressing the Start button.
- If there is no set time, you will hear a sound indicating the error.
- if there is a set time, it proceeds as follows.
- It will count down from five to zero, with a beep type Formula One in every second and one stronger when it reaches zero.
- Will start the countdown showed on the display previously. The real countdown.
- When the countdown ends, sounds an alarm.
- The clock is put back in the allotted time.
8 - When pressing Start in the different states:
- NOT_SET : sounds error signal.
- READY : starts the countdown.
- COUNTING : stops countdown.
- PAUSE : restart countdown.
9 - When pressing +1, +5 and +10 buttons in the different states:
- NOT_SET : Sets count down to correspondant value.
- READY : Adds the value to the countdown.
- COUNTING : Has no effect.
- PAUSE : Has no effect.
10- When pressing Reset button in the different states:
- NOT_SET : The program is reset.
- READY : The program is reset.
- COUNTING : the account ends, without the final sound.
- it is put back in the allotted time.
- PAUSE : the account ends, without the final sound.
- it is put back in the allotted time.
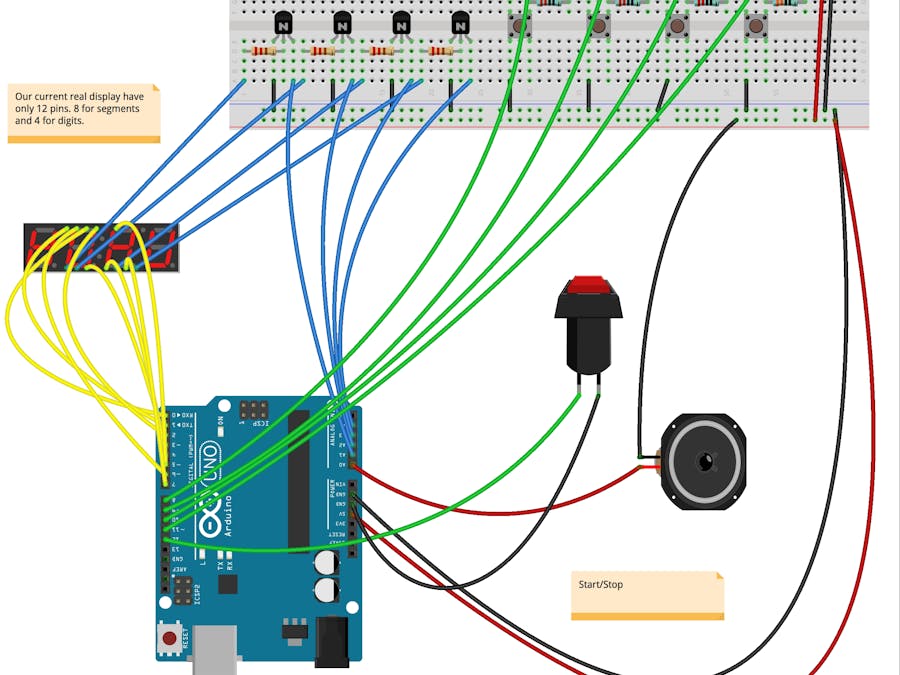
In this first prototype we have three functionalities. All three has been mounted here, but we are going to tests every one with a separate program. The first functionality is about displaying the countdown and othe information at the four digits 7 segments display. The second part is about the buttons that will operate the prototype. And the third is about the sounds that the prototype will play.
The next schema show you the connection of the four transistors with his respective resistors and the pins in arduino where connect it. The program called "Display4Digits_Test.ino" shall be loaded to test that the display is well connected.
This program, simply make three type of turn on and turn off of every segment on every digit and finally shows number from 0 to 9 on each digit.
If the test works well, you can go to the next section.
You should have into account that there exists a lot of different displays, each one with his own pin configuration and own particularities. You should configure the pins in the display since the test program run as espected.
Testing Buttons functionality.Now we are going to test that the four buttons of the prototipe works well.
Like we have the display running, we use it to show the result our tests.
We name the buttons like "+1 button", "+5 button", "+10 button", "reset" and "start".
When I press +1 button the display shows "1111" and "5555" when I press +5 button. Logically if I press +10 button, the display shows "0000". For reset button, we show "3333", and for the start button the display shows "8888".
- +1 = 1111
- +5 = 5555
- +10 = 0000
- Reset = 3333
- Start = 8888
We need, at least four different sounds.
- End Count Sound for when the countdown finish.
- Error Sound when occurs an error or malfunction.
- Go Sound In the Be Ready little countdown, last sound, whith Zero time.
- F1 Sound In the previous countdown, every second.
As we have tested already the buttons, we are going to assign a sound to each of the next:
- Button +1: End Count Sound.
- Button +5: Error Sound.
- Button +10: Go Sound.
- Button Reset: F1 Sound.
You can see the code of this test here.
Construction of the ShieldConstruction of the modules for Buttons and Display.The shield with all components on it.Presentation of all the parts, before be finally mount.


_ztBMuBhMHo.jpg?auto=compress%2Cformat&w=48&h=48&fit=fill&bg=ffffff)


Comments
Please log in or sign up to comment.